TL;DR
In the previous tutorial I showed you how to get started with Vue.js 3 by building a Pokemon search application. I’m going to do the same here, but by using React.
In this post, you’ll learn how to use create-react-app (official React project scaffolding tool) to build a React application for searching Pokemon by using Poke API.
Introduction – The Battle is Over Indeed

A few years ago, this was a popular meme. It was funny because it was true 🙂
However, it seems that the craziness has settled down a bit and that the war is seemingly over. For now. These top four (top 5 lists are overrated 😉) frameworks established themselves:
I added the number of Github *s (at the time of this writing), but I don’t want you to read into that too much 🤗
Analysis paralysis will, well, paralyze you!
You could argue that there are other options like Ember, Mithril, or good ‘ol jQuery even! However, this tweet says it all:
Developers are fighting over which frontend framework is better.. it’s not like users know or care. They mostly care about the User Experience. UX should be our focus on the frontend.
Personally, I stuck to the Angular bandwagon since version 1.0, but that started losing its ooomph after versions 2, 3, 4, … sorry, lost count.
In the previous post I said that Vue.js (due to its progressive and flexible nature) is a perfect fit for teams that have to rewrite old codebases one step at a time.
I also said that:
React’s JSX just seems wrong, and some people, smarter than me, swear by that being TheRightWay™, and I guess we’re not here to discuss tastes…
Well, after playing with it a bit, I can say it’s not that bad and that indeed one gets used to it.
Also, I recently checked out Svelte and kinda like it, so will be doing a post like this next; stay tuned.
General ‘framework war’ kind of questions I tend to answer in the following way:
Please just stop with the analysis paralysis already.
Do your research, pick a framework (any framework for that matter) that the community is using, use it, and see how far it gets you.
All these talks about X being slow or Y being better just make no sense until you try it yourself for your use case and preference.
Besides, nowadays speed will not be a deciding factor among the top JS frameworks.
With all this out of the way, fasten your seatbelts, take a venti (or trenta) sized cup of coffee, and let’s go do something practical! 💪
The Demo App
As said in the intro, we’ll build an application for searching (and showing) Pokemon by using Poke API.
You can fork the complete source code on Github, and you can see the app in action here.
Prerequisites
Make sure that you have the following tools installed:
- Node.js – here’s a free but outdated step by step guide/book for both Windows and Mac. Or, really, just go to the main website and download the executable for your machine
- Git – here’s a fun getting started tutorial in case you’re new to it
Start a new app with create-react-app
To start the project, run the following command (in your Terminal): npx create-react-app pokemon_search_react
This command, as their docs say, will install and execute create-react-app, the official React project scaffolding tool. The output of that command will be similar to the one below:
Creating a new React app in /Users/nikola/Development/Testing/pokemon_search_react.

Installing packages. This might take a couple of minutes.
Installing react, react-dom, and react-scripts with cra-template...

added 1490 packages in 2m

258 packages are looking for funding
  run `npm fund` for details

Initialized a git repository.

Installing template dependencies using npm...

added 67 packages, and changed 1 package in 8s

262 packages are looking for funding
  run `npm fund` for details
Removing template package using npm...

removed 1 package, and audited 1557 packages in 1s

262 packages are looking for funding
  run `npm fund` for details

8 vulnerabilities (2 moderate, 6 high)

To address all issues (including breaking changes), run:
  npm audit fix --force

Run `npm audit` for details.

Created git commit.

Success! Created pokemon_search_react at /Users/nikola/Development/Testing/pokemon_search_react
Inside that directory, you can run several commands:

  npm start
    Starts the development server.

  npm run build
    Bundles the app into static files for production.

  npm test
    Starts the test runner.

  npm run eject
    Removes this tool and copies build dependencies, configuration files
    and scripts into the app directory. If you do this, you can’t go back!

We suggest that you begin by typing:

  cd pokemon_search_react
  npm start

Happy hacking!
Running our scaffolded project
Let’s run the commands (in terminal) noted at the end of the previous output:
cd pokemon_search_react
npm start
You should get this something similar to this output:
 Compiled successfully!

You can now view pokemon_search_react in the browser.

  Local:            http://localhost:3001
  On Your Network:  http://192.168.8.165:3001

Note that the development build is not optimized.
To create a production build, use npm run build.

webpack compiled successfully
One of your dependencies, babel-preset-react-app, is importing the
"@babel/plugin-proposal-private-property-in-object" package without
declaring it in its dependencies. This is currently working because
"@babel/plugin-proposal-private-property-in-object" is already in your
node_modules folder for unrelated reasons, but it may break at any time.

babel-preset-react-app is part of the create-react-app project, which
is not maintianed anymore. It is thus unlikely that this bug will
ever be fixed. Add "@babel/plugin-proposal-private-property-in-object" to
your devDependencies to work around this error. This will make this message
go away.
⚠️ If you’re bothered by the seeming error-like output, then just add the following code to your package.json file:
"devDependencies": {
  "@babel/plugin-proposal-private-property-in-object": "^7.16.7"
},
You should see the following page in your browser if you open http://localhost:3001. Please note that the port (number after localhost:) could be different. Usually it’s 3000, but I had some other stuff running at that port, so it took the next available one.

Folder structure
Now, let’s open this project in the editor of your choice (I’m using Visual Studio Code), and you should see something like this:

⚠️ This is an introduction tutorial, to get you running fast, so I won’t be going into any specific details and will be only focusing on the src folder.
Add content
OK, so let’s add something to our app.
But, where to start? 🤔
Well, one of the first things I do when I come to a project for the first time is to look at the generated output. Then I try to find the strings corresponding to that output within the source code.
So, if you search for the string Learn React, you’ll see the string is within the App.js file. This file contains the following code:
import logo from './logo.svg';
import './App.css';

function App() {
  return (
    <div className="App">
      <header className="App-header">
        <img src={logo} className="App-logo" alt="logo" />
        <p>
          Edit <code>src/App.js</code> and save to reload.
        </p>
        <a
          className="App-link"
          href="https://reactjs.org"
          target="_blank"
          rel="noopener noreferrer"
        >
          Learn React
        </a>
      </header>
    </div>
  );
}

export default App;
Without knowing much about React, you can see where you would change the Learn React text. So, let’s change that to Welcome to Pokemon Search. Save that, and voila!, you’ll see the change reflected immediately in your browser.
If you’re new to web dev, you may not appreciate the usefulness of the so-called hot-reload. Back in the day, we had to refresh the browser after each save. Yeah, yeah, I know: #okboomer 🫣
Add some style
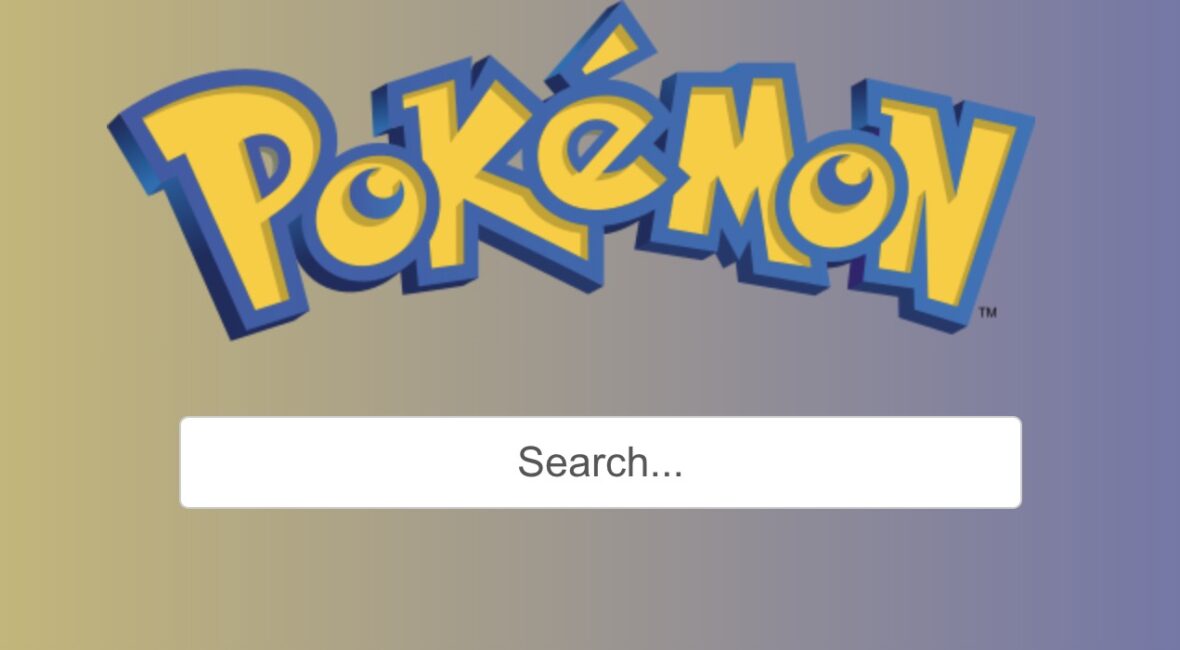
I borrowed the image (hope they don’t mind) from Wikipedia and saved it in the src folder as logo.png, added a search input, and styled it a bit to match it with the Pokemon style. In case you’re wondering, I asked ChatGPT to help with coming up with the style 🙂
Here’s the final code that I came up with in App.js:
import logo from './logo.png';
import './App.css';

function App() {
  return (
    <div className="App">
      <header>
        <img alt="react logo" className="logo" src={logo} />
      </header>

      <main>
        <div className="search-container">
          <input className="search-box" type="text" placeholder="Search..." />
        </div>
      </main>
    </div>
  );
}

export default App;
And the CSS in the App.css file:
body {
  background: linear-gradient(to right, #FDDF3C, #3B4CCA);
}

header {
  display: flex;
  justify-content: center;
  align-items: center;
  flex-direction: column;
}

.logo {
  margin: 0 2rem 0 0;
}

.search-container {
  display: flex;
  justify-content: center;
  align-items: center;
  flex-direction: column;
  gap: 10px;
}

.search-box {
  width: 30%;
  height: 50px;
  font-size: 1.5em;
  padding: 10px;
  border: 1px solid #ccc;
  border-radius: 5px;
  margin: 40px 0;
  text-align: center;
}
The way this looks now is as follows: 
If you get stuck in any of the above steps, please reach out in the comments, and I’ll be happy to help.
Pokemon API
Finally, we come to the cool part 🥶, and that is to fetch some data from the PokeAPI and show it in our app.
How do we get this API? Well, if you do a simple Google search for pokemon api and open the first link, you’ll also get to the documentation for their API.
By looking at the docs, you can find that the API endpoint that lists all the available Pokemon is this: https://pokeapi.co/api/v2/pokemon. There’s a total of 1302 records.
Now, fetching all this data every time you load your app would be a bad idea from the performance standpoint, but also from their fair use policy.
So, what we will do is open this link which will fetch all 1320 Pokemon endpoints. The output looks like this:

Now, save this output (just Command + S or Ctrl + s if you’re on Windows) to a local file that we’ll name pokemonapi.json and place it in the src/ folder.
⚠️ I just want to give proper props to PokeAPI for their awesome service 👏
For our demo purposes, this will be fine, but if you’d like to deploy this somewhere where you’d get a lot of traffic (or, if the main list of Pokemon changes), you’d have to cache the responses. We’ll tackle this in another blog post, but just something to keep in mind.
Show the data
Now we’ll want to list all the Pokemon that we have in the pokemonapi.json file. To do that, we’ll add some code at the top of the App.js file that looks like this:
import pokemonData from "./pokemonapi.json";
import React, { useState } from "react";
And then, inside the function App():
  const [pokemonList, setPokemonList] = useState(pokemonData.results);
  const [searchTerm, setSearchTerm] = useState("");
  const [selectedPokemon, setSelectedPokemon] = useState(null);

  const filteredPokemonList = pokemonList.filter((pokemon) =>
    pokemon.name.includes(searchTerm)
  );
filteredPokemonList function returns the list of pokemon that we loaded from the pokemonapi.json file and filters them by what we enter in the input box.
We’ll add this portion of JSX just below the search-container div:
<ul>
  {filteredPokemonList.map((pokemon) => (
    <li key={pokemon.id} className="pokemon-item">
      <a href="#">{pokemon.name}</a>
    </li>
  ))}
</ul>
And, we’ll add a bit of CSS:
.pokemon-item {
  float: left;
  margin: 10px;
}
.pokemon-item a {
  color: #000;
  text-decoration: none;
  font-size: 16px;
  transition: color 0.3s ease;
  text-transform: capitalize;
}

.pokemon-item a:hover {
  color: #3B4CCA;
}

ul {
  display: grid;
  grid-template-columns: repeat(auto-fill, minmax(150px, 1fr));
  gap: 5px;
  list-style: none;
}
Doing this, you should have your app look like this:

Get additional details about each Pokemon
If you open any of the URLs that you see in the pokemonapi.json file, you will get an output like this:

To show some additional information about a certain Pokemon (once clicked on its name in the list), we’ll update the a tag inside the li:
<li key={pokemon.id} className="pokemon-item">
  <a href="#" onClick={() => showPokemon(pokemon.url)}>{pokemon.name}</a>
</li>
On the click event we attached the showPokemon function (by using onClick) and passed it the URL that we get in the main API call (loaded from the JSON file).
Now we should define this function:
const showPokemon = async (url) => {
  const response = await fetch(url);
  if (!response.ok) {
    console.error(`Error fetching Pokemon: ${response.statusText}`);
    return;
  }

  const data = await response.json();
  setSelectedPokemon(data);
}
To show the selected Pokemon, we’ll add a bit of JSX between the search-container div and the ul:
{selectedPokemon && (
  <div className="pokemon-details">
    <h2>{selectedPokemon.name}</h2>
    <img
      src={selectedPokemon.sprites.front_default}
      alt={selectedPokemon.name}
    />
    <p>Height: {selectedPokemon.height}</p>
    <p>Weight: {selectedPokemon.weight}</p>

    {selectedPokemon.stats.map((stat, index) => (
      <div key={index}>
        <p>
          {stat.stat.name}: {stat.base_stat}
        </p>
      </div>
    ))}
  </div>
)}
We’re using selectedPokemon && so that the line {{ selectedPokemon.name }} doesn’t throw an error for trying to access a property that doesn’t exist on the object selectedPokemon (which is initialized as null in the beginning: const [selectedPokemon, setSelectedPokemon] = useState(null);).
BTW, useState is a so-called React Hook that essentially enables you to update a certain variable.
Anyways, back on point; we’re using map to loop through all the elements of the stats array and output the name and base_stat properties.
To make it look nicer, we’ll use a bit of CSS:
.pokemon-details {
  display: flex;
  flex-direction: column;
  align-items: center;
  justify-content: center;
  width: 30%;
  margin: 20px auto;
  padding: 20px;
  border: 1px solid #000;
  border-radius: 10px;
  color: #000;
  text-transform: capitalize;
}

.pokemon-details img {
  width: 100px;
  height: 100px;
}
Two-way data binding
Right now if you test your app and type something in the search box, it will not filter the list of Pokemon.
You may remember that in Vue.js, we achieved this by using the v-model. However, in React, there isn’t a direct equivalent to Vue’s v-model for two-way data binding. In React we can achieve a similar effect by using a combination of state and event handlers.
To do this, we’ll update the input tag to this:
<input className="search-box" type="text"
  placeholder="Search..."
  value={searchTerm}
  onChange={event => setSearchTerm(event.target.value)}
/>
In this code, searchTerm is a state variable that is set as the value of the input field. The onChange event handler updates searchTerm whenever the user types something into the input field. This creates a two-way data binding effect similar to Vue’s v-model.
Go try it out! The app is now fully functional 💪
All the code
For reference, for those following the tutorial to the dot, here’s the full listing of App.js file:
import logo from "./logo.png";
import "./App.css";
import pokemonData from "./pokemonapi.json";
import React, { useState } from "react";

function App() {
  const [pokemonList, setPokemonList] = useState(pokemonData.results);
  const [searchTerm, setSearchTerm] = useState("");
  const [selectedPokemon, setSelectedPokemon] = useState(null);

  const filteredPokemonList = pokemonList.filter((pokemon) =>
    pokemon.name.includes(searchTerm)
  );

  const showPokemon = async (url) => {
    const response = await fetch(url);
    if (!response.ok) {
      console.error(`Error fetching Pokemon: ${response.statusText}`);
      return;
    }

    const data = await response.json();
    setSelectedPokemon(data);
  };

  return (
    <div className="App">
      <header>
        <img alt="react logo" className="logo" src={logo} />
      </header>

      <main>
        <div className="search-container">
          <input className="search-box" type="text" placeholder="Search..."
          value={searchTerm}
          onChange={event => setSearchTerm(event.target.value)}
          />
        </div>

        {selectedPokemon && (
          <div className="pokemon-details">
            <h2>{selectedPokemon.name}</h2>
            <img
              src={selectedPokemon.sprites.front_default}
              alt={selectedPokemon.name}
            />
            <p>Height: {selectedPokemon.height}</p>
            <p>Weight: {selectedPokemon.weight}</p>

            {selectedPokemon.stats.map((stat, index) => (
              <div key={index}>
                <p>
                  {stat.stat.name}: {stat.base_stat}
                </p>
              </div>
            ))}
          </div>
        )}

        <ul>
          {filteredPokemonList.map((pokemon) => (
            <li key={pokemon.id} className="pokemon-item">
              <a href="#" onClick={() => showPokemon(pokemon.url)}>
                {pokemon.name}
              </a>
            </li>
          ))}
        </ul>
      </main>
    </div>
  );
}

export default App;
And here’s the full contents of the App.css file:
body {
  background: linear-gradient(to right, #FDDF3C, #3B4CCA);
}

header {
  display: flex;
  justify-content: center;
  align-items: center;
  flex-direction: column;
}

.logo {
  margin: 0 2rem 0 0;
}

.search-container {
  display: flex;
  justify-content: center;
  align-items: center;
  flex-direction: column;
  gap: 10px;
}

.search-box {
  width: 30%;
  height: 50px;
  font-size: 1.5em;
  padding: 10px;
  border: 1px solid #ccc;
  border-radius: 5px;
  margin: 40px 0;
  text-align: center;
}

.pokemon-item {
  float: left;
  margin: 10px;
}
.pokemon-item a {
  color: #000;
  text-decoration: none;
  font-size: 16px;
  transition: color 0.3s ease;
  text-transform: capitalize;
}

.pokemon-item a:hover {
  color: #3B4CCA;
}

ul {
  display: grid;
  grid-template-columns: repeat(auto-fill, minmax(150px, 1fr));
  gap: 5px;
  list-style: none;
}

.pokemon-details {
  display: flex;
  flex-direction: column;
  align-items: center;
  justify-content: center;
  width: 30%;
  margin: 20px auto;
  padding: 20px;
  border: 1px solid #000;
  border-radius: 10px;
  color: #000;
  text-transform: capitalize;
}

.pokemon-details img {
  width: 100px;
  height: 100px;
}

.pokemon-details p {
  margin: 5px;
}
B e a utiful
At this point, we can search for some Pokemon (my son’s favorite is, ofc, Pikachu), and if we click on it, we’ll get this:

Deployment
If you’d like to host this on your web server, then first run npm run build and you’ll get an output similar to this:
> [email protected] build
> react-scripts build

Creating an optimized production build...
Compiled with warnings.

[eslint]
src/App.js
  Line 64:15:  The href attribute requires a valid value to be accessible. Provide a valid, navigable address as the href value. If you cannot provide a valid href, but still need the element to resemble a link, use a button and change it with appropriate styles. Learn more: https://github.com/jsx-eslint/eslint-plugin-jsx-a11y/blob/HEAD/docs/rules/anchor-is-valid.md  jsx-a11y/anchor-is-valid

Search for the keywords to learn more about each warning.
To ignore, add // eslint-disable-next-line to the line before.

File sizes after gzip:

  58.34 kB (-1 B)  build/static/js/main.b3bd969c.js
  1.78 kB          build/static/js/453.bd7a2879.chunk.js
  677 B            build/static/css/main.af098727.css

The project was built assuming it is hosted at /.
You can control this with the homepage field in your package.json.

The build folder is ready to be deployed.
You may serve it with a static server:

  serve -s build

Find out more about deployment here:
  https://cra.link/deployment
Now all you have to do is take the contents of the build folder (you may remember that in Vue that folder was called dist) and ‘paste’ it on your static web server.
If you don’t have a server of your own, then Vite has an extensive description for deploying your static pages to many popular services like Github Pages, Netlify, Vercel, Surge, etc.
You can deploy to Github Pages in under 2 minutes by following their documentation.
Just for brevity sake the steps are as follows:
- create a new public Github repository and name it
username.github.io, whereusernameis yourusernameon GitHub. - clone the repo with
git clone https://github.com/username/username.github.io - inside the folder copy the contents of the
buildfolder - commit and push the changes:
git add --all
git commit -m "Initial commit"
git push -u origin main
Now your site will be visible online at https://username.github.io (again, where username is your Github username)
You can see my deployment live here.
⚠️ If you’ll have multiple folders in Github pages, then before using the npm run build command, you’ll want to set the homepage variable in the package.json file to that folder. Example: "homepage": "/pokemon-search-react".
Conclusion
In this tutorial, you learned how to get started with using React by building an application for searching Pokemon by using PokeAPI and making it publically accessible via Github Pages.
I intend to cover at least two more frameworks in the future blog posts, so stay tuned. Finally, out of curiosity, which one do you prefer so far: React or Vue.js? I’m looking to test Svelte next, but curious which one you’d like to see me cover.
Please leave any comments and feedback in the discussion section below, and thank you for reading!