Nikola Brežnjak blog - Tackling software development with a dose of humor
  • Home
  • Daily Thoughts
  • Ionic
  • Stack Overflow
  • Books
  • About me
Home
Daily Thoughts
Ionic
Stack Overflow
Books
About me
  • Home
  • Daily Thoughts
  • Ionic
  • Stack Overflow
  • Books
  • About me
Nikola Brežnjak blog - Tackling software development with a dose of humor
NodeJS, Servers

How to host multiple Node.js applications with multiple different domains on one VPS with Nginx

First things first, if you bought your domain elsewhere then you first need to point that domain to your server. You basically have two options here

  • installing, setting up and running a DNS on your VPS and pointing the DNS (from the control panel where you bought a domain) records to your VPS
  • setting your DNS Zone file A record (in the control panel where you bought a domain) to the VPS IP
  • this posts explain what are the pros and cons

Now, if you do that for multiple domains they will all point to your server’s IP and show the same thing, essentially the thing which is running on port 80 (and that, in our main Nginx installation, will be a default Nginx welcome screen). If you have multiple Node.js applications, which are running on different ports, and you want to pinpoint the domains to that particular applications, then this is where the Nginx comes in so that it takes the requests for each domain and routes it to an appropriate port where the appropriate Node.js application is running. Basically, what Nginx does in this case is called reverse proxying.

Useful links:

  • this StackOverflow question
  • http://blog.grabeh.net/Digital-Ocean-VPS-Nginx-Express-apps
  • https://www.digitalocean.com/community/tutorials/how-to-host-multiple-node-js-applications-on-a-single-vps-with-nginx-forever-and-crontab
  • http://ludovf.net/blog/configure-nginx-to-proxy-virtual-hosts-to-apache/
  • http://kbeezie.com/apache-with-nginx/
  • https://www.digitalocean.com/community/tutorials/how-to-set-up-nginx-virtual-hosts-server-blocks-on-centos-6

Use forever:

  • npm install forever -g
  • forever start –spinSleepTime 10000 yourApp.js
  • if the app crashes, forever starts it up again

Lets start:

  • sudo vim /etc/nginx/conf.d/example.com.conf:
    server {
        listen 80;
    
        server_name your-domain.com;
    
        location / {
            proxy_pass http://localhost:{YOUR_PORT};
            proxy_http_version 1.1;
            proxy_set_header Upgrade $http_upgrade;
            proxy_set_header Connection 'upgrade';
            proxy_set_header Host $host;
            proxy_cache_bypass $http_upgrade;
        }
    }
  • to reference multiple domains for one Node.js app (like www.example.com and example.com) you need to add the following code to the file /etc/nginx/nginx.conf in the http section: server_names_hash_bucket_size 64;
  • but, as it always is, the upper statement didn’t work for me, so I ended up using this solution from StackOverflow:
    server {
        #listen 80 is default
        server_name www.example.com;
        return 301 $scheme://example.com$request_uri;
    }
  • sudo service nginx restart

Forever keeps your application running when it crashes but if VPS is rebooted it won’t start anymore. Simple cronjob solves this issue. Create starter.sh in your application’s home folder and copy the following code:

#!/bin/sh

if [ $(ps -e -o uid,cmd | grep $UID | grep node | grep -v grep | wc -l | tr -s "\n") -eq 0 ]
then
export PATH=/usr/local/bin:$PATH
forever start --sourceDir /path/to/your/node/app main.js >> /path/to/log.txt 2>&1
fi

where main.js is your application’s main script. Add to crontab the following line: @reboot /path/to/starter.sh.

NodeJS

How to get all of your own Facebook posts and parse them with JavaScript

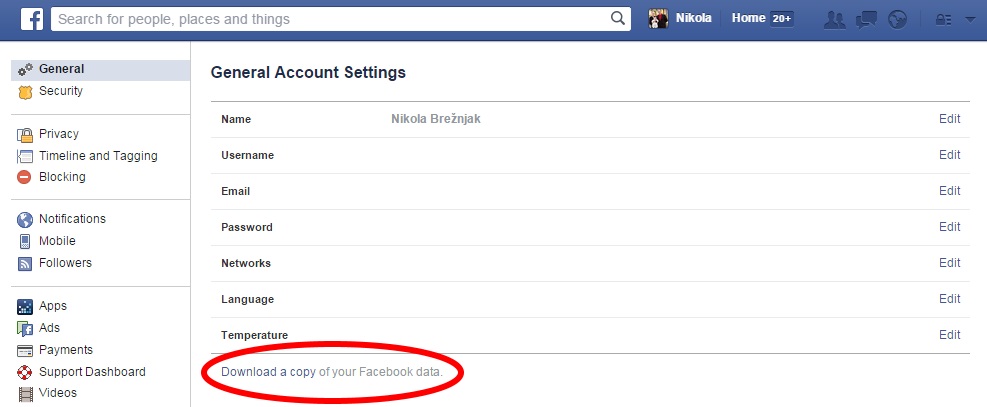
So, first you need to download all the data that Facebook has stored for you (well, and what it’s willing to give you :)). You can do that by going to https://www.facebook.com/settings when you’re logged in, and you will see the following screen:FacebookDataDownload2

Here you can just click on the Download a copy of your Facebook data and after they process your request you will get the download link on your email.

The download package looks contains 3 folders (videos, photos, html) and a index.html file. In order to take a look at your posts you have to open up the html folder where you’ll find the file named wall.htm. This is a simple HTML file whose contents is put inside the <div class=”comment”> elements.

In order to parse this with JavaScript (you’ll need to have Node.js installed) you can use the following snippet:

function getMatches(string, regex, index) {
    index || (index = 1); // default to the first capturing group
    var matches = [];
    var match;
    while (match = regex.exec(string)) {
        matches.push(match[index]);
    }
    return matches;
}

fs = require('fs');
fs.readFile('wall.htm', 'utf8', function(err, data){
	if (err){
	    return console.log(err);
	}

	var regex = /comment">([\s\S]*?)<\/div>/g
	var matches = getMatches(data, regex, 1);

	var output = '';
	for(var i=0; i<matches.length; i++){
		output += matches[i] + '\n';
	}

	fs.writeFile('parsed.txt', output, 'utf8', function(){
		console.log('done!');
	});
});

What this does is that it reads the wall.html file and outputs just simple text of the posts in a parsed.txt file.

Few of the challenges here we’re the multiline regex matching which I solved with this link on StackOverflow, and another one was getting access to matched groups of a regex in JavaScript.

MEAN

MEAN T-shirt graphic, presentation and video

Since I’m all into MEAN stack lately, I made a custom graphic for a MEAN T-shirt. Also, I made the presentation and a talk for hack.hands().

I’m giving the image here freely without any restrictions, yada, yada, use it whatever way you like, just don’t sue me if someone will tell you you’re a mean person :P. You can send the image to your local T-shirt makers, or you can order it from my SpreadShirt store.

The T-shirt looks like this on me:

IMG_2617

Desktop background version can be downloaded here (Right click, Save Image As):MEAN_1_black

And a transparent PNG version ideal for a black T-shirt can be downloaded here (Right click, Save Image As):

MEAN_1

I got a t-shirt made at a reasonable price here in Croatia at t-shirtmania.hr.

The video of the talk in full on youtube below, and the two posts in a series of getting started on a MEAN stack are here:

  • https://hackhands.com/how-to-get-started-on-the-mean-stack/
  • https://hackhands.com/delving-node-js-express-web-framework/

Hacker Games, JavaScript

JavascriptBattle

Lately I’ve been playing at JavascriptBattle, which is

a fun and engaging web application intended to make artificial intelligence (AI) design accessible to all. Every day, your code will be pulled down from your “hero-starter” repository on Github. Your code (along with every other user’s code) will be run daily, behind the scenes, in our game engine.

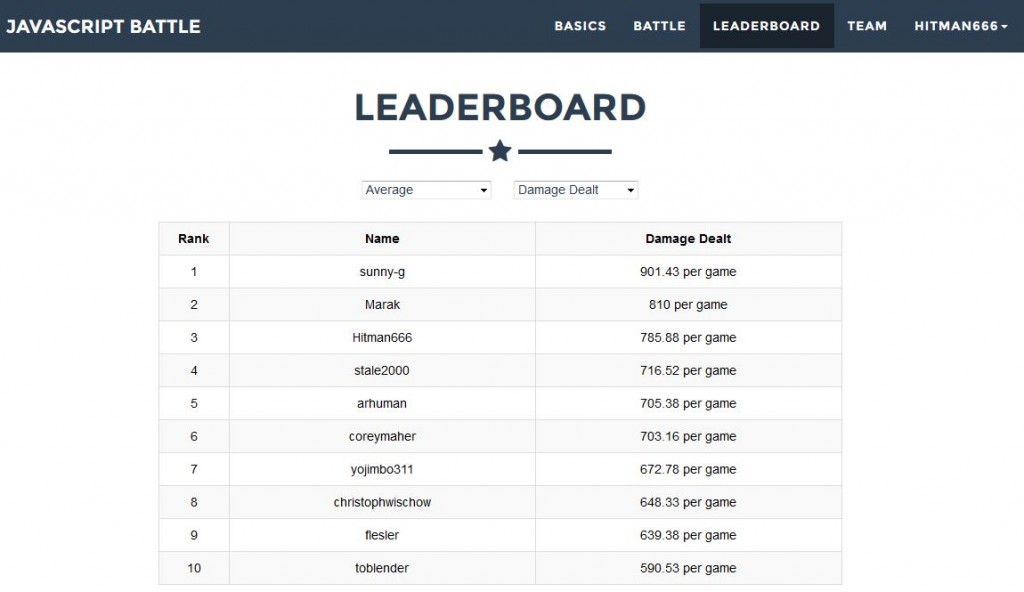
Basically, you write JavaScript code for your hero in order to instruct him how to behave when for example his health drops to a certain level, or when enemies are close, etc. and then you participate in a daily battle. They have various stats, and as it turns out I’m currently on position #3 for average damage dealt, yay me!

JavascriptBattle


Anyways, it’s cool so feel free to check it out and take me down from the pedestal :P. If you happen to like these “hacker games” then do checkout the one I made for my university project back in the old days 1415131129_smiley-evil.

JavaScript

JavaScript event loop video explanation

Awesome short video about JavaScript event loop

One cool thing I didn’t know is that you can defer something right after the end of the stack. So for example the code below in the setTimeout function would print to console “done”, right after “hi” and “testing”:

console.log("hi");

setTimeout(function(){
    console.log("done");
}, 0);

console.log("testing");


JavaScript

Converting a JavaScript switch statement into a function lookup

I just read a great post on WebTools Weekly newsletter about how to convert a JavaScript switch statement into a function lookup. Here’s the full content from there, so be sure to check it out if you like it (it’s one newsletter a week, and no – I’m not affiliated with them in any way).

Because of the problems inherent in using JavaScript’s switch statement, many developers and reference guides will recommend avoiding switch constructs and instead using something called amethod lookup (also referred to as a lookup table or even dispatch table). Let’s convert a switchstatement to a method lookup, so we can see how this is done. Here’s our switch:

function doSomething(condition) {
  switch (condition) {
    case 'one':
      return 'one';
    break;

    case 'two':
      return 'two';
    break;

    case 'three':
      return 'three';
    break;

    default:
      return 'default';
    break;
  }
}

(JS Bin example)

All of this is inside a doSomething() function, with a condition passed in. The possible values are ‘cased’, to define the return value. This is cleaner than a messy if-else construct, but can we clean it up even more? Here’s basically the same thing in the form of a method lookup:

function doSomething (condition) {
  var stuff = {
    'one': function () {
      return 'one';
    },

    'two': function () {
      return 'two';
    },

    'three': function () {
      return 'three';
    }
  };

  if (typeof stuff[condition] !== 'function') {
    return 'default';
  }


  return stuff[condition]();
}

(JS Bin example)

In the demo, you can see four logs in the console, one for each valid condition and then another one to demonstrate the default condition when the argument doesn’t match one of the methods.

You can see why people like this technique. It’s clean, elegant, and seems a little more sophisticated without being more complex. I’ve only scratched the surface on this, so here are a few good resources to read up more on this subject:

  • Don’t Use Switch in Programming JavaScript Applications by Eric Elliot.
  • Using Dispatch Tables to Avoid Conditionals in JavaScript by Josh Clanton
NodeJS, Quick tips

How to delete node_modules folder on Windows machine?

Due to its folder nesting Windows can’t delete the folder as its name is too long. To solve this, install RimRaf:

npm install rimraf -g

and delete the node_modules folder easily with:

rimraf node_modules


edit: If you happen to get an “error” like this:

C:\Users\Nikola\Desktop>npm install -g rimraf
C:\Users\Nikola\AppData\Roaming\npm\rimraf -> C:\Users\Nikola\AppData\Roaming\npm\node_modules\rimraf\bin.js
npm WARN unmet dependency C:\Users\Nikola\AppData\Roaming\npm\node_modules\generator-ionic requires cordova@'^4.2.0' but will load
npm WARN unmet dependency C:\Users\Nikola\AppData\Roaming\npm\node_modules\cordova,
npm WARN unmet dependency which is version 5.1.1
npm WARN unmet dependency C:\Users\Nikola\AppData\Roaming\npm\node_modules\bower\node_modules\bower-registry-client requires request@'~2.51.0' but will load
npm WARN unmet dependency undefined,
npm WARN unmet dependency which is version undefined
npm WARN unmet dependency C:\Users\Nikola\AppData\Roaming\npm\node_modules\bower\node_modules\fstream-ignore requires fstream@'^1.0.0' but will load
npm WARN unmet dependency undefined,
npm WARN unmet dependency which is version undefined
npm ERR! peerinvalid The package node-inspector does not satisfy its siblings' peerDependencies requirements!
npm ERR! peerinvalid Peer [email protected] wants node-inspector@~0.7.0

npm ERR! System Windows_NT 6.1.7601
npm ERR! command "C:\\NodeJS\\\\node.exe" "C:\\NodeJS\\node_modules\\npm\\bin\\npm-cli.js" "install" "-g" "rimraf"
npm ERR! cwd C:\Users\Nikola\Desktop
npm ERR! node -v v0.10.36
npm ERR! npm -v 1.4.28
npm ERR! code EPEERINVALID
npm ERR!
npm ERR! Additional logging details can be found in:
npm ERR!     C:\Users\Nikola\Desktop\npm-debug.log
npm ERR! not ok code 0

Don’t panic :), just try to run rimraf instead, as noted above. In most cases, all will be okay and you’ll be able to use it without a problem. If not, head to the comments, and we’ll take care of it together! For those who don’t care much about comments, here’s the post in which I address this node-inspector issue.

How to delete node_modules folder on Windows machine? http://t.co/0pV4OSTG1L #nodejs #windows #node_modules

— Nikola Brežnjak (@HitmanHR) July 28, 2015

NodeJS

MEAN.io VS MEAN.js and deploying the latter on DigitalOcean

What are they?

MEAN.(io + js) are both full-stack JavaScript frameworks, and they are both comprised of these technologies:

  • MongoDB – leading NoSQL database, empowering businesses to be more agile and scalable
  • Express – minimal and flexible Node.js web application framework, providing a robust set of features for building single and multi-page, and hybrid web applications
  • Angular – lets you extend HTML vocabulary for your application. The resulting environment is extraordinarily expressive, readable, and quick to develop
  • Node.js – a platform built on Chrome’s JavaScript runtime for easily building fast, scalable network applications

Which is which?

There seems to be a lot of confusion between the two, and this StackOverflow answer can help clarify it. Essentially:

Mean.js is a fork of Mean.io and both initiatives were started by the same guy. Mean.io is now under the umbrella of the company Linnovate and looks like the guy (Amos Haviv) stopped his collaboration with this company and started Mean.js. You can read more about his reasons here.

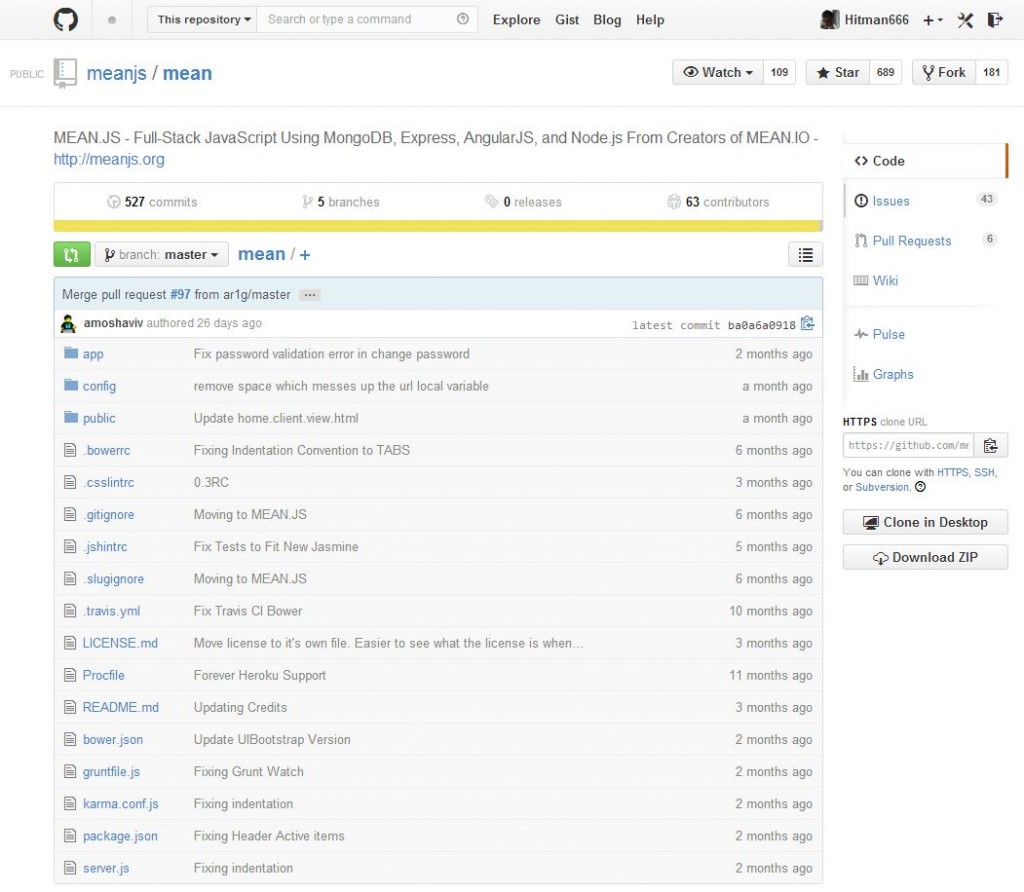
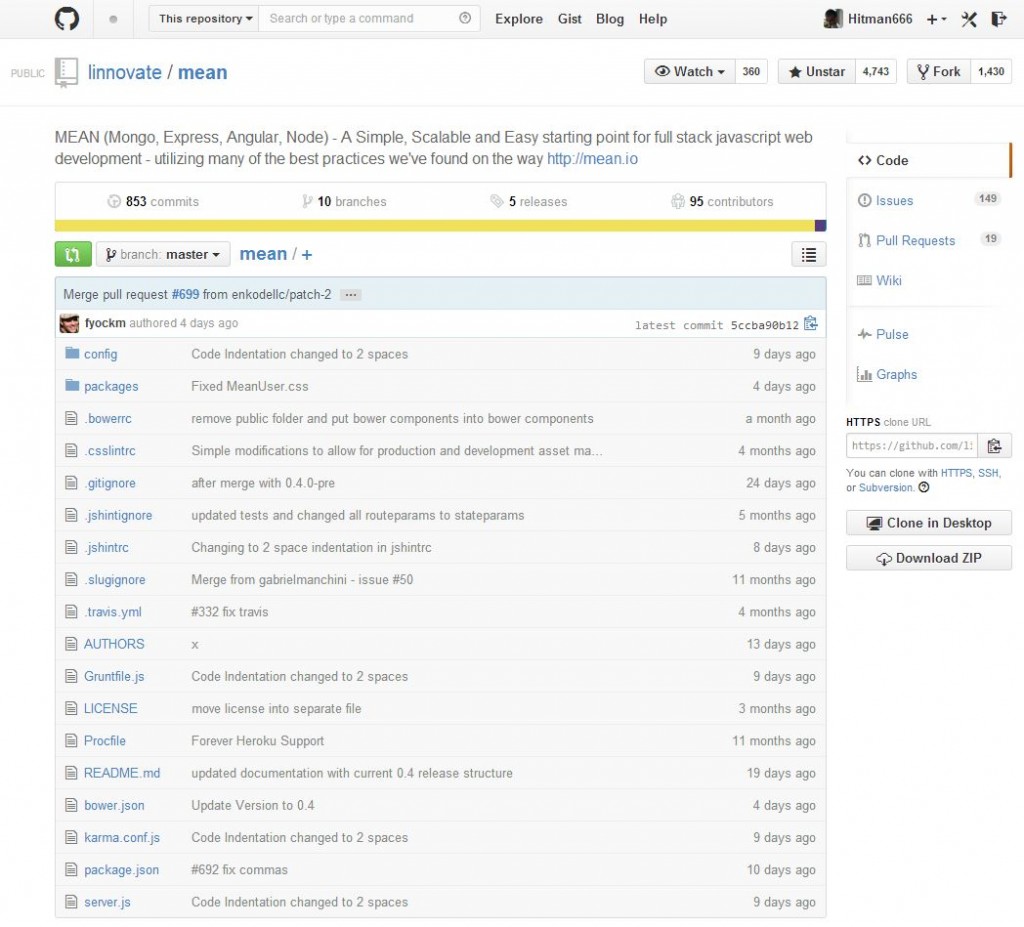
On their GitHub pages the MEAN.io has more stars, forks, and watchers but that may easily be to the fact that the MEAN.js is younger:

mean js github page

MEAN.js GitHub page

mean.io github page

MEAN.io GitHub page

How to get started?

I already wrote about MEAN.io and how to deploy it to Nodejitsu from Windows machine, and in this blog post I’ll show you how easy it is to deploy MEAN.js on DigitalOcean. Surely, you can deploy MEAN.io too on DigitalOcean, but you would have to install all the prerequisites on your own, and as you’ll see the MEAN.js is all set up automagically with few button clicks.

Disclamer: I am affiliated with DigitalOcean. If the post helped you, you can signup via my referral link. They regularly offer free credit (currently they offer 10$) so you can try it out without paying anything (I’m sure you have the Google skills to get the discount code).

So, from my experience with the cloud hostings I was pretty much amazed how fast you can get your root box up and running on DigitalOcean, additionally they have the (so called) droplet for MEAN ready so in basically less than 1 minute you’ll have everything ready to start coding your MEAN project. Let’s now see how to do this step by step.

Create a droplet

Naturally, first you have to signup up with DigitalOcean (remember to look for coupons), and once you do that you’ll be able to login to their web admin dashboard.

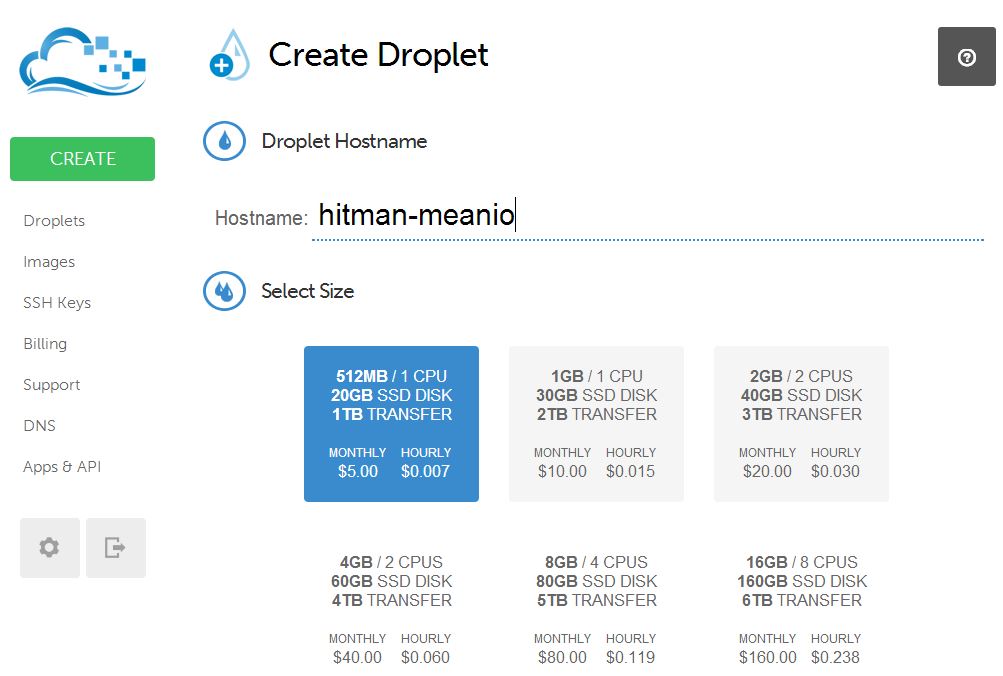
DigitalOcean calls its virtual servers, droplets; each droplet that you create is a new virtual server for your personal use. In order to create a new droplet from your web admin, click on the CREATE button, and select a custom hostname and size (as shown on the image below):

create_1

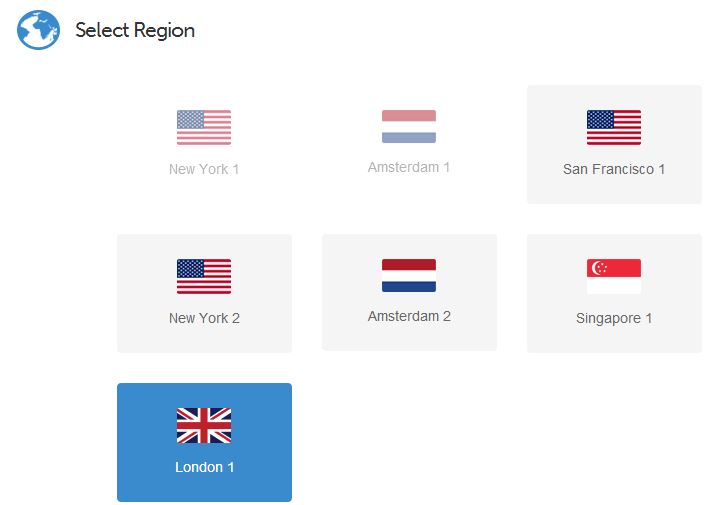
All on the same page (scroll down), select a region which is closest to you (London  1 in my case, as shown on the image below):

create_2

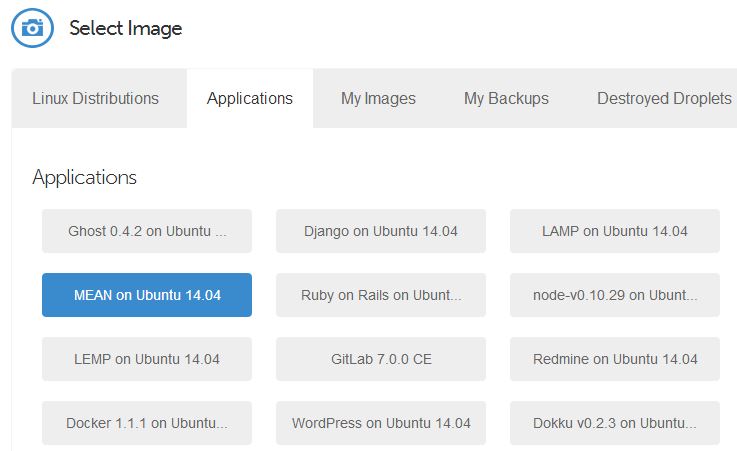
The most important part is selecting the actual distribution/application that will be installed on your droplet by default. Here you have quite a few options and I encourage you to test them as you see fit. In my example, however, we’re gonna use the MEAN on Ubuntu 14.04 (as shown on the image below).

create_4

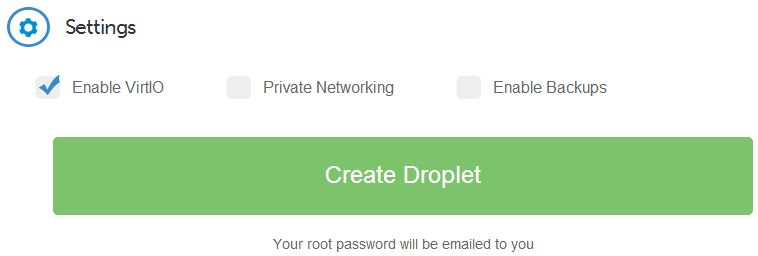
Finally, you can leave the additional settings as they are and you can confirm the droplet creation by clicking on the Create Droplet button.

create_5

Login to your new droplet

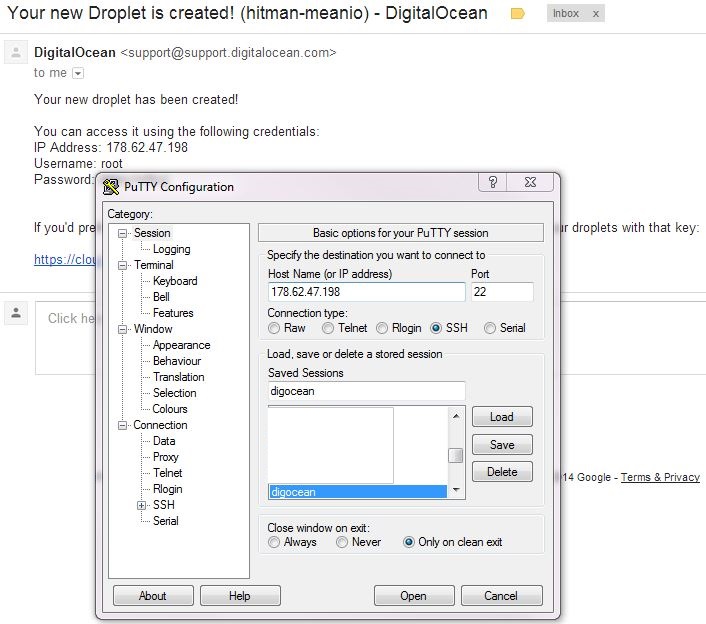
Shortly after (less than 1 minute!) you’ve clicked the Create Droplet button you’ll get the email with the info on how to connect to your droplet. Below is the example of such an email. In order to connect to your droplet you can use PuTTY (a free implementation of Telnet and SSH for Windows and Unix platforms), and all you’ll have to do is enter the IP and click Open (it’s good to name this connection and save it for later use – digocean in the image below).connect_1

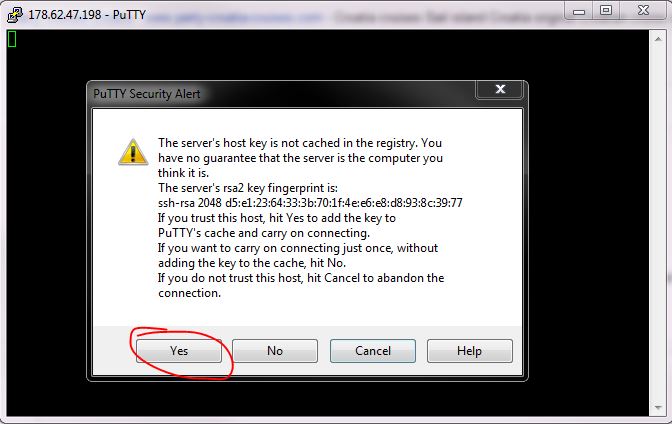
If the popup appears as shown on the image below, most likely you’ll want to click Yes.connect_2

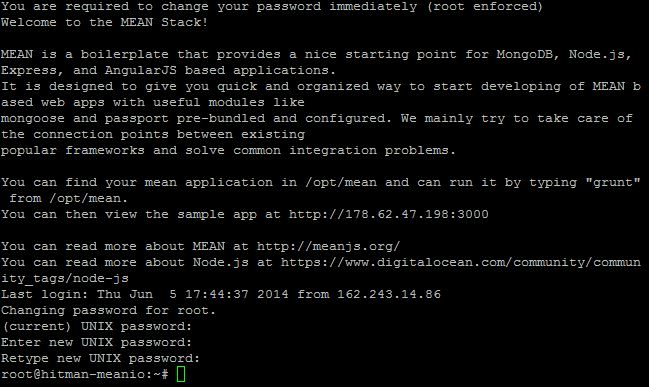
When you log in with the username root and password that you got in the mail, you’ll be prompted to repeat the root’s password and to change it to something else, which is a standard security practice.connect_3

Run the application

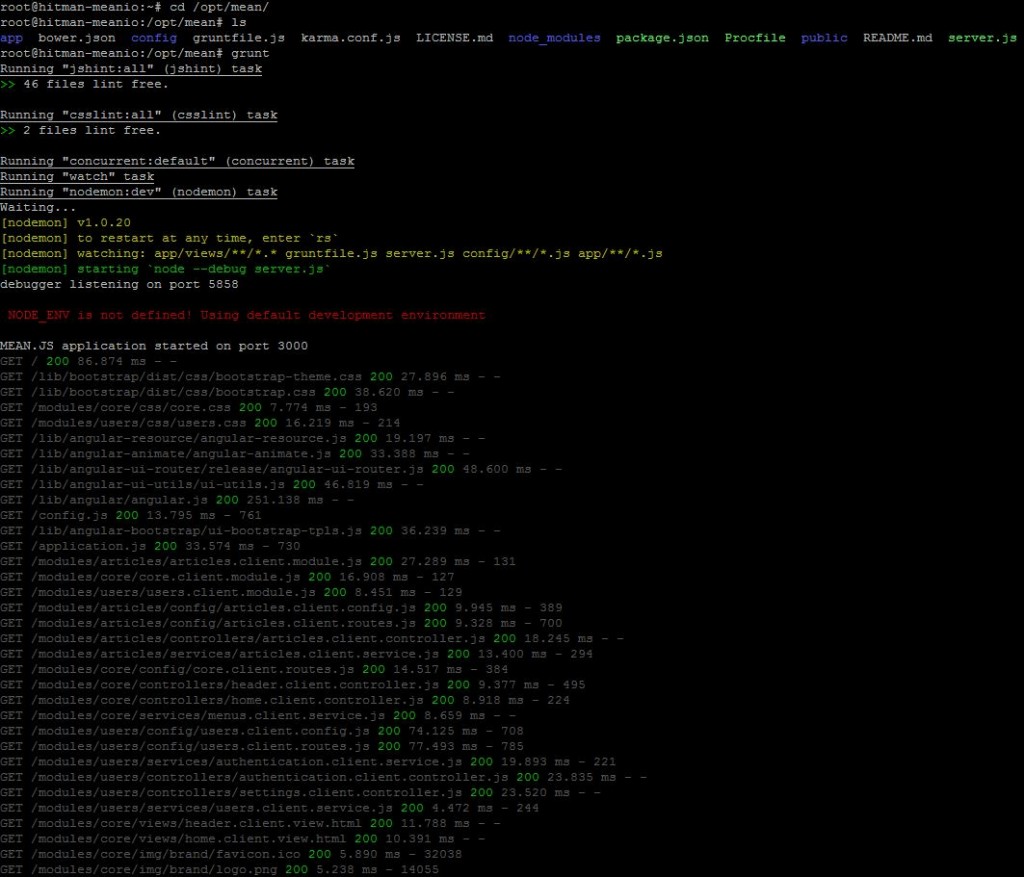
Your application will be located in /opt/mean  folder, and in order to run it you just have to execute the following command in that folder:

grunt

Output that you’ll most likely see after running the grunt command can be seen on the image below:

run_1

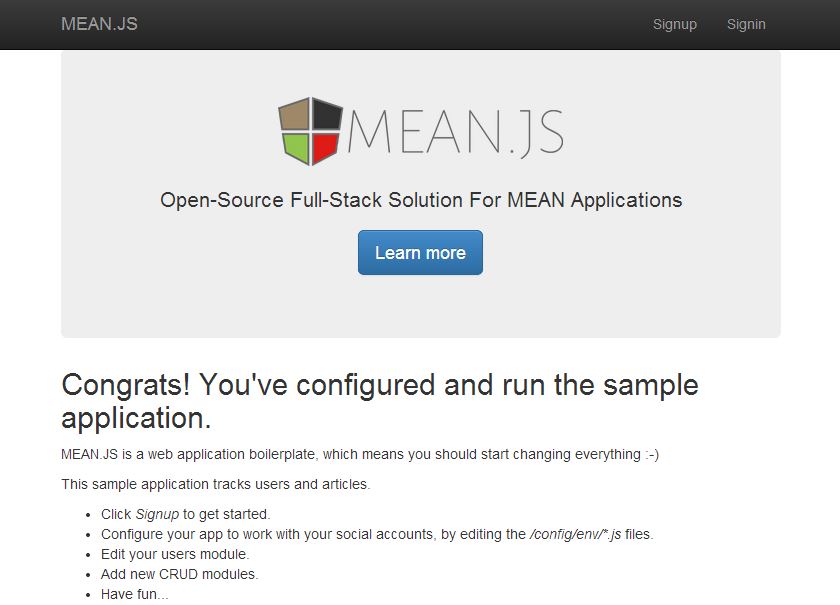
To view your application in the browser, visit http://YOUR_DROPLET_IP:3000/ (in my case that would be http://178.62.47.198:3000) and you should see a screen similar to the one on the image below:run_2Finally, all done. Next logical step would be to check out he MEAN.js docs.

Happy building!

CodeProject, JavaScript

Simple official Spritz API usage

TL;DR: See it in action here or here, and official site here.

Spritz – change the way people read and make communication faster, easier, and more effective.

So, there has been a lot of buzz about this lately and today I too got my API key to test this out. I must say that using Spritz is really easy, and they have a very good documentation with examples so I will keep this short.

After you register to their developer program you will get your API key. A simple use case to get you started is to make a HTML document with the following content:

<!DOCTYPE html>
<html>
<head>
	<script type="text/javascript" src="jquery-2.1.0.min.js"></script>
	<script type="text/javascript">
        var SpritzSettings = {
            clientId: "4aac1453ff37b364f",
            redirectUri: "http://www.nikola-breznjak.com/codez/spritz/login_success.html",
        };
    </script>

 	<script type="text/javascript" src="spritz.min.js"></script>
</head>

<body>
    <h1>Spritz test</h1>

  	<div data-role="spritzer"></div>

    <div>This is some demo text that will be Spritzt</div>
  	</div>
</body>
</html>

Important things to note here are that Spritz uses jQuery and you have to use your clientId and put this rediretUri file to your server (on which you host the domain with which you registered your Spritz application).

A little more advanced example is here: http://www.nikola-breznjak.com/codez/spritz/ (you can just view the source of it and I’m sure you’ll know how to take it from there).

Worth noting is that there are some open source versions of this like Open Spritz, though I think this one is way better as it has whole research and the science behind it.

Using this on a simple HTML page was, well, simple. I tried to incorporate this into my wordpress blog (the one you’re reading right now), and though it works nicely when I put the code in the index.php file (the main template file which lists all of the posts), it does not work when I put the same exact code to the single.php (template for showing specific posts). The error that I’m getting in the latter case is this:

Unable to spritz: Unable to retrieve contentVersion, contentId=5343e07be4b063e2752c379b: HTTP call failed, status: 500, message: Internal Server Error

So, if someone got the same error, how did you go about it?

Phaser

Make a Flappy Bird clone with Phaser

Flappy Bird – no info as anyone who may be reading this knows about it 😉

Phaser – open source desktop and mobile HTML5 game framework supporting both JavaScript and TypeScript

This is basically just an addition to the great 3 series tutorial (part 1, part 2, part 3) from LessMilk’s blog and hereby I thank him for them.

The original tutorial makes the bird (square) jump by pressing the space key, whilst to make the bird jump on a mouse click (or tap on mobile devices) all you have to do is replace the

var space_key = this.game.input.keyboard.addKey(Phaser.Keyboard.SPACEBAR);

in the menu.js  file with:

var space_key = this.game.input;

Also, I added the crash sound (original file from here) in the hit_pipe  function:

if (this.bird.alive == false){
    this.crash_sound.play();
    return;
}

which I’ve defined in the create  function:

this.crash_sound = this.game.add.audio('crash');

of the file play.js .

You can download this changed code from Github, and try out the game here.

Page 12 of 13« First...«10111213»

Recent posts

  • When espanso Breaks on Long Replacement Strings (and How to Fix It)
  • 2024 Top Author on dev.to
  • Hara hachi bun me
  • Discipline is also a talent
  • Play for the fun of it

Categories

  • Android (3)
  • Books (114)
    • Programming (22)
  • CodeProject (36)
  • Daily Thoughts (78)
  • Go (3)
  • iOS (5)
  • JavaScript (128)
    • Angular (4)
    • Angular 2 (3)
    • Ionic (61)
    • Ionic2 (2)
    • Ionic3 (8)
    • MEAN (3)
    • NodeJS (27)
    • Phaser (1)
    • React (1)
    • Three.js (1)
    • Vue.js (3)
  • Leadership (1)
  • Meetups (8)
  • Miscellaneou$ (78)
    • Breaking News (8)
    • CodeSchool (2)
    • Hacker Games (3)
    • Pluralsight (7)
    • Projects (2)
    • Sublime Text (2)
  • PHP (6)
  • Quick tips (41)
  • Servers (8)
    • Heroku (1)
    • Linux (3)
  • Stack Overflow (81)
  • Unity3D (9)
  • Windows (8)
    • C# (2)
    • WPF (3)
  • Wordpress (2)

"There's no short-term solution for a long-term result." ~ Greg Plitt

"Everything around you that you call life was made up by people that were no smarter than you." ~ S. Jobs

"Hard work beats talent when talent doesn't work hard." ~ Tim Notke

© since 2016 - Nikola Brežnjak