Nikola Brežnjak blog - Tackling software development with a dose of humor
  • Home
  • Daily Thoughts
  • Ionic
  • Stack Overflow
  • Books
  • About me
Home
Daily Thoughts
Ionic
Stack Overflow
Books
About me
  • Home
  • Daily Thoughts
  • Ionic
  • Stack Overflow
  • Books
  • About me
Nikola Brežnjak blog - Tackling software development with a dose of humor
Miscellaneou$

Get free stickers from dev.to

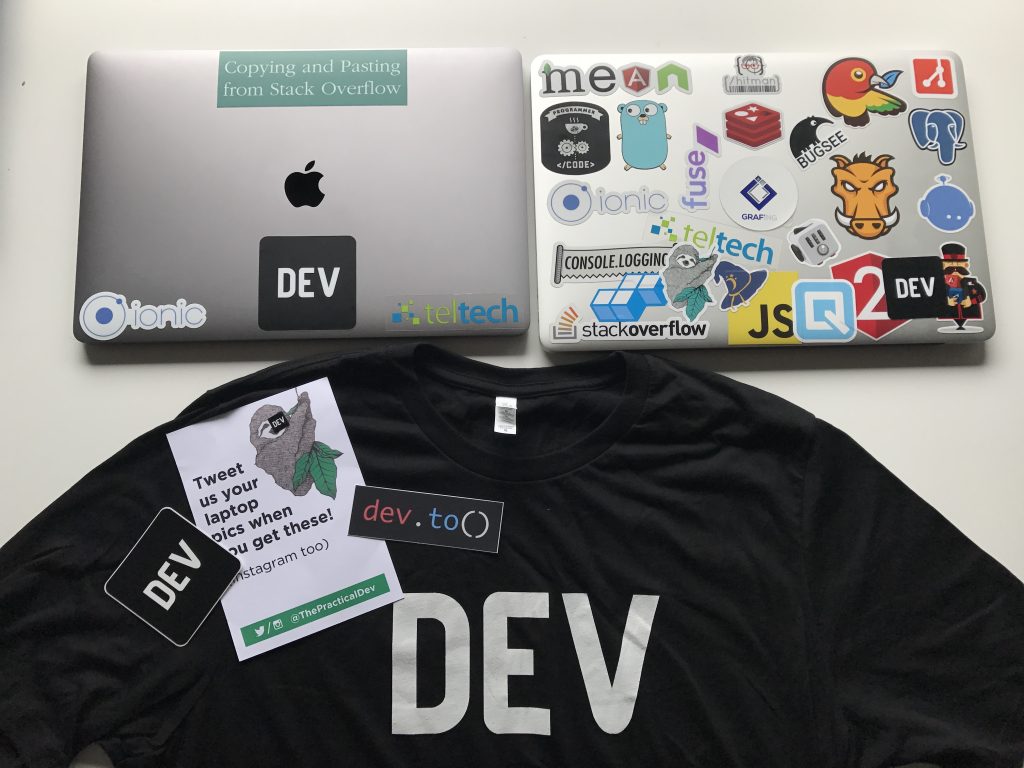
This is just a quick post to say thank you to the dev.to community for sending me these awesome new stickers and a T-shirt. This way my ‘old’ laptop got even more crowded and a ‘new’ one is now nicely showing my day to day activities:

Copying and pasting from StackOverflow ?

OK, true, sometimes I answer some questions as well ?

Anyways, make sure to check them out as you too can get these stickers (if you’re into this that is) for free here: http://dev.to/freestickers.

Their community seemed to have liked the post I shared about Git branching done right with Gitflow & improving code quality with code reviews so check it out if it sounds interesting…

Oh, btw, you can see how my Lenovo ? looked like covered with stickers.

Keep your stacks overflowing folks and talk to you soon!

devtoStickers

Got free stickers thanks to @ThePracticalDev https://t.co/Jg2L5ZabL7

— Nikola Brežnjak (@HitmanHR) June 27, 2017

Meetups

Freelancing – 10th MeCoDe meetup

Meetup notes

Recently (14.06.2017), we had our 10th MeCoDe meetup, and this time the topic was the ever so slightly mysterious world of Freelancing.

The presenter was Martina Lipovac, the owner of the creative studio Trogled, who did an awesome job sharing her experience with freelancing in terms of how it is to work from home, how to use different freelancing platforms, how to find new work and communicate with clients, how to organize time, etc.

Also, she covered a lot of things from the legal aspect regarding how to have everything ‘by the book’. Martina also arranged a guest video presentation from her friend Matija Matečić, the CEO of Solo, which is an online service for creating invoices which follow our (sometimes weird) legislation (Croatian specific).

By sharing her success story, I hope some folks got inspired to finally try if this ‘mysterious freelancing’ works for them.

You can take a look at Martina’s presentation here.

Picture time

[ngg_images source=”galleries” container_ids=”29″ override_thumbnail_settings=”0″ thumbnail_width=”120″ thumbnail_height=”90″ thumbnail_crop=”1″ images_per_page=”20″ number_of_columns=”0″ ajax_pagination=”0″ show_all_in_lightbox=”0″ use_imagebrowser_effect=”0″ show_slideshow_link=”1″ slideshow_link_text=”[Show as slideshow]” order_by=”sortorder” order_direction=”ASC” returns=”included” maximum_entity_count=”500″ display_type=”photocrati-nextgen_basic_thumbnails”]

Milestones

This was our 10th Meetup in a span of just a bit over one year. I’m very happy that our small community has such a will to learn new things and expand horizons on a professional level, so am looking forward to another 10!

Call for speakers

As always, we welcome new speakers, even with n0 prior experience (you gotta start somewhere, right? :)) so in case you wanna share something with us, just shoot me an email…

#Freelancing – 10th MeCoDe meetup https://t.co/0WguhFlAqu

— Nikola Brežnjak (@HitmanHR) June 26, 2017

Ionic3

Posting data from Ionic 3 app to a PHP server

TL;DR

This is the simplest example which shows how to POST data from an Ionic 3 app to a PHP server.

The tutorial covering the Ionic version 1 can be found here, and the tutorial covering the Ionic version 2 can be found here.

Quickstart

To see it in action:

    1. Clone the finished project from Github
    2. Make sure you’ve got the newest Ionic CLI (see below for instructions)
    3. Run ionic serve
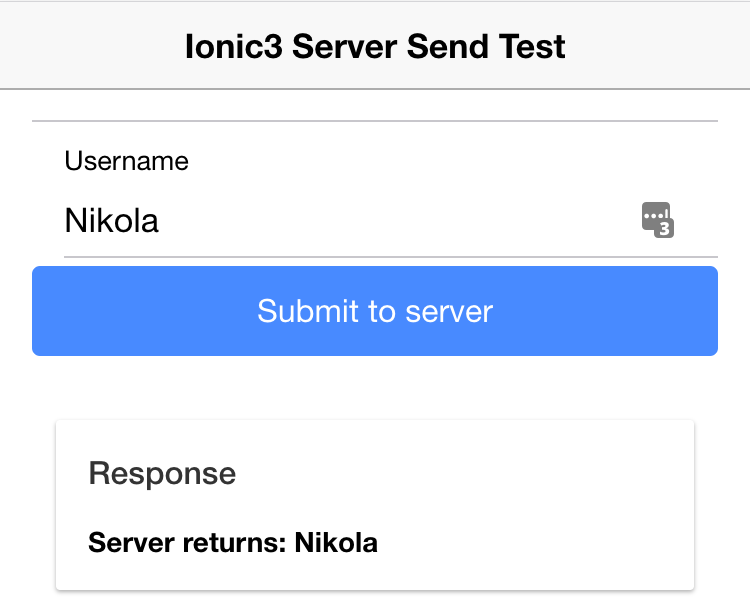
    4. You should see something like this:
      ionic2ServerPost

If you want to make it work from your server:

  1. Make sure you’ve got the newest Ionic CLI (see below for instructions)
  2. Clone the finished project from Github
  3. Upload the PHP/api.php file to your server
  4. In the src/pages/home/home.ts file adjust the link variable (line #21) to point to your server
  5. Run ionic serve

Getting started with Ionic 3

After neglecting Ionic 3 (and for the most part Ionic 2) for far too long due to the overburdening work I still have on my Ionic 1 apps, I finally got some time to take a look at Ionic 3 and update the most popular post about Ionic on my blog, so here you go and enjoy.

In general, from me playing just a bit with Ionic 3, I have to say I love it, so expect some more posts about it soon-ish…

To install the Ionic SDK and create Ionic 3 projects, you need to install the latest Ionic CLI:

npm install -g ionic

You don’t need to worry about this messing up your current ionic CLI since the new one still works with old Ionic 1 projects.

Just for reference, here’s what my ionic info says now:

$> ionic info 

global packages:

    @ionic/cli-utils : 1.4.0
    Ionic CLI        : 3.4.0

local packages:

    @ionic/app-scripts              : 1.3.7
    @ionic/cli-plugin-ionic-angular : 1.3.1
    Ionic Framework                 : ionic-angular 3.4.2

System:

    Node       : v8.0.0
    OS         : macOS Sierra
    Xcode      : Xcode 8.3.3 Build version 8E3004b 
    ios-deploy : 1.9.1 
    ios-sim    : 5.0.13 
    npm        : 5.0.1 

Step by step on how to create this yourself from scratch

  1. Create a new blank Ionic project with:
    ionic start Ionic3ServerSendTest blank
  2. Copy the following code to src/pages/home/home.html file:
    <ion-header>
     <ion-navbar>
     <ion-title>
     Ionic3 Server Send Test
     </ion-title>
     </ion-navbar>
    </ion-header>
    
    <ion-content padding>
     <ion-list>
     <ion-item>
     <ion-label floating>Username</ion-label>
     <ion-input type="text" name="username" [(ngModel)]="data.username"></ion-input>
     </ion-item>
    
     <button ion-button block (click)="submit()">Submit to server</button>
     </ion-list>
    
     <ion-card>
     <ion-card-header>
     Response
     </ion-card-header>
    
     <ion-card-content>
     <b>{{data.response}}</b>
     </ion-card-content>
     </ion-card>
    </ion-content>
    

    Here you basically created a form with an username input field and with a button which acts as a submit button.

    Once the button is clicked AngularJS should handle it within the submit() function which we will define in our src/pages/home/home.ts file (shown below).

    Input username uses  the new syntax for ng-model , and it binds to the variable data.username, so that you can then use it in your submit() function (shown below).

    Components are a bit different in Ionic 3 now, so I encourage you can take a look at the official documentation.

  3. On your server, create an api.php file with the following content:
    <?php
        //http://stackoverflow.com/questions/18382740/cors-not-working-php
        if (isset($_SERVER['HTTP_ORIGIN'])) {
            header("Access-Control-Allow-Origin: {$_SERVER['HTTP_ORIGIN']}");
            header('Access-Control-Allow-Credentials: true');
            header('Access-Control-Max-Age: 86400');    // cache for 1 day
        }
    
        // Access-Control headers are received during OPTIONS requests
        if ($_SERVER['REQUEST_METHOD'] == 'OPTIONS') {
    
            if (isset($_SERVER['HTTP_ACCESS_CONTROL_REQUEST_METHOD']))
                header("Access-Control-Allow-Methods: GET, POST, OPTIONS");         
    
            if (isset($_SERVER['HTTP_ACCESS_CONTROL_REQUEST_HEADERS']))
                header("Access-Control-Allow-Headers:        {$_SERVER['HTTP_ACCESS_CONTROL_REQUEST_HEADERS']}");
    
            exit(0);
        }
    
    
        //http://stackoverflow.com/questions/15485354/angular-http-post-to-php-and-undefined
        $postdata = file_get_contents("php://input");
        if (isset($postdata)) {
            $request = json_decode($postdata);
            $username = $request->username;
    
            if ($username != "") {
                echo "Server returns: " . $username;
            }
            else {
                echo "Empty username parameter!";
            }
        }
        else {
            echo "Not called properly with username parameter!";
        }
    ?>

    As you can see from the code, the first part is explained in detail in this StackOverflow question, and it basically solves the CORS issue that you would otherwise run into.

    The second part, explained in detail in this StackOverflow question,  deals with the way you POST data from Ionic to your PHP server. The gist is that since we POSTed in a JSON format, we have to json_decode  the data that comes to your PHP server.

  4. To the file src/pages/home/home.ts file copy the following content and adjust the link variable to point to the file on your server:
    import { Component } from '@angular/core';
    import { NavController } from 'ionic-angular';
    import { Http } from '@angular/http'; //https://stackoverflow.com/questions/43609853/angular-4-and-ionic-3-no-provider-for-http
    
    @Component({
     selector: 'page-home',
     templateUrl: 'home.html'
    })
    
    export class HomePage {
     data:any = {};
    
     constructor(public navCtrl: NavController, public http: Http) {
     this.data.username = '';
     this.data.response = '';
    
     this.http = http;
     }
    
     submit() {
     var link = 'http://nikola-breznjak.com/_testings/ionicPHP/api.php';
     var myData = JSON.stringify({username: this.data.username});
     
     this.http.post(link, myData)
     .subscribe(data => {
     this.data.response = data["_body"]; //https://stackoverflow.com/questions/39574305/property-body-does-not-exist-on-type-response
     }, error => {
     console.log("Oooops!");
     });
     }
    }

    As with the Ionic 2 tutorial, things have changed a lot since Ionic 1, but in Ionic 3 (if you come from Ionic 2) you shouldn’t have any problems. Anyways, practice makes perfect, so make sure you put in the hours of deliberate practice.

    In this file, we import the Http component from Angular. You can check out the link in the comment to learn that you also need to import and inject HttpModule in src/app/app.module.ts (two new lines that I’ve added are bolded):

    import { BrowserModule } from '@angular/platform-browser';
    import { ErrorHandler, NgModule } from '@angular/core';
    import { IonicApp, IonicErrorHandler, IonicModule } from 'ionic-angular';
    import { SplashScreen } from '@ionic-native/splash-screen';
    import { StatusBar } from '@ionic-native/status-bar';
    import { HttpModule} from '@angular/http';
    
    import { MyApp } from './app.component';
    import { HomePage } from '../pages/home/home';
    
    @NgModule({
     declarations: [
     MyApp,
     HomePage
     ],
     imports: [
     BrowserModule,
     IonicModule.forRoot(MyApp),
     HttpModule
     ],
     bootstrap: [IonicApp],
     entryComponents: [
     MyApp,
     HomePage
     ],
     providers: [
     StatusBar,
     SplashScreen,
     {provide: ErrorHandler, useClass: IonicErrorHandler}
     ]
    })
    export class AppModule {}

    Inside the HomePage class, we now have a constructor where we’re setting some default values. Important to note, see how we’re passing in Http via the constructor parameter.

    Inside the submit function we use the http service to post to our API endpoint with some data. Make note of how we use the subscribe function to handle data once it arrives. Also, make sure you check out the StackOverflow link in the comment as a solution of how to access plain text response.

  5. Run ionic serve  from the root directory of your Ionic app

That’s all folks, I hope this tutorial helps you in starting your journey towards Ionic3 & Angular4!

Posting data from #Ionic 3 app to a #PHP server https://t.co/QYKiQtq1kJ

— Nikola Brežnjak (@HitmanHR) June 21, 2017

Meetups

Web API on ASP.NET Core – 9th MeCoDe meetup

Meetup notes

Few Thursdays ago (18.05.2017) (yeah, I know, this post comes late, but better late than never, they say 🙂) we had our 9th MeCoDe meetup, and this time the topic was Web API on ASP.NET Core.

The presenter was Velimir Sanjković, the owner of S-Soft, who did a great job showing us first hand how to create a Web API on ASP.NET core using both Visual Studio and Visual Code.

Source code

In case you want to check out the code, you can do so via Github.

Picture time

[ngg_images source=”galleries” container_ids=”28″ override_thumbnail_settings=”0″ thumbnail_width=”120″ thumbnail_height=”90″ thumbnail_crop=”1″ images_per_page=”20″ number_of_columns=”0″ ajax_pagination=”0″ show_all_in_lightbox=”0″ use_imagebrowser_effect=”0″ show_slideshow_link=”1″ slideshow_link_text=”[Show as slideshow]” order_by=”sortorder” order_direction=”ASC” returns=”included” maximum_entity_count=”500″ display_type=”photocrati-nextgen_basic_thumbnails”]

Milestones

Believe it or not, MeCoDe is one year old already!

Miscellaneou$

Weblica 2017

This was the 3rd Weblica conference in my Međimurje county (I wrote about the first one here and about the second one here).

Again, the entrance was free and every attendee got a nice T-Shirt (best design so far if you ask me), loads of stuff to eat and drink. The talks were interesting and informative, and for all this a big two thumbs up to the organizers. Also, active participants could get Microsoft keyboards, wireless mouses, USB drives, etc…

I got a mouse 🙂

Here I’ll just add few of the interesting slides from the presentations that I’ve attended. You can check the full program on Weblica’s website.

Conference oppening – Velimir Sanjković

ASP.NET Core i Angular 2 – Ratko Ćosić

[ngg_images source=”galleries” container_ids=”21″ override_thumbnail_settings=”0″ thumbnail_width=”120″ thumbnail_height=”90″ thumbnail_crop=”1″ images_per_page=”20″ number_of_columns=”0″ ajax_pagination=”0″ show_all_in_lightbox=”0″ use_imagebrowser_effect=”0″ show_slideshow_link=”1″ slideshow_link_text=”[Show as slideshow]” order_by=”sortorder” order_direction=”ASC” returns=”included” maximum_entity_count=”500″ display_type=”photocrati-nextgen_basic_thumbnails”]

ASP.NET Core serving JavaScript applications – Dobriša Adamec

[ngg_images source=”galleries” container_ids=”23″ override_thumbnail_settings=”0″ thumbnail_width=”120″ thumbnail_height=”90″ thumbnail_crop=”1″ images_per_page=”20″ number_of_columns=”0″ ajax_pagination=”0″ show_all_in_lightbox=”0″ use_imagebrowser_effect=”0″ show_slideshow_link=”1″ slideshow_link_text=”[Show as slideshow]” order_by=”sortorder” order_direction=”ASC” returns=”included” maximum_entity_count=”500″ display_type=”photocrati-nextgen_basic_thumbnails”]

Lunch

[ngg_images source=”galleries” container_ids=”24″ override_thumbnail_settings=”0″ thumbnail_width=”120″ thumbnail_height=”90″ thumbnail_crop=”1″ images_per_page=”20″ number_of_columns=”0″ ajax_pagination=”0″ show_all_in_lightbox=”0″ use_imagebrowser_effect=”0″ show_slideshow_link=”1″ slideshow_link_text=”[Show as slideshow]” order_by=”sortorder” order_direction=”ASC” returns=”included” maximum_entity_count=”500″ display_type=”photocrati-nextgen_basic_thumbnails”]

Node.js + Docker – Davor Tarandek

[ngg_images source=”galleries” container_ids=”25″ override_thumbnail_settings=”0″ thumbnail_width=”120″ thumbnail_height=”90″ thumbnail_crop=”1″ images_per_page=”20″ number_of_columns=”0″ ajax_pagination=”0″ show_all_in_lightbox=”0″ use_imagebrowser_effect=”0″ show_slideshow_link=”1″ slideshow_link_text=”[Show as slideshow]” order_by=”sortorder” order_direction=”ASC” returns=”included” maximum_entity_count=”500″ display_type=”photocrati-nextgen_basic_thumbnails”]

React – Toni Petrina

[ngg_images source=”galleries” container_ids=”26″ override_thumbnail_settings=”0″ thumbnail_width=”120″ thumbnail_height=”90″ thumbnail_crop=”1″ images_per_page=”20″ number_of_columns=”0″ ajax_pagination=”0″ show_all_in_lightbox=”0″ use_imagebrowser_effect=”0″ show_slideshow_link=”1″ slideshow_link_text=”[Show as slideshow]” order_by=”sortorder” order_direction=”ASC” returns=”included” maximum_entity_count=”500″ display_type=”photocrati-nextgen_basic_thumbnails”]

No Bulls*it Freelancer – Tomislav Kozačinski

[ngg_images source=”galleries” container_ids=”27″ override_thumbnail_settings=”0″ thumbnail_width=”120″ thumbnail_height=”90″ thumbnail_crop=”1″ images_per_page=”20″ number_of_columns=”0″ ajax_pagination=”0″ show_all_in_lightbox=”0″ use_imagebrowser_effect=”0″ show_slideshow_link=”1″ slideshow_link_text=”[Show as slideshow]” order_by=”sortorder” order_direction=”ASC” returns=”included” maximum_entity_count=”500″ display_type=”photocrati-nextgen_basic_thumbnails”]

Demystified Webpack – Andrei Zvonimir Crnković

[ngg_images source=”galleries” container_ids=”22″ override_thumbnail_settings=”0″ thumbnail_width=”120″ thumbnail_height=”90″ thumbnail_crop=”1″ images_per_page=”20″ number_of_columns=”0″ ajax_pagination=”0″ show_all_in_lightbox=”0″ use_imagebrowser_effect=”0″ show_slideshow_link=”1″ slideshow_link_text=”[Show as slideshow]” order_by=”sortorder” order_direction=”ASC” returns=”included” maximum_entity_count=”500″ display_type=”photocrati-nextgen_basic_thumbnails”]

All in all, a great conference and hope to see you next year…

#Weblica 2017 notes @weblica https://t.co/2UooGO7k6R

— Nikola Brežnjak (@HitmanHR) May 29, 2017

Quick tips

How to stop and remove MySQL server on a Mac but keep the client

Remove MySQL server on a Mac

The other day I wanted to run some project via Docker Compose. Surprisingly, the MySQL service defined normally like this:

mysql:
       image: tutum/mysql
       env_file:
         - docker.env
       ports:
         - "3306:3306"

didn’t start, because I apparently had MySQL server already running locally.

Trust me, I tried everything from this StackOverflow post but any time I tried to kill the process (that I saw is running with ps aux | grep mysql) it would spun back up.

Then, I remembered that I installed MySQL server some time ago via the app called MAMP. I went in and removed all of that and also I found one post that I’ll paste here (full credit to Vitor Britto):

# Remove MySQL completely

1. Open the Terminal
2. Use `mysqldump` to backup your databases
3. Check for MySQL processes with: `ps -ax | grep mysql`
4. Stop and kill any MySQL processes
5. Analyze MySQL on HomeBrew: 

    ```
    brew remove mysql
    brew cleanup
    ```

6. Remove files: 

    ```
    sudo rm /usr/local/mysql
    sudo rm -rf /usr/local/var/mysql
    sudo rm -rf /usr/local/mysql*
    sudo rm ~/Library/LaunchAgents/homebrew.mxcl.mysql.plist
    sudo rm -rf /Library/StartupItems/MySQLCOM
    sudo rm -rf /Library/PreferencePanes/My*
    ```

7. Unload previous MySQL Auto-Login: 

    ```
    launchctl unload -w ~/Library/LaunchAgents/homebrew.mxcl.mysql.plist
    ```

8. Remove previous MySQL Configuration: 

    ```
    subl /etc/hostconfig` 
    # Remove the line MYSQLCOM=-YES-
    ```

9. Remove previous MySQL Preferences: 

    ```
    rm -rf ~/Library/PreferencePanes/My*
    sudo rm -rf /Library/Receipts/mysql*
    sudo rm -rf /Library/Receipts/MySQL*
    sudo rm -rf /private/var/db/receipts/*mysql*
    ```

10. Restart your computer just to ensure any MySQL processes are killed
11. Try to run mysql, **it shouldn't work**

Keep the MySQL client for interacting with the MySQL databases

At this point, I removed everything related to MySQL, but I still needed the client to connect to the MySQL database that I ran with Docker Compose.

The fastest way (that I’ve found in this StackOverflow post) to install the client without installing the server was to install MySQLWorkbench and then add this to your path (I put these in my .zshrc file; you may use .bashrc):

export PATH=$PATH:/Applications/MySQLWorkbench.app/Contents/MacOS

Of course, the path may vary for you in case you’ve installed it in some other location. Anyway, hope this helps someone… ?

How to stop and remove #MySQL server on a Mac but keep the client https://t.co/0vtuBgOqMD

— Nikola Brežnjak (@HitmanHR) May 11, 2017

Miscellaneou$

This tool will save you tons of typing in Terminal

Even though this may come off as a clickbait title, I’m honestly telling you that this tool will save you lots of time typing in the terminal.

Tell me, how many times you did something like this:

mkdir testProject
cd testProject
mkdir app
cd app
mkdir config
mkdir js
mkdir css
cd js
mkdir vendor
cd vendor
cd ../../../

Let’s assume that you did all that on the ~/Desktop folder; then you’re currently at the ~/Desktop/testProject/ folder.

Now, say you want to go back to the vendor folder to add some other files/folders (or do some other stuff). Naturally, you would write cd app/js/vendor.

What if I tell you that you could achieve the same this by typing something like z vend?

Enter the Z tool. This simple script allows you to do just that – move to some folder without having to type the whole path in.

Just imagine, how many times you found yourself going through the terminal and changing directories and then telling yourself “Wouldn’t it be nice if I could just go back to that directory by just clicking on it (as you can in any GUI tool)?”. Well, now you can.

This cool tool was presented to me by my coworker Shawn Milochik, and I’m using it ever since. Here’s his YouTube video which will show you how to install and run this tool in under 3 minutes.

For the sake of brevity, here are the installation steps:

  • download the z.sh to your local folder (for example /Users/nikola/CoolScripts/z.sh)
  • source it in your .bash_profile or .zshrc config file by adding this line: source /Users/nikola/CoolScripts/z.sh
  • start a new terminal window and make good use of Z

Hope this helps you and saves you some typing time as it does for me ?

This tool will save you tons of typing in Terminal – thanks to @ShawnMilo for showing it to me https://t.co/XPEegWPJRq

— Nikola Brežnjak (@HitmanHR) May 8, 2017

Meetups

Golang Zagreb – First Workshop

Last Saturday (22.03.2017) I attended the first ever Go language workshop.

The workshop host was Matej Baćo, who is also the organizer of Golang Zagreb.

We were working on a task to create a currency exchange rates JSON service. The Github repo of the project is here. Matej did an excellent job preparing this workshop as you can checkout the master branch and follow the instructions in the main.go in order to go through the same process as we did. If you get stuck at some point or don’t know how would you solve a certain step, you can check out other branches which Matej prepared (for each phase there is a start and done branch).

Few pics from the workshop

[ngg_images source=”galleries” container_ids=”20″ override_thumbnail_settings=”0″ thumbnail_width=”120″ thumbnail_height=”90″ thumbnail_crop=”1″ images_per_page=”20″ number_of_columns=”0″ ajax_pagination=”0″ show_all_in_lightbox=”0″ use_imagebrowser_effect=”0″ show_slideshow_link=”1″ slideshow_link_text=”[Show as slideshow]” order_by=”sortorder” order_direction=”ASC” returns=”included” maximum_entity_count=”500″ display_type=”photocrati-nextgen_basic_thumbnails”]

If you’re a Go aficionado and would like to keep learning about Go from the first-hand experience, make sure to attend their next meetup this Wednesday where they also have a so-called ‘hack table’ where you can ask any question about the Go code you’re writing and having some issues with.

All in all, great workshop, I highly recommend you check them out, and I’m looking forward to the next one!

#Golang Zagreb – First #Workshop lead by @matejbaco https://t.co/zCCtdsPRgw

— Nikola Brežnjak (@HitmanHR) April 25, 2017

Miscellaneou$

Git branching done right with Gitflow & improving code quality with code reviews

Meetup notes

Last Thursday (06.04.2017) we had our 8th MeCoDe meetup, and this time it was all about Git branching with Gitflow and Code reviews.

This time the presenter was yours truly 🙂 and it seems the topic was quite intriguing as this was our most attended meetup so far

NextGEN Gallery

    ## Presentation By popular demand 🙂 here’s the link to the presentation slides. ## Tutorial I already blogged about Gitflow briefly in this post, but in this one, I’m going to explain a little bit about how to use git from the command line. Then I’ll cover the basic commands that you need to know to be able to work with git. After that, I’ll show how to use gitflow for managing branches, and in the end, I show how to do code reviews. ### Source control I hope that everybody is on board with source control or at least you’re considering to do it. But honestly, I think that everyone these days uses some form of source control. Don’t worry we won’t do any show of hands 😛 ### Git Git is a distributed version control system (VCS). Version control means that you use it to store versions of your documents. True, it seems it’s very popular among developers, but designers and other people (that are a bit more tech savvy) also use it to track versions of their files. This whole distributed part is one of the things that makes it different from other VCS. Rather than have only one single place for the full version history of the software, as is common in once-popular VCS like CVS or Subversion, in Git every developer’s working copy is also a repository that can contain the full history of all changes. This well-spoken gentleman created Git: Of course, he is Linus Torvalds, the creator of Linux. ### So, how do we start? First, make sure you’ve installed Git for your operating system. Then, all you need to do to create your repository is to execute: git init in a certain folder. Let’s do that now; go to your command line and say that on Desktop (yeah, we’re gonna be original) you create a folder called GitflowMeetup. Inside the folder, execute git init. Now we have an empty git repository. ### Adding files Now create a simple README.md file and write something like: # GitflowMeetup I love these meetups! and save the file. One useful command that you’ll use a lot is git status, which will you tell you the status of your git project. If you execute that in your command line (while being in a Git project) you will see that the README.md file is untracked by Git. This file is now not in Git, but how do we tell it to add it? Well, we use the command git add README.md. Of course, if you were to have multiple files you would not have to list each and every one of them, you would just use git add . If you run the git status command again, you’ll see that we have a new file which we’ve added. ### Committing changes To commit the added changes to your local repository, just run: git commit -m "Added the README.md file" Of course, the commit message can be anything, but please do yourself a favor and write some meaningful commit messages. ### Pushing to a remote repo In this example, we’re gonna use Github (Bitbucket and Gitlab are few other popular options that I know of). First, if you don’t have it, create an account on Github. Then, click on the Start a project button on the homepage and select some name for your project. You can leave all other options as they are by default: Since we already created a project locally, we’ll use the second option (...or push an existing) for adding a remote origin: ### Branches Git makes this whole notion of branching very easy. Say we’re on a master branch right now, and we want to try out some new feature based on our master branch: > You just use a simple command to create a new branch and then you do some work there. When you finish a feature, you just merge it back to the master branch.

Let’s do that now; make a new branch: git checkout -b new_feature. This will create a new branch called new_feature out of the master branch (or the branch on which you currently are) and it will check it out (meaning, you’ll be ‘positioned’ in new_feature branch instead of master).

Make some changes to your README.md file, save it and use the following commands to commit the changes in the current branch and merge them back to master:

git add .
git commit -m "New feature changes"
git checkout master
git merge new_feature

Gitflow

Now that you’ve seen how these branches are easy to work with, it shouldn’t come as a surprise that a lot of people came up with their own ways to manage branches.

However, it seems that one of them is quite popular in the community. So, let me introduce you to a popular git branching model called Gitflow by Vincent Driessen:

This picture is a mess when you look at it for the first time, so let’s go step by step. You have two main branches:

  • master
  • develop

The master branch contains the same exact state of the source code that is currently in production.

All the work happens on the develop branch.

You use the so called feature branches which are created from the develop branch. You can have multiple feature branches.

Then you have a release branch which is branch used to prepare for a new release.

Finally, you have a hotfix branch which is used when, for example, you find some bug in the production code, and you need to fix it #ASAP.

Here’s how one usual workflow would happen with Gitflow in theory:

  • First, you have to have a Git repository
  • Then you would initialize the Gitflow repository
  • You would start developing on a develop branch
  • Then, say you wanna try out a new feature – you would make a new feature branch and do some commits there
  • When done, you would merge back to develop by finishing a feature
  • If you’re happy with your current version and you want to do an update then you would use the release branch. Also, you would do any bug fixing here
  • And, when perfectly done you would finish the release branch which would mean that you would merge to master and back to develop
  • Also, you would tag your master branch at that point

Gitflow – the tool

Now we’re going to do that step by step, but first, you need to make sure you install Gitflow tool (in a lack of a better name for it :)) on your computer. It’s very easy, and for example, on Mac it’s literally a simple brew install git-flow-avh.

So, what’s the difference between Gitflow model and the tool, you ask?? Well, the tool is actually:

a collection of Git extensions to provide high-level repository operations for Vincent Driessen’s branching model

The tool makes your life easier as it executes some repetitive commands so that you don’t have to. For example, when you finish a feature it makes sure that it merges it back to develop and deletes it. Sure, you could follow the Gitflow model yourself, without the Gitflow tool, but this tool saves you some keystrokes and makes sure you don’t miss a step when following the Gitflow model.

There have been scores of posts and tutorials written about Gitflow, but this one has a nice little graphical cheat-sheet which you may want to check out.

As a prerequisite for Gitflow, you need to have a Git repository. Fortunately, if you’ve been a good sport and followed thus far then, you have one ready. Next, you need to init the Gitflow repository by executing:

git-flow init

You will be asked a few questions on which you can answer with a default option. It will just set up branch names following the Gitflow model.

In case git-flow doesn’t exist on your machine try git flow. This depends on how you installed Gitflow tool.

When you’re done with this you can see that you’re on the develop branch. Now, let’s start a new feature by doing:

git-flow feature start new_docs

Next, open up the README.md file and add some new text. Then, commit your changes locally:

git add .
git commit -m "Added new documentation"

And now, since we’re happy with this feature changes, let’s finish the feature:

git-flow feature finish new_docs

This command now did, as you’ll see in your command line output, a few things:

  • it merged the new_docs branch to the develop branch
  • it deleted the new_docs branch locally
  • it checked out out the develop branch so you can continue working

Say now that we’re really happy with our feature, we have tested it on our test servers (I won’t go into this, but some people tend to have continuous deployment set up so that once you push to develop it pushes to the staging server where the testers can check if the feature does what it needs to do) and now we want to make a new release.

First, we have to execute:

git-flow release start 2.0

Here we need to add any last potential fixes, update the version (makes sense when dealing with mobile apps), etc.

When done, we just have to execute:

git-flow release finish 2.0

You will need to add few merge messages and a tag message, but when that is done Gitflow tool will:

  • merge the release branch to master
  • tag the release branch as 2.0
  • merge the release branch to develop
  • delete the release branch
  • check out the develop branch

Collaborators

Even though we might have collaborators on our projects, it so very often feels like this:

In Github, you could add someone that you know to your Collaborators by going to Settings-Collaborators. That way they would get the permission to push to your repository or you could create a team organization on Github for that, and thus on every new project you would be able to choose to what team has (and what kind) access.

Of course, this can work well if you know a person that’s going to be committing to your repo. However, it’s still not a good solution if you ask me because I doubt it that you’d like your junior developers to commit to master without you at least checking the code.

So, there’s a better solution for this which not only solves a problem of people just committing to master but also improves code quality. These are called pull requests and code reviews.

What this means in practice is that you create a new feature branch and submit a so-called pull request on Github requesting that this feature branch is merged into master (or, well, any other branch). Then someone else from the team, be it a lead developer or some other senior developer code reviews your code, gives you some comments and eventually merges it.

Yeah, this seems nice BUT

Trust me; I’ve heard it all. Ranging from

to

You may have even heard that

but the truth is often somewhat in a gray-ish area.

So, will you just give up on this? I’d advise not to and just calculate the time that it will take you to do these code reviews into your estimate of how long a certain feature will take. Sure, I’m aware that it’s easy to say ‘just do it’, but then again if you have a problem with getting some well-formed practices into your team, well, you may need to reconsider some things…

This will not only help you on the long run, but it will also help your team get a sense of code ownership and knowledge sharing and it will help your junior developers get up to speed faster. Besides, last I checked – you (yes, you dear reader) are in for it for a long run; this (programming) is something that you love, and you’re here to master your craft, right?

If you’re still not sold, please read Why code reviews matter (and actually save time!).

Demo or it didn’t happen

Anyways, so now we’re gonna do a demo showing this in practice.

So, let’s create a new feature branch.

git-flow feature start NewFeatureDocs

Repeat the process from before of changing some text and committing your change.

And now we will do something different from before. We will now publish this branch to our remote repo with this command:

git-flow feature publish NewFeatureDocs

If you check Github now, you’ll see that we’ve pushed this new branch.

Now, click on the Compare &amp; pull request button:

Here you can add some comment summarizing your pull request.

And now (if we’re playing by the book) someone else from your team would come and review your code. At this point, you could let someone know about this via your Project Management Tool (JIRA, Trello, Leankit, Kanbanflow, etc…) by putting this task/card in the appropriate column.

When the pull request is approved, you as the author just do: git-flow feature finish NewFeatureDocs in your command line. From this you can see that Github closed the pull request and deleted the branch:

Sure, you could have just accepted the pull request on Github, but then that wouldn’t fit with this whole git-flow workflow.

Other solutions

Few workflows are very well explained here in a graphical way. Also, here is the post about Gitflow vs Github flow in case you’re interested in more learning.

Conclusion

Either way, I’m not saying that the Gitflow workflow is the silver bullet. Nothing is these days. I’m just saying that you probably would benefit if you check what’s out there (truth, OFC, what else ;)).

Anyways, even if you don’t adopt this whole git-flow approach, I urge you to give the pull requests/code reviews a shot and see if it will help you.

Parting wisdom

This image nails it:

A piece of some hard learned advice is to keep your pull requests small in terms of changed code and commit as often as possible.

Otherwise, be prepared for this 😉

Questions !?

I’m far from being an expert on the subject, but in case you have some questions please ping, and I’ll do my best attempt at answering them.

Git branching done right with #Gitflow & improving code quality with #code #reviews https://t.co/1zPbhEDfq4

— Nikola Brežnjak (@HitmanHR) April 14, 2017

Books

Elantris – Brandon Sanderson

My favorite quotes from the great book Elantris by Brandon Sanderson which I rated 5/5 on my Goodreads account.

When you accept authority you must be willing to take responsibility for it at all times even when you don’t particularly feel like it.

Do not dash if you only have the strength to walk, and do not waste your time pushing on the walls that will not give. More importantly, don’t shove where a pat would be sufficient.

Your most awful experiences are never the ones you’re anticipating.

The problem with being clever, Serene thought with a sigh, is that everyone assumes you’re always planning something.

Pain loses its power when other things become more important.

My favorite #quotes from Elantris – another great #book by Brandon Sanderson https://t.co/8g7qeV4O2a

— Nikola Brežnjak (@HitmanHR) March 11, 2017

Page 20 of 51« First...10«19202122»304050...Last »

Recent posts

  • When espanso Breaks on Long Replacement Strings (and How to Fix It)
  • 2024 Top Author on dev.to
  • Hara hachi bun me
  • Discipline is also a talent
  • Play for the fun of it

Categories

  • Android (3)
  • Books (114)
    • Programming (22)
  • CodeProject (36)
  • Daily Thoughts (78)
  • Go (3)
  • iOS (5)
  • JavaScript (128)
    • Angular (4)
    • Angular 2 (3)
    • Ionic (61)
    • Ionic2 (2)
    • Ionic3 (8)
    • MEAN (3)
    • NodeJS (27)
    • Phaser (1)
    • React (1)
    • Three.js (1)
    • Vue.js (3)
  • Leadership (1)
  • Meetups (8)
  • Miscellaneou$ (78)
    • Breaking News (8)
    • CodeSchool (2)
    • Hacker Games (3)
    • Pluralsight (7)
    • Projects (2)
    • Sublime Text (2)
  • PHP (6)
  • Quick tips (41)
  • Servers (8)
    • Heroku (1)
    • Linux (3)
  • Stack Overflow (81)
  • Unity3D (9)
  • Windows (8)
    • C# (2)
    • WPF (3)
  • Wordpress (2)

"There's no short-term solution for a long-term result." ~ Greg Plitt

"Everything around you that you call life was made up by people that were no smarter than you." ~ S. Jobs

"Hard work beats talent when talent doesn't work hard." ~ Tim Notke

© since 2016 - Nikola Brežnjak