
Posting data from Ionic 3 app to a PHP server
TL;DR
This is the simplest example which shows how to POST data from an Ionic 3 app to a PHP server.
The tutorial covering the Ionic version 1 can be found here, and the tutorial covering the Ionic version 2 can be found here.
Quickstart
To see it in action:
- Clone the finished project from Github
- Make sure you’ve got the newest Ionic CLI (see below for instructions)
- Run ionic serve
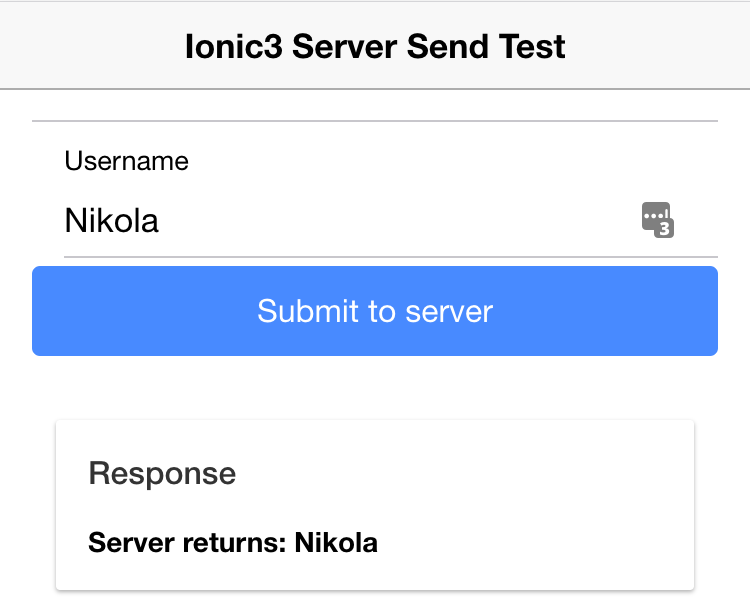
- You should see something like this:
If you want to make it work from your server:
- Make sure you’ve got the newest Ionic CLI (see below for instructions)
- Clone the finished project from Github
- Upload the PHP/api.php file to your server
- In the src/pages/home/home.ts file adjust the link variable (line #21) to point to your server
- Run ionic serve
Getting started with Ionic 3
After neglecting Ionic 3 (and for the most part Ionic 2) for far too long due to the overburdening work I still have on my Ionic 1 apps, I finally got some time to take a look at Ionic 3 and update the most popular post about Ionic on my blog, so here you go and enjoy.
In general, from me playing just a bit with Ionic 3, I have to say I love it, so expect some more posts about it soon-ish…
To install the Ionic SDK and create Ionic 3 projects, you need to install the latest Ionic CLI:
npm install -g ionic
You don’t need to worry about this messing up your current ionic CLI since the new one still works with old Ionic 1 projects.
Just for reference, here’s what my ionic info says now:
$> ionic info

global packages:

    @ionic/cli-utils : 1.4.0
    Ionic CLI        : 3.4.0

local packages:

    @ionic/app-scripts              : 1.3.7
    @ionic/cli-plugin-ionic-angular : 1.3.1
    Ionic Framework                 : ionic-angular 3.4.2

System:

    Node       : v8.0.0
    OS         : macOS Sierra
    Xcode      : Xcode 8.3.3 Build version 8E3004b
    ios-deploy : 1.9.1
    ios-sim    : 5.0.13
    npm        : 5.0.1
Step by step on how to create this yourself from scratch
- Create a new blank Ionic project with:
ionic start Ionic3ServerSendTest blank
- Copy the following code to src/pages/home/home.html file:
<ion-header>
 <ion-navbar>
 <ion-title>
 Ionic3 Server Send Test
 </ion-title>
 </ion-navbar>
</ion-header>

<ion-content padding>
 <ion-list>
 <ion-item>
 <ion-label floating>Username</ion-label>
 <ion-input type="text" name="username" [(ngModel)]="data.username"></ion-input>
 </ion-item>

 <button ion-button block (click)="submit()">Submit to server</button>
 </ion-list>

 <ion-card>
 <ion-card-header>
 Response
 </ion-card-header>

 <ion-card-content>
 <b>{{data.response}}</b>
 </ion-card-content>
 </ion-card>
</ion-content>
Here you basically created a form with an username input field and with a button which acts as a submit button.
Once the button is clicked AngularJS should handle it within the submit() function which we will define in our src/pages/home/home.ts file (shown below).
Input username uses the new syntax for ng-model , and it binds to the variable data.username, so that you can then use it in your submit() function (shown below).
Components are a bit different in Ionic 3 now, so I encourage you can take a look at the official documentation.
- On your server, create an api.php file with the following content:
<?php
    //http://stackoverflow.com/questions/18382740/cors-not-working-php
    if (isset($_SERVER['HTTP_ORIGIN'])) {
        header("Access-Control-Allow-Origin: {$_SERVER['HTTP_ORIGIN']}");
        header('Access-Control-Allow-Credentials: true');
        header('Access-Control-Max-Age: 86400');    // cache for 1 day
    }

    // Access-Control headers are received during OPTIONS requests
    if ($_SERVER['REQUEST_METHOD'] == 'OPTIONS') {

        if (isset($_SERVER['HTTP_ACCESS_CONTROL_REQUEST_METHOD']))
            header("Access-Control-Allow-Methods: GET, POST, OPTIONS");

        if (isset($_SERVER['HTTP_ACCESS_CONTROL_REQUEST_HEADERS']))
            header("Access-Control-Allow-Headers:        {$_SERVER['HTTP_ACCESS_CONTROL_REQUEST_HEADERS']}");

        exit(0);
    }


    //http://stackoverflow.com/questions/15485354/angular-http-post-to-php-and-undefined
    $postdata = file_get_contents("php://input");
    if (isset($postdata)) {
        $request = json_decode($postdata);
        $username = $request->username;

        if ($username != "") {
            echo "Server returns: " . $username;
        }
        else {
            echo "Empty username parameter!";
        }
    }
    else {
        echo "Not called properly with username parameter!";
    }
?>
As you can see from the code, the first part is explained in detail in this StackOverflow question, and it basically solves the CORS issue that you would otherwise run into.
The second part, explained in detail in this StackOverflow question, deals with the way you POST data from Ionic to your PHP server. The gist is that since we POSTed in a JSON format, we have to json_decode the data that comes to your PHP server.
- To the file src/pages/home/home.ts file copy the following content and adjust the link variable to point to the file on your server:
import { Component } from '@angular/core';
import { NavController } from 'ionic-angular';
import { Http } from '@angular/http'; //https://stackoverflow.com/questions/43609853/angular-4-and-ionic-3-no-provider-for-http

@Component({
 selector: 'page-home',
 templateUrl: 'home.html'
})

export class HomePage {
 data:any = {};

 constructor(public navCtrl: NavController, public http: Http) {
 this.data.username = '';
 this.data.response = '';

 this.http = http;
 }

 submit() {
 var link = 'http://nikola-breznjak.com/_testings/ionicPHP/api.php';
 var myData = JSON.stringify({username: this.data.username});

 this.http.post(link, myData)
 .subscribe(data => {
 this.data.response = data["_body"]; //https://stackoverflow.com/questions/39574305/property-body-does-not-exist-on-type-response
 }, error => {
 console.log("Oooops!");
 });
 }
}
As with the Ionic 2 tutorial, things have changed a lot since Ionic 1, but in Ionic 3 (if you come from Ionic 2) you shouldn’t have any problems. Anyways, practice makes perfect, so make sure you put in the hours of deliberate practice.
In this file, we import the Http component from Angular. You can check out the link in the comment to learn that you also need to import and inject HttpModule in src/app/app.module.ts (two new lines that I’ve added are bolded):
import { BrowserModule } from '@angular/platform-browser';
import { ErrorHandler, NgModule } from '@angular/core';
import { IonicApp, IonicErrorHandler, IonicModule } from 'ionic-angular';
import { SplashScreen } from '@ionic-native/splash-screen';
import { StatusBar } from '@ionic-native/status-bar';
import { HttpModule} from '@angular/http';

import { MyApp } from './app.component';
import { HomePage } from '../pages/home/home';

@NgModule({
 declarations: [
 MyApp,
 HomePage
 ],
 imports: [
 BrowserModule,
 IonicModule.forRoot(MyApp),
 HttpModule
 ],
 bootstrap: [IonicApp],
 entryComponents: [
 MyApp,
 HomePage
 ],
 providers: [
 StatusBar,
 SplashScreen,
 {provide: ErrorHandler, useClass: IonicErrorHandler}
 ]
})
export class AppModule {}
Inside the HomePage class, we now have a constructor where we’re setting some default values. Important to note, see how we’re passing in Http via the constructor parameter.
Inside the submit function we use the http service to post to our API endpoint with some data. Make note of how we use the subscribe function to handle data once it arrives. Also, make sure you check out the StackOverflow link in the comment as a solution of how to access plain text response.
- Run ionic serve from the root directory of your Ionic app
That’s all folks, I hope this tutorial helps you in starting your journey towards Ionic3 & Angular4!
Posting data from #Ionic 3 app to a #PHP server https://t.co/QYKiQtq1kJ
— Nikola Brežnjak (@HitmanHR) June 21, 2017


I can’t post the data to my PHP server (Apache). How to set the exact path for api.php file?
I entered this path at my local server:
‘PHP/api.php’
The error is like this:
“POST http://localhost:8100/PHP/api.php 404 (Not Found)” .
Please reply fast!!
That means that you’ve put it in the wrong location.
Thanks a lot dude, it works.
Great, I’m glad it works for you!
hii nikola. i found your blog when i search php and ionic 3.
i got a problem on returning the data body response to an alert box on ionic. do you happen to know a way on how to do it? thanks.
Hey, has my example not helped you? What error are you getting?
it just goes directly to the runtime error page. The alert box wasn’t even called.
my php is this:
check database see if user existed
If username existed… Then pass the userdata.jsonencode to the app and let the user pass on to the next page. (Works fine)
Else
get the username and pass it back to the app
And my .ts file can capture that value and then do popup alert
because so far I see all of the error handling are just using console.log
I would check the server for any logs to help see what could be the problem. So, most likely your Apache error logs.
yep checked my logs… nothing that is dated today. the logs were dated 2 days ago. the runtime error is: Uncaught (in promise): TypeError: Cannot read property ‘user_id’ of undefined TypeError: Cannot read property ‘user_id’ of undefined at ..
In a way, this runtime error is correct because I put in the wrong login. and the console log returned the correct error message which is wrong username and password.
I changed from using alertbox to presentToast.
never mind. fixed it 😀
Glad you got it working in the end! What was the problem?
no idea. but i modified the code. i added if and else statement to check the credentials.. and under else i set the presenttoast… and it worked.
the way i set mine is a different than yours. cause i have my own custom auth service. so i have to modify your codes 😀 i’m using your code as skeleton to get me up and running quickly.
stay awesome. keep on blogging. i’ve bookmarked your site 😀
Thanks man, I appreciate it!
Hi nikola, I have a problem Posting data from my form , this is the message “the requested url was rejected. please consult with your administrator”, but only I have this problem when I run the application on my phone.
however when I run the application on my pc I have not problems
I hope you can guide me, could be CORS issues?
Thanks
I would check the server for any logs to help see what could be the problem. So, most likely your Apache error logs.
Hi Nikola, I am using your code, it runs and does not show any any error, but it does not response back the data.
submit() {
var link = ‘../contact/api.php’;
var myData = JSON.stringify({username: this.data.username});
this.http.post(link, myData)
.subscribe(data => {
this.data.response = data[“_body”];
}, error => {
console.log(“Oooops!”);
});
}
api.php file is as below
echo “You have CORS!”;
$postdata = file_get_contents(“php://input”);
if (isset($postdata)) {
$request = json_decode($postdata);
$username = $request->username;
echo “hello how are you”
if ($username != “”) {
echo “Server returns: ” . $username;
}
else {
echo “Empty username parameter!”;
}
}
else {
echo “Not called properly with username parameter!”;
}
I am using local server (my own laptop)
Of course it doesn’t. the link that you’re using has to be accessible. If you can’t get from your browser to `var link = ‘../contact/api.php’;` then you won’t be able to get to it from your app. If you have this set up locally, then I would presume you have this running somewhere like `http://localhost/contact/api.php`. See if that helps you move onward…
In my programme i am calling var link = ‘../contact/api.php’; file, but i think this file is not being run/called by the programme
Thanx Nikola for reply.i have set the path var link=’http://localhost/contact/api.php’;, but it is also not accessible from browser. so i have set the complete path
var link=’http://localhost/contact/api.php’;. it is accessible from browser. But now program is showing Syntax error message.
Error: SyntaxError
at callWithDebugContext (http://localhost:8100/build/vendor.js:13575:9)
at debugHandleEvent (http://localhost:8100/build/vendor.js:13153:5)
at dispatchEvent (http://localhost:8100/build/vendor.js:9173:5)
at Anonymous function (http://localhost:8100/build/vendor.js:9765:13)
at Anonymous function (http://localhost:8100/build/vendor.js:33247:9)
at t.prototype.invokeTask (http://localhost:8100/build/polyfills.js:3:9843)
at onInvokeTask (http://localhost:8100/build/vendor.js:4499:21)
at t.prototype.invokeTask (http://localhost:8100/build/polyfills.js:3:9843)
at r.prototype.runTask (http://localhost:8100/build/polyfills.js:3:5117)
at invoke (http://localhost:8100/build/polyfills.js:3:10918)
Second path wrongly copied same, now i have set the path
var link=’g:\myionic\first\src\pages\contact\api.php’, it is accessible from browser
I am getting this error in php :
Notice: Trying to get property of non-object in C:\xampp\htdocs\testdb\api.php on line 53
Empty username parameter!
my php code is :
if (isset($_SERVER[‘HTTP_ORIGIN’])) {
header(“Access-Control-Allow-Origin: {$_SERVER[‘HTTP_ORIGIN’]}”);
header(‘Access-Control-Allow-Credentials: true’);
header(‘Access-Control-Max-Age: 86400’); // cache for 1 day
}
// Access-Control headers are received during OPTIONS requests
if ($_SERVER[‘REQUEST_METHOD’] == ‘OPTIONS’) {
if (isset($_SERVER[‘HTTP_ACCESS_CONTROL_REQUEST_METHOD’]))
header(“Access-Control-Allow-Methods: GET, POST, OPTIONS”);
if (isset($_SERVER[‘HTTP_ACCESS_CONTROL_REQUEST_HEADERS’]))
header(“Access-Control-Allow-Headers: {$_SERVER[‘HTTP_ACCESS_CONTROL_REQUEST_HEADERS’]}”);
exit(0);
}
$dbhost=’localhost’;
$username=’root’;
$password=”;
$dbName=’testdatabase’;
$con = mysqli_connect(“$dbhost” , “$username” , “$password”);
mysqli_select_db($con,”testdatabase”);
$postdata = file_get_contents(“php://input”);
if (isset($postdata)) {
$request = json_decode($postdata);
$username = $request->username;
if ($username != “”) {
//echo “Server returns: ” . $username;
$sql = mysqli_query($con, “INSERT INTO doctortable (Name, Username, Password)
VALUES (‘TEST’, ‘TEST’, ‘TEST’)”);
}
else {
echo “Empty username parameter!”;
}
}
else {
echo “Not called properly with username parameter!”;
}
$username=$request->username is not working
Great tutorial!
Only running into an error in the PHP bit: ” Failed to load ___: No ‘Access-Control-Allow-Origin’ header is present on the requested resource. Origin ‘http://localhost:8100’ is therefore not allowed access. ”
Have hosted api.php on my server, and used exactly your code.
Any idea why it isn’t working?
How can we post data without using JSON, like if we post using a normal HTML Form ??
Basically, just like you said – it works the same way as you would do it on the ‘web’. Did you try that – maybe run into problems? Let me know and maybe I can help.
I dont’ know how to code it.
When i tried your code above in ionic 3, the data in the input doesn’t pass through submit and i get error
Hi, Thanks for brilliant easy and simple post.
I appreciate if you tell about the opposite process with clear explanation as you did in this post.
I mean receiving json data from php api .
it will be great to include the php code and ionic code .
thanks in advance
But, that is all already in the post, no?
thanks,your ionic3 php api code is working fine, i jus need 1 small help fr example if der is a login page and user try’s to login but hez details are not there in database so how to take response from the server and display error on app that user does not exist something like this.
plz if u have any idea about how to do that than plz mail me the answer
thanks in advance
Sure, you can handle that error (or any other) in the error callback:
this.http.post(link, myData).subscribe(data => {
this.data.response = data["_body"];
}, error => {
// handle error here
});
Hi Nikola,
I have an issue with the layout of the API’s result : I would like it to be in with line break between each response. I tried to insert like this : “echo “”.$nom.””;”, but when it appears on the app screen, it is written as if it wasn’t recognized as tag.
Do you know what could I do ?
Anyway thank you for this tutorial, it was very helpful !
Hey Clara,
I know what you’re trying to do and I’ve been down that path myself when starting. But, let me tell you that is the wrong approach. The API should return only the data, and you should construct the layout on the client side vs. returning the HTML from the api itself.
If you have more questions about this, feel free to ask.
Thanks for the answer !
The thing is that I’m trying to return a list of names, but I do not know how to make each name stand apart in a , rather than having a block of all names.
Do you know how to do that ? Maybe I should change this line in home.ts : “this.data.response = data[“_body”];” and change “_body” by something else but I’m not sure what
From the PHP code you would return a JSON object. Look into it a bit more and you’ll see it’s basically a ‘way to do it’ these days.
You can do something like this on the server in PHP:
$array = array(“name1”, “name2”, “name3”, “name4”);
$json = json_encode($array);
echo $json;
See if this helps and good luck!
If you are using Laravel as your Backend, then edit your .htaccess file by just pasting this code, to solve problem CROS in your Angular or IONIC project
Header add Access-Control-Allow-Origin “*”
Header add Access-Control-Allow-Methods: “GET,POST,OPTIONS,DELETE,PUT”
Thanks for the code mate. Sorry, had to block your CryptoMining Script 🙂
You’re welcome. Hehe, yes, it was actually an experiment of how long will it take someone to write this.
I enter user name and I click on submit to server button and for server response I get
Empty username parameter!
but if i fill user name manually in home.ts this.data.username = ‘say any name’; then i get server response to that any name, It seems that username input in home html does not pass input value username to the home.ts. Please help
Could be the cors issue – please check the comments for more info. If it’s not the case, ping back and we can debug onward.
It is not cors issue as i altered the cod so it could just lsubmit() {
console.log({username: this.data.username});
}og to console
and I only get response from console {username: “”} The input username does not pass from home page.html to username in home.ts function
If you can, please share the whole code that you have and I’ll take a look. Do you get this on my demo example?
Thank you very much for the great help and great example, I have managed to solve the issue , it was the fact I forgot to edit the app.module.ts .
Awesome, I’m glad you figured it out!
Can i know the codestyle or theme you using with for that code? it seems so neat. Need to apply it to my phpstorm
it works. It’s exactly what i’m searching for. Thank you!
You’re welcome.
Hey Nikola
This works well. Thanks
In my api.php, if the user exists in the database I am trying to navigate to another page using header(“Location: ……. However, I am unable to do this. My response is fine just before I add this line and nothing after this. Can you help me with this?
Thanks nikola , yours code works
But when i make changes in api.php it does not reflect in output like from echo “Server returns” to echo “echo server sending back”.. It seems that project does not rebuild itself after making changing and saving
Where are you changing the api.php? In the code I provided? Then surely it can’t work. For that to work, you need to set up your own server and host the api.php file there.
Hi Nilola
In the home.ts file i have changes your code “var link = ‘http://nikola-breznjak.com/_testings/ionicPHP/api.php’;” to “var link = ‘/home/api.php’;” and then in the api.php file typed the test msg echo “hello”. But on submitting submit button it does not show any changes in output
it seems that my api.php file is not called on clicking submit button.
Do you have a local web server running, for serving this api.php file?
This works well. Thanks Nikola
Great, glad it worked!
how to post file formated data.
What have you tried so far?
Nice example well done thanks a lot
how can i display the array values….
What have you tried so far?
It worked, excellent! Thank you so much 😀
You’re welcome ?
My hosting service does not support. What hosting service do you use?
I always get No ‘Access-Control-Allow-Origin’ and it turns out that my service turns off the function for the app.
I use my own server (droplet as they call them) on Digital Ocean:
If you use that link, I quote:
bagaimana jika menggunakan web hosting yang mendukung. apakah ada yang dapat digunakan ?
saya mengunggah file server tersebut pada hosting gratis yang saya gunakan.
dan ini merupakan respons dari server.
Failed to load http://mainkosema.epizy.com/server/index.php: No ‘Access-Control-Allow-Origin’ header is present on the requested resource. Origin ‘http://localhost:8100’ is therefore not allowed access.
home.ts:27 Oooops!
and this is response from network on dev tools.
This site requires Javascript to work, please enable Javascript in your browser or use a browser with Javascript support.
could you like to help. because i don’t understand VPS.
what if using web hosting that supports. can anyone use it?
I uploaded the file server on the free hosting that I used.
and this is a response from the server.
Failed to load http://mainkosema.epizy.com/server/index.php: No ‘Access-Control-Allow-Origin’ header is present on the requested resource. Origin ‘http://localhost:8100’ is therefore not allowed access.
home.ts:27 Oooops!
and this is response from network on dev tools.
This site requires Javascript to work, please enable Javascript in your browser or use a browser with Javascript support.
could you like to help. because i don’t understand VPS.
Hello, Can this work on JOOMLA?
I’ll go with no on this question. What are you trying to achieve?
Hi Nikola! The app works perfectly , but when I try to echo $postadata in php file, it doesn’t return anything and I really need to read its value.. How can I do?
Can you share the exact code that you wrote?
I had to use the same session not to try to access data from another php.. thanks the same!
Thank you Sir, it’s really helpful.
I’m glad it helped ?
Nice, Do you have any experience with stripe in ionic???
Sure.
Oh good.. Actually I have a stripe token in ionic 3. I want to charge it. Can you please help me?
Could you explain this in a bit more details?
Actually, I am working with Ionic and Woocommerce. And, I done everything in my app. I want to integrate stripe payment with my app. And I already have a token. I want to charg my token. Can you please help, how can I do that??
What have you tried so far, what’s the blocker that you’re getting into?
Please check your mail ( that you provided in this site ) now.
Thank you, you save my day. Its working on ionic 4
Thanks heaps! You’ve gained a comment in my code. 😀
This has been the only ionic 3 example I’d found that was working without giving be untraceable errors.