Nikola Brežnjak blog - Tackling software development with a dose of humor
  • Home
  • Daily Thoughts
  • Ionic
  • Stack Overflow
  • Books
  • About me
Home
Daily Thoughts
Ionic
Stack Overflow
Books
About me
  • Home
  • Daily Thoughts
  • Ionic
  • Stack Overflow
  • Books
  • About me
Nikola Brežnjak blog - Tackling software development with a dose of humor
Quick tips

How to stop and remove MySQL server on a Mac but keep the client

Remove MySQL server on a Mac

The other day I wanted to run some project via Docker Compose. Surprisingly, the MySQL service defined normally like this:

mysql:
       image: tutum/mysql
       env_file:
         - docker.env
       ports:
         - "3306:3306"

didn’t start, because I apparently had MySQL server already running locally.

Trust me, I tried everything from this StackOverflow post but any time I tried to kill the process (that I saw is running with ps aux | grep mysql) it would spun back up.

Then, I remembered that I installed MySQL server some time ago via the app called MAMP. I went in and removed all of that and also I found one post that I’ll paste here (full credit to Vitor Britto):

# Remove MySQL completely

1. Open the Terminal
2. Use `mysqldump` to backup your databases
3. Check for MySQL processes with: `ps -ax | grep mysql`
4. Stop and kill any MySQL processes
5. Analyze MySQL on HomeBrew: 

    ```
    brew remove mysql
    brew cleanup
    ```

6. Remove files: 

    ```
    sudo rm /usr/local/mysql
    sudo rm -rf /usr/local/var/mysql
    sudo rm -rf /usr/local/mysql*
    sudo rm ~/Library/LaunchAgents/homebrew.mxcl.mysql.plist
    sudo rm -rf /Library/StartupItems/MySQLCOM
    sudo rm -rf /Library/PreferencePanes/My*
    ```

7. Unload previous MySQL Auto-Login: 

    ```
    launchctl unload -w ~/Library/LaunchAgents/homebrew.mxcl.mysql.plist
    ```

8. Remove previous MySQL Configuration: 

    ```
    subl /etc/hostconfig` 
    # Remove the line MYSQLCOM=-YES-
    ```

9. Remove previous MySQL Preferences: 

    ```
    rm -rf ~/Library/PreferencePanes/My*
    sudo rm -rf /Library/Receipts/mysql*
    sudo rm -rf /Library/Receipts/MySQL*
    sudo rm -rf /private/var/db/receipts/*mysql*
    ```

10. Restart your computer just to ensure any MySQL processes are killed
11. Try to run mysql, **it shouldn't work**

Keep the MySQL client for interacting with the MySQL databases

At this point, I removed everything related to MySQL, but I still needed the client to connect to the MySQL database that I ran with Docker Compose.

The fastest way (that I’ve found in this StackOverflow post) to install the client without installing the server was to install MySQLWorkbench and then add this to your path (I put these in my .zshrc file; you may use .bashrc):

export PATH=$PATH:/Applications/MySQLWorkbench.app/Contents/MacOS

Of course, the path may vary for you in case you’ve installed it in some other location. Anyway, hope this helps someone… ?

How to stop and remove #MySQL server on a Mac but keep the client https://t.co/0vtuBgOqMD

— Nikola Brežnjak (@HitmanHR) May 11, 2017

Miscellaneou$, Quick tips

Gitflow – a successful Git branching model

edit 14.4.2017: I made a 2.5k+ word post about Gitflow, Pull Requests and Code Reviews which goes way deeper in the topic. The post is here if you want to check it out: Git branching done right with Gitflow & improving code quality with code reviews.

Before I started working on my newest project, I took the time to finally delve into the proper way of doing branching. Not long into the research gitflow popped up as the more/less something that community loves.

After checking it out, I’m amazed how awesome this is.

So, first things firs; the original article was written by Vincent Driessen: A successful Git branching model goes into the details of this workflow.

Later I found out that community built the git-flow command line program that provides high-level repo operations for Vincent Driessen’s branching model.

Tutorial

  • 15min video

Installation

Simple brew install git-flow if you’re on Mac.

Git-flow command completion

Use tabs to auto-complete the git-flow commands: https://github.com/bobthecow/git-flow-completion. Completions available for both bash and zsh.

Gitflow – a successful Git branching model https://t.co/1ecyQ5qlTd

— Nikola Brežnjak (@HitmanHR) June 14, 2016

Quick tips

Your Apple Developer Program membership has expired

TL;DR: If your Apple Developer Program expires then your apps are taken off the App Store as well 1415131129_smiley-evil

So the other day I got an email from Apple saying that:

You are no longer a member of the Apple Developer Program and any apps you had on the App Store or Mac App Store are no longer available. Renew your membership to reinstate your apps for download, submit new apps, and get personal technical support.

I’ll be honest and tell you that I initially thought that you can’t upload any new apps if you don’t have a Developer Account since that seemed totally logical. However, I didn’t think that they would also take down any existing apps that you have in the App Store.

Ah, dear Apple, live and learn I guess…

Your #Apple Developer Program membership has expired https://t.co/19pv6Rg3du pic.twitter.com/8cFO73c4x9

— Nikola Brežnjak (@HitmanHR) February 13, 2016

PHP, Quick tips

M is not for minutes in PHP date function

Ah, it was one of those days when you’re too smart for your own good and you don’t check the docs and falsely assume that m must definitely be minutes in the date function in PHP.

It should be

$dateNow = date("Y-m-d H:i:s");

and not H:m:i!

The offcial docs are clear, one just needs to read them 🙂

Quick tips

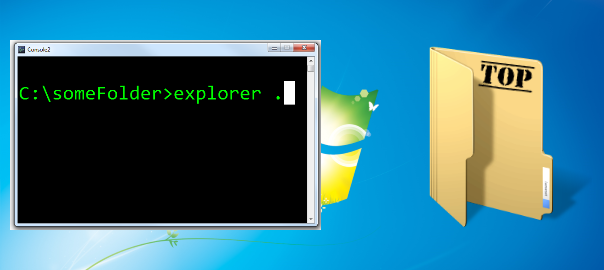
How to open current folder in Explorer from Command prompt on Windows

To open current folder in Explorer from Command prompt on Windows use the following command:

explorer .

The dot (.) represents the current directory.

This is usually useful for when you’re using Command prompt (or any other you prefer, like Console2 for example) to navigate through your folders but then you need to open the current one for some reason in the Explorer.

You also may want to check out How to open current folder in Finder from Terminal on Mac OS X.

Quick tips

How to open current folder in Finder from Terminal on Mac OS X

To open current folder in Finder from Terminal on Mac OS X use the following command:

open .

The dot (.) represents the current directory.

This is usually useful for when you’re using Terminal (or any other you prefer, like iTerm2 for example) to navigate through your folders but then you need to open the current one for some reason in the Finder application.

You also may want to check out how to open current folder in Explorer from Command prompt on Windows.

CodeProject, Quick tips, Wordpress

How to add excerpts to your WordPress blog homepage in a TwentyThirteen theme and not break the Codeproject importer

As you may know, CodeProject has a thing called Technical blogs which lets you publish your post on their site too, and thus widening the range of potential readers.

Thanks to a great plugin by hjgode you can automatically import your posts.

However, recently I wanted just to show excerpts of the posts on my blog homepage and in the archives. The problem was that that stopped the importer from collecting the posts that are marked with the codeproject category because the posts were too short according to their rules (1000 words minimum).

I solved this in my  TwentyThirteen theme by doing slight changes in content.php (around line 33), which by default looks like this:

<?php if ( is_search() ) : // Only display Excerpts for Search ?>

This line displays excerpts only on a search page, and to show excerpts on homepage I did:

<?php if ( is_search() || is_home() ) :  ?>

You just have to make sure that you don’t include the

is_category()

and you’re all set.

True, you could further optimize this in a way that you would show excerpts for all other categories except “codeproject”.

Quick tips

How to add a subdomain for Nodejs application on DigitalOcean

When I was preparing this post I bought a domain just for testing purposes called nikola-dev.com and I wanted to have Node.js apps running on this VPS (behind a NGINX running as proxy) but that they would be accessible from different domains (for example mean.nikola-dev.com). Below are the steps I needed to take in order to make this happen:

  1. Clearly, have a droplet on DigitalOcean
  2. Buy a domain (where ever you buy it, make sure you use Honey, to get the best price)
  3. Edit the Nameserver information in the admin dashboard of your domain provider (where you bought the domain) to the following three records:
    ns1.digitalocean.com, ns2.digitalocean.com, ns3.digitalocean.com
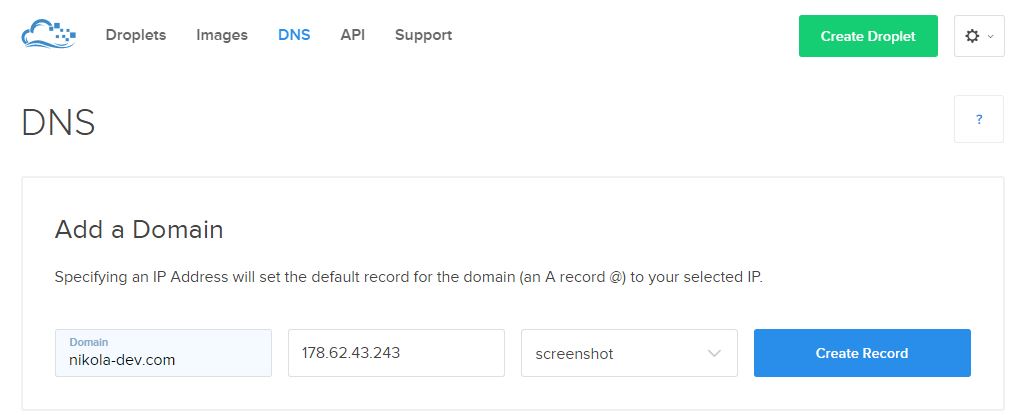
  4. Add the domain on DigitalOcean DNS settings page:
    digitalOcean_dns
  5. Delete /etc/nginx/sites-enabled/default
  6. Create /etc/nginx/sites-available/nikola-dev.com file with the following content (this will be a simple single HTML file which will list the available test apps on this server):
    server {
        listen 80;
        server_name nikola-dev.com;
        root /var/www/nikola-dev.com/public_html;
    }
  7. Create /etc/nginx/sites-available/mean.nikola-dev.com file with the following content (this will serve the actual Node.js app that we’re building in this tutorial):
    server {
        listen 80;
    
        server_name mean.nikola-dev.com;
    
        location / {
            proxy_pass http://127.0.0.1:3000;
            proxy_http_version 1.1;
            proxy_set_header Upgrade $http_upgrade;
            proxy_set_header Connection 'upgrade';
            proxy_set_header Host $host;
            proxy_cache_bypass $http_upgrade;
        }
    }
  8. Restart NGINX:
    sudo service nginx restart

Clearly, if you would need to add more subdomains, just repeat the steps from step 6 onward. Of course, you would need to put your other Node.js apps on different ports, since only one app can work on one port.

NodeJS, Quick tips

Using nginx as a reverse proxy in front of your Node.js application

This is a straight to point short tutorial on how to set up NGINX as a reverse proxy in front of a Node.js application, and although this is not mandatory, there are several benefits of doing so, as answered in this Stack Overflow question:

  • Not having to worry about privileges/setuid for the Node.js process. Only root can bind to port 80 typically. If you let nginx/Apache worry about starting as root, binding to port 80, and then relinquishing its root privileges, it means your Node app doesn’t have to worry about it.
  • Serving static files like images, CSS, js, and HTML. Node may be less efficient compared to using a proper static file web server (Node may also be faster in select scenarios, but this is unlikely to be the norm). On top of files serving more efficiently, you won’t have to worry about handling eTags or cache control headers the way you would if you were servings things out of Node. Some frameworks may handle this for you, but you would want to be sure. Regardless, still probably slower.
  • More easily display meaningful error pages or fall back onto a static site if your node service crashes. Otherwise users may just get a timed out connection.
  • Running another web server in front of Node may help to mitigate security flaws and DoS attacks against Node. For a real-world example, CVE-2013-4450 is prevented by running something like Nginx in front of Node.

So, with being convinced that having NGINX in front of Node.js application is a good thing, following are the steps on how to install and configure it.

First, update the apt-get package lists with the following command:

sudo apt-get update

Then install NGINX using apt-get:

sudo apt-get install nginx

Now open the default server block configuration file for editing:

sudo vi /etc/nginx/sites-available/default

and add this to it:

server {
    listen 80;

    server_name meantodo.com;

    location / {
        proxy_pass http://127.0.0.1:1337;
        proxy_http_version 1.1;
        proxy_set_header Upgrade $http_upgrade;
        proxy_set_header Connection 'upgrade';
        proxy_set_header Host $host;
        proxy_cache_bypass $http_upgrade;
    }
}

This configures the web server to respond to requests at its root. Assuming our server is available at http://meantodo.com, accessing it via a web browser would send the request to the application server’s private IP address on port 1337, which would be received and replied to by the Node.js application.

Once you’re done with the setting you have to run the following command which will restart NGINX:

sudo service nginx restart

You can learn more about additional NGINX setting from quite a load of tutorials.

Quick tips

How to market your app as an indie developer

A video worth watching if you’re wondering how you should market your App. Also, a cool link I just stumbled upon today is the one on GitHub: App launch guide.

Btw, if you too like to increase your video playback speed, and you miss that in vimeo videos, check this post out to resolve this issue.

Page 2 of 4«1234»

Recent posts

  • Discipline is also a talent
  • Play for the fun of it
  • The importance of failing
  • A fresh start
  • Perseverance

Categories

  • Android (3)
  • Books (114)
    • Programming (22)
  • CodeProject (35)
  • Daily Thoughts (77)
  • Go (3)
  • iOS (5)
  • JavaScript (127)
    • Angular (4)
    • Angular 2 (3)
    • Ionic (61)
    • Ionic2 (2)
    • Ionic3 (8)
    • MEAN (3)
    • NodeJS (27)
    • Phaser (1)
    • React (1)
    • Three.js (1)
    • Vue.js (2)
  • Leadership (1)
  • Meetups (8)
  • Miscellaneou$ (77)
    • Breaking News (8)
    • CodeSchool (2)
    • Hacker Games (3)
    • Pluralsight (7)
    • Projects (2)
    • Sublime Text (2)
  • PHP (6)
  • Quick tips (40)
  • Servers (8)
    • Heroku (1)
    • Linux (3)
  • Stack Overflow (81)
  • Unity3D (9)
  • Windows (8)
    • C# (2)
    • WPF (3)
  • Wordpress (2)

"There's no short-term solution for a long-term result." ~ Greg Plitt

"Everything around you that you call life was made up by people that were no smarter than you." ~ S. Jobs

"Hard work beats talent when talent doesn't work hard." ~ Tim Notke

© since 2016 - Nikola Brežnjak