Nikola Brežnjak blog - Tackling software development with a dose of humor
  • Home
  • Daily Thoughts
  • Ionic
  • Stack Overflow
  • Books
  • About me
Home
Daily Thoughts
Ionic
Stack Overflow
Books
About me
  • Home
  • Daily Thoughts
  • Ionic
  • Stack Overflow
  • Books
  • About me
Nikola Brežnjak blog - Tackling software development with a dose of humor
Miscellaneou$

Learn Git fast as if your job depends on it

Update: Fancy a video course? I made my first one on Skillshare, go check it out.

TL;DR

In this post, with a grain of humor, I’m going to show you the minimum number of Git commands that you need to learn in order to start being productive and get that code from your machine to the company Git server. Also, I’ll cover a bit of theory and Git installation as well.

Disclaimer

⚠️ Nobody in this story, and no outfit or corporation, thank God, is based upon an actual person or outfit in the real world. But I can tell you this; as my journey through the software jungle progressed, I came to realize that, by comparison with the reality, my story was as tame as a holiday postcard. ~ John le Carré

Setting the stage

So, let’s set a scene; it’s your first day as a junior developer straight out of college. You get to work, greet your superior that’s supposed to be responsible for you, and since he’s too busy with putting down some fire that just popped up, he, conversely, while you’re trying to keep up walking aside him tells you something like:

I’ve set the Git access for you to my website project.

You have a ticket in our project management tool assigned to you. No worries, it’s just some simple stuff that needs to be changed.

Just check the email details, and you can start immediately.

I’m aware that you may not be familiar with Git. I’m not trying to be an asshole, but just deal with it, learn it, OK? Don’t they, like, teach you kids nothing in school these days?

Ah, I gotta run.

Oh, and one more thing, look up branching and do not EVER, and I repeat – EVER, commit to master; do a PR instead! Good luck and see ya later!

OK. You sit down at your cubicle, open up your email client, log in, and there you see the email (without the subject line, of course) with the contents:

Here’s a link to the Git repo on Github.

Good luck,
Mr. Superior

Reality sets in

⚠️ This, in and of itself is a poor onboarding if you ask me, but I personally have seen it way too many times, so here are the things you need to do to get productive fast and learn the ropes as fast as you can.

So now you’re, in lack of better words, screwed (you know the exact word, but we’re not supposed to be using profanity here, ae?).

You’re lost. You heard about Git before, but you never used it. Now you’re kicking yourself for not learning it properly yourself. But, it is what it is, and since you’re really determined to make it in this ‘programming’ world, you’re ready to do what it takes.

I would question the fact that if you are ‘so into it’, how come you haven’t learned it yet, but as Mr. Superior said, I’m not trying to be an asshole ?

Therefore, buckle up young padawan, you’re in for a ride!

What is this Git thing?

First, let me start off with a few problems:

  • Say you’re writing a seminar and you make some changes, save them, go out of the text editor, come back, and you want to see all of your changes that you did last in the file. Or, for example, you want to undo some changes that you did last night (writing a seminar after returning from a party is a noble act, but not a very smart one!).
  • While writing this seminar you create several versions of the same file and you don’t even know what’s changed in which version; you would really love to know what was, for example, changed in this current version based on the, say, a version from a few days ago.
  • You’re working on a group project and someone deletes your changes ‘by accident’.

VCS (Version Control Systems) tends to solve these problems. And, let me start off by saying that no, you don’t need to use VCS only for writing code (thus the seminar example). You can use it for any textual project. One of VCS solutions is Git. One other popular VCS, that’s still used to some extent today is Subversion. You can see a detailed list of Version Control Systems here.

Git was made by the ever so slightly genius Linus Torvalds, the father of Linux:

Git is a distributed version control system (VCS).

Version control means that you use it to store versions of your documents. True, it seems it’s very popular among developers, but designers and other people (that are a bit more tech savvy) also use it to track versions of their files.

This whole distributed part is one of the things that makes it different from other VCS. Rather than have only one single place for the full version history of the software, as is common in once-popular VCS like CVS or Subversion, in Git every developer’s working copy is also a repository that can contain the full history of all changes.

OK, but what is Github?

Something like Dropbox, but customized for Git.

Github is a hosting service for Git projects, with some additional batteries included that we’re not going to get into at this point, as you’re short on time. Think of it as a place where you store your Git ‘stuff’.

Installing Git

To install Git, go to the official website and download the executable for your machine. I’m not going into the installation details as they’re really just a bunch of Next, Next, Next, yes to malware, Finish set of steps. I’m kidding about the malware OFC.

To make sure your installation was successful, run the following command in your Terminal/Command prompt:

git --version

You should get something like:

git version 2.10.1

Fetching the repo

OK, so let’s finally get some action. In your email, you received an URL to the Git repository. It was this: https://github.com/Hitman666/MrSupervisorWebsite. You click the link, and you see something like this:

Click the Clone or download button, make sure you see the Use SSH in the top right corner of a popup and copy the link.

To get this repository to your computer, you have to execute the following command in your Terminal/Command prompt (I’ll use Terminal in the rest of the post):

git clone https://github.com/Hitman666/MrSupervisorWebsite.git

The output of the command should look something like this:

Cloning into 'MrSupervisorWebsite'...
remote: Counting objects: 7, done.
remote: Compressing objects: 100% (4/4), done.
remote: Total 7 (delta 0), reused 7 (delta 0), pack-reused 0
Receiving objects: 100% (7/7), done.

Checking out the code

Now, go into the newly created MrSupervisorWebsite folder and open it in your editor.

You should see three files: index.htmnl, style.css, and README.md.

You quickly go and click to open the README.md file, but all you see is this:

# MrSupervisorWebsite

Hmm, so, no help there.

You open up the index.html file and you see:

<!DOCTYPE html>
<html lang="en">
<head>
    <meta charset="UTF-8">
    <meta name="viewport" content="width=device-width, initial-scale=1.0">
    <meta http-equiv="X-UA-Compatible" content="ie=edge">
    <title>MrSupervisorWebsite</title>
    <link rel="stylesheet" href="style.css">
</head>
<body>
    <h1 class="title">Welcome to MrSupervisorWebsite!</h1>
</body>
</html>

OK, finally something that you’re familiar with! You also open up the style.css file, and you see:

.title {
    color: blue;
}

Next, you take a look at the ticket assigned to you in the project management tool that Mr.Superior mentioned, and it looks something like:

You take a deep breath, finally something that you know how to handle! ?

You’re a bit taken aback by the ‘manly color’, so you go and ask Google:

You pick the 4872A2, and you’re happy. You think to yourself: OK, now I just need to change this color in the style.css file, somehow add this to this Git thing and ‘publish’ it.

You’re right, but not so fast! You remember that note from Mr.Supervisor that you shouldn’t commit to master, EVER?

Creating a new branch

So, what is this master anyway? You go online, and you find that:

Git has branches, and its main one is called master. You can create as many of them as you want, based on any other existing one.

Also, you read a bit about the PR, and you learn that:

PR is short for Pull Request. Pull requests let you tell others about changes you’ve pushed to a repository on GitHub. Once a pull request is opened, you can discuss and review the potential changes with collaborators and add follow-up commits before the changes are merged into the repository.

So, this is smart, right? You can add your code to the Git repo without breaking any existing stuff on the master branch, and through this PR you can then ask a more experienced developer to do a CR (code review) on your PR and accept it or not.

You’re smart; you see the huge benefit of this vs. just committing something to master and potentially breaking something in production.

Now, to circle back a bit and explain how could it be that you would break something!? Well, there’s a thing called CI (Continuous Integration) and CD (Continuous Deployment), and you can read more about it, but in essence, it’s this:

Every time someone pushes a new commit to master branch, a whole set of deploy scripts are being triggered, and essentially the new code that’s pushed is going to appear in production.

What this means is that if you change that color and you commit it to master (you’ll learn in a minute how to actually do this commit action), it will ‘automagically’ appear in the production on the website.

⚠️ Of course, the premise is that the service is set like that in the first place.

So, you get the point and value of additional branches, and you create a new branch by executing the following command in your Terminal:

git checkout -b poppingTitle

The upper command is a shortcut for two commands:

git branch poppingTitle
git checkout poppingTitle

The first one creates a new branch called poppingTitle from the current branch that you’re on (in our case that’s master). The second one ‘checks it out’. Meaning, it places you on that branch.

Adding some code

Now you’re finally ready to add some code!

Open up the style.css file, change the color, and save the file. It should look like this now:

.title {
    color: #4872A2;
}

One useful command that you’ll use a lot is git status, which will you tell you the status of your git project. If you execute that in your Terminal you will see that the style.css file was modified:

On branch poppingTitle
Changes not staged for commit:
  (use "git add <file>..." to update what will be committed)
  (use "git checkout -- <file>..." to discard changes in working directory)

    modified:   style.css

no changes added to commit (use "git add" and/or "git commit -a")

As you can see, in the instructions from the output, these changes are not yet added to the commit. To do that, execute the command git add style.css. Of course, if you were to have multiple files you would not have to list each and every one of them, you would just use git add . command.

If you run the git status command again, you’ll see that we have changes that are ready to be committed:

On branch poppingTitle
Changes to be committed:
  (use "git reset HEAD <file>..." to unstage)

    modified:   style.css

Committing code

To commit (one could use words like save or apply here for better clarity) the added changes to your local repository, just run:

git commit -m "Changed the title color"

Of course, the commit message can be anything, but please do yourself a favor and write meaningful commit messages.

If you run the git status command again, you’ll see that we have a clean repository:

On branch poppingTitle
nothing to commit, working tree clean

Pushing to a remote repository

So, great, at this point you have the change locally in your repository, but you’d like to get this back to Github (the so-called remote repository, or origin as it’s usually referred to).

For that you have to execute the following command:

git push origin poppingTitle

You should get an output similar to this:

Counting objects: 3, done.
Delta compression using up to 8 threads.
Compressing objects: 100% (2/2), done.
Writing objects: 100% (3/3), 299 bytes | 0 bytes/s, done.
Total 3 (delta 1), reused 0 (delta 0)
remote: Resolving deltas: 100% (1/1), completed with 1 local object.
To github.com:Hitman666/MrSupervisorWebsite.git
 * [new branch]      poppingTitle -> poppingTitle

Doing a PR

If you check Github now, you’ll see that we’ve pushed this new branch:

Now, click on the Compare & pull request button.

Here you can add some comment summarizing your pull request:

Finally, click the Create pull request button.

And now (if we’re playing by the book) someone else from your team would come and review your code. At this point, you could let someone know about this via your Project Management Tool (JIRA, Trello, Leankit, Kanbanflow, etc…) by putting this task/card in the appropriate column.

Your PR is accepted

When the pull request is approved (you get a notification from Github when someone approves or rejects it), you as the author go back to Github and just click on the Merge pull request button, and that’s it:

Finally, click the Delete branch button as it’s a good practice to not keep the merged branches in the remote repo:

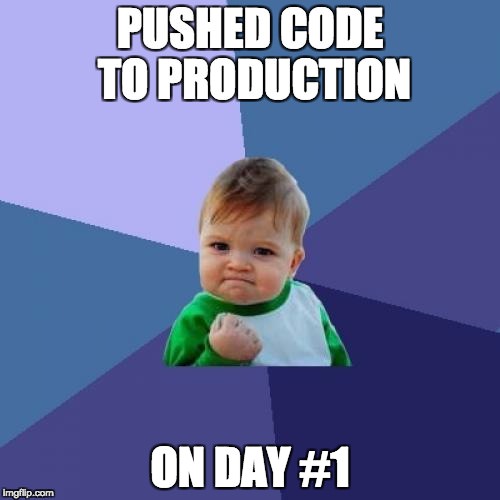
You get to live another day

Your merge to master goes well, it’s auto-deployed, you check the website and all is cool. You update the ticket in your ticketing system by placing it in the ‘Deployed’ column (or some similarly named column).

It’s 17:12, you close your laptop and cheerfully go home to learn more about this awesome Git thingy. ?

Learn #Git fast as if your #job depends on it https://t.co/or1bTBS4Vt

— Nikola Brežnjak (@HitmanHR) December 17, 2017

Miscellaneou$

Ekobit DevArena 2017

TL;DR

In this post, I’ll show you some pictures and notes from the Ekobit DevArena 2017 conference.

Previous conferences

In case you’re interested, here are the posts from the previous three that I attended:

  • DevArena 2016
  • DevArena 2015
  • DevArena 2014

This is how the accreditation looked like on the back side, with the list of presentations per each track (4 in total):

accreditation

Conference oppening

uvod

Awards for fastest signups

This year I got a Kitronik :MOVE mini for BBC micro:bit for making it to the top 10 people who signed up first. Can’t wait to play with this one ?. You can check the other awards here.

nagrada

As always, if you were active on the talks, you could get one of these:

active

Which would then go to the drawing pot, for a chance to win yet another set of great prizes at the end of the conference… 

A great intro presentation by Damir Sabol, the founder of Iskon. Though, you may know him better as the man behind the Microblink company that makes a world know PhotoMath app.

[ngg_images source=”galleries” container_ids=”31″ override_thumbnail_settings=”0″ thumbnail_width=”120″ thumbnail_height=”90″ thumbnail_crop=”1″ images_per_page=”20″ number_of_columns=”0″ ajax_pagination=”0″ show_all_in_lightbox=”0″ use_imagebrowser_effect=”0″ show_slideshow_link=”1″ slideshow_link_text=”[Show as slideshow]” order_by=”sortorder” order_direction=”ASC” returns=”included” maximum_entity_count=”500″ display_type=”photocrati-nextgen_basic_thumbnails”]There were a lot of presentations that covered the ever so slightly eyebrow raising GDPR law ?

[ngg_images source=”galleries” container_ids=”32″ override_thumbnail_settings=”0″ thumbnail_width=”120″ thumbnail_height=”90″ thumbnail_crop=”1″ images_per_page=”20″ number_of_columns=”0″ ajax_pagination=”0″ show_all_in_lightbox=”0″ use_imagebrowser_effect=”0″ show_slideshow_link=”1″ slideshow_link_text=”[Show as slideshow]” order_by=”sortorder” order_direction=”ASC” returns=”included” maximum_entity_count=”500″ display_type=”photocrati-nextgen_basic_thumbnails”]DevOps presentation had a cool intro showing how (fast) Uber solved one problem when Croatian taxi drivers went on strike.

[ngg_images source=”galleries” container_ids=”33″ override_thumbnail_settings=”0″ thumbnail_width=”120″ thumbnail_height=”90″ thumbnail_crop=”1″ images_per_page=”20″ number_of_columns=”0″ ajax_pagination=”0″ show_all_in_lightbox=”0″ use_imagebrowser_effect=”0″ show_slideshow_link=”1″ slideshow_link_text=”[Show as slideshow]” order_by=”sortorder” order_direction=”ASC” returns=”included” maximum_entity_count=”500″ display_type=”photocrati-nextgen_basic_thumbnails”]The discussion on the presentation titled “Worst experiences from working in an agile team” was great with lots of practical input from attendees.

[ngg_images source=”galleries” container_ids=”34″ override_thumbnail_settings=”0″ thumbnail_width=”120″ thumbnail_height=”90″ thumbnail_crop=”1″ images_per_page=”20″ number_of_columns=”0″ ajax_pagination=”0″ show_all_in_lightbox=”0″ use_imagebrowser_effect=”0″ show_slideshow_link=”1″ slideshow_link_text=”[Show as slideshow]” order_by=”sortorder” order_direction=”ASC” returns=”included” maximum_entity_count=”500″ display_type=”photocrati-nextgen_basic_thumbnails”]Challenges of the virtual communication and team work was very valuable for me…

[ngg_images source=”galleries” container_ids=”35″ override_thumbnail_settings=”0″ thumbnail_width=”120″ thumbnail_height=”90″ thumbnail_crop=”1″ images_per_page=”20″ number_of_columns=”0″ ajax_pagination=”0″ show_all_in_lightbox=”0″ use_imagebrowser_effect=”0″ show_slideshow_link=”1″ slideshow_link_text=”[Show as slideshow]” order_by=”sortorder” order_direction=”ASC” returns=”included” maximum_entity_count=”500″ display_type=”photocrati-nextgen_basic_thumbnails”]Standardly awesome Ratko Ćosić was “cooking” this year ?‍?

[ngg_images source=”galleries” container_ids=”36″ override_thumbnail_settings=”0″ thumbnail_width=”120″ thumbnail_height=”90″ thumbnail_crop=”1″ images_per_page=”20″ number_of_columns=”0″ ajax_pagination=”0″ show_all_in_lightbox=”0″ use_imagebrowser_effect=”0″ show_slideshow_link=”1″ slideshow_link_text=”[Show as slideshow]” order_by=”sortorder” order_direction=”ASC” returns=”included” maximum_entity_count=”500″ display_type=”photocrati-nextgen_basic_thumbnails”]All in all, yet another great conference!

Till next time, CODE ON! ?

@DevArena 2017 was great! I got a micro:bit ? ❤️ https://t.co/cBzDjcmWrD

— Nikola Brežnjak (@HitmanHR) October 28, 2017

Miscellaneou$

How to remove a .DS_Store file from a Git repo on a Mac

This is a quick tip on how to remove the pesky .DS_Store file from a Git repository on a Mac.

Sure, you can just put it in the .gitignore file, but what if you’d like to remove the .DS_Store files from your folders?

Well, just use this one-liner in the command line: find . -name '.DS_Store' -type f -delete.

You can use this for other files as well. For example, you could use find . -name '*.js' -type f -delete to delete all JavaScript files within a containing folder.

Ok, but what if you accidentally added the .DS_Store file to your Git repository? In that case, add the .DS_Store to your .gitignore file, but also execute the following command:

find . -name .DS_Store -print0 | xargs -0 git rm -f --ignore-unmatch

That’s all, hope this helps!

How to remove a .DS_Store file from a Git repo on a Mac https://t.co/lLM5RqqiO0

— Nikola Brežnjak (@HitmanHR) October 27, 2017

Miscellaneou$

Become a speed demon

Here are my notes from the Udemy course Become a speed demon by Jonathan Levi. This may change by the time you read this post, but the course is now on a sale for $10, so you may wanna check it out if you’re into ‘this kind of things’.

Proper preparation is key to everything.

Specific
Measurable
Actionable
Realistic
Time related

The checklist manifesto book

The priority Star Exercise:

Parkinson’s Law – work expands to fill the time available for its completion

Efficient != Effective

15 minutes to get back in the optimal zone after distraction

MEDITATE!

Batching tasks – answer emails @ specific time

Buddhist wheel of life: career, money, health, friends and family, romance, personal growth, fun, and recreation, physical environment

Some cool tools/tips:

  • Pomodoro
  • Rescue Time
  • Scheduling meetings with an app
  • TextExpander
  • Dvorak keyboard
  • Typing numbers is faster if you actually speak them
  • Make use of Siri (or another equivalent on your phone)
  • QuickSilver app for Mac
  • Better Touch Tool
  • IFTTT
  • Sleep Cycle App
  • Bill Guard
  • Mint.com
  • Have someone do your laundry
  • TaskWonder, Workerly, Fiverr

Decision fatigue leads to ego depletion.

Too many options make us miserable.

Sorry I’m so direct, but I’m sure you’re very busy.

Maker vs. Manager time

Become a #speed demon https://t.co/cAfQ8MYpFm

— Nikola Brežnjak (@HitmanHR) August 8, 2017

Miscellaneou$

Get free stickers from dev.to

This is just a quick post to say thank you to the dev.to community for sending me these awesome new stickers and a T-shirt. This way my ‘old’ laptop got even more crowded and a ‘new’ one is now nicely showing my day to day activities:

Copying and pasting from StackOverflow ?

OK, true, sometimes I answer some questions as well ?

Anyways, make sure to check them out as you too can get these stickers (if you’re into this that is) for free here: http://dev.to/freestickers.

Their community seemed to have liked the post I shared about Git branching done right with Gitflow & improving code quality with code reviews so check it out if it sounds interesting…

Oh, btw, you can see how my Lenovo ? looked like covered with stickers.

Keep your stacks overflowing folks and talk to you soon!

devtoStickers

Got free stickers thanks to @ThePracticalDev https://t.co/Jg2L5ZabL7

— Nikola Brežnjak (@HitmanHR) June 27, 2017

Miscellaneou$

Weblica 2017

This was the 3rd Weblica conference in my Međimurje county (I wrote about the first one here and about the second one here).

Again, the entrance was free and every attendee got a nice T-Shirt (best design so far if you ask me), loads of stuff to eat and drink. The talks were interesting and informative, and for all this a big two thumbs up to the organizers. Also, active participants could get Microsoft keyboards, wireless mouses, USB drives, etc…

I got a mouse 🙂

Here I’ll just add few of the interesting slides from the presentations that I’ve attended. You can check the full program on Weblica’s website.

Conference oppening – Velimir Sanjković

ASP.NET Core i Angular 2 – Ratko Ćosić

[ngg_images source=”galleries” container_ids=”21″ override_thumbnail_settings=”0″ thumbnail_width=”120″ thumbnail_height=”90″ thumbnail_crop=”1″ images_per_page=”20″ number_of_columns=”0″ ajax_pagination=”0″ show_all_in_lightbox=”0″ use_imagebrowser_effect=”0″ show_slideshow_link=”1″ slideshow_link_text=”[Show as slideshow]” order_by=”sortorder” order_direction=”ASC” returns=”included” maximum_entity_count=”500″ display_type=”photocrati-nextgen_basic_thumbnails”]

ASP.NET Core serving JavaScript applications – Dobriša Adamec

[ngg_images source=”galleries” container_ids=”23″ override_thumbnail_settings=”0″ thumbnail_width=”120″ thumbnail_height=”90″ thumbnail_crop=”1″ images_per_page=”20″ number_of_columns=”0″ ajax_pagination=”0″ show_all_in_lightbox=”0″ use_imagebrowser_effect=”0″ show_slideshow_link=”1″ slideshow_link_text=”[Show as slideshow]” order_by=”sortorder” order_direction=”ASC” returns=”included” maximum_entity_count=”500″ display_type=”photocrati-nextgen_basic_thumbnails”]

Lunch

[ngg_images source=”galleries” container_ids=”24″ override_thumbnail_settings=”0″ thumbnail_width=”120″ thumbnail_height=”90″ thumbnail_crop=”1″ images_per_page=”20″ number_of_columns=”0″ ajax_pagination=”0″ show_all_in_lightbox=”0″ use_imagebrowser_effect=”0″ show_slideshow_link=”1″ slideshow_link_text=”[Show as slideshow]” order_by=”sortorder” order_direction=”ASC” returns=”included” maximum_entity_count=”500″ display_type=”photocrati-nextgen_basic_thumbnails”]

Node.js + Docker – Davor Tarandek

[ngg_images source=”galleries” container_ids=”25″ override_thumbnail_settings=”0″ thumbnail_width=”120″ thumbnail_height=”90″ thumbnail_crop=”1″ images_per_page=”20″ number_of_columns=”0″ ajax_pagination=”0″ show_all_in_lightbox=”0″ use_imagebrowser_effect=”0″ show_slideshow_link=”1″ slideshow_link_text=”[Show as slideshow]” order_by=”sortorder” order_direction=”ASC” returns=”included” maximum_entity_count=”500″ display_type=”photocrati-nextgen_basic_thumbnails”]

React – Toni Petrina

[ngg_images source=”galleries” container_ids=”26″ override_thumbnail_settings=”0″ thumbnail_width=”120″ thumbnail_height=”90″ thumbnail_crop=”1″ images_per_page=”20″ number_of_columns=”0″ ajax_pagination=”0″ show_all_in_lightbox=”0″ use_imagebrowser_effect=”0″ show_slideshow_link=”1″ slideshow_link_text=”[Show as slideshow]” order_by=”sortorder” order_direction=”ASC” returns=”included” maximum_entity_count=”500″ display_type=”photocrati-nextgen_basic_thumbnails”]

No Bulls*it Freelancer – Tomislav Kozačinski

[ngg_images source=”galleries” container_ids=”27″ override_thumbnail_settings=”0″ thumbnail_width=”120″ thumbnail_height=”90″ thumbnail_crop=”1″ images_per_page=”20″ number_of_columns=”0″ ajax_pagination=”0″ show_all_in_lightbox=”0″ use_imagebrowser_effect=”0″ show_slideshow_link=”1″ slideshow_link_text=”[Show as slideshow]” order_by=”sortorder” order_direction=”ASC” returns=”included” maximum_entity_count=”500″ display_type=”photocrati-nextgen_basic_thumbnails”]

Demystified Webpack – Andrei Zvonimir Crnković

[ngg_images source=”galleries” container_ids=”22″ override_thumbnail_settings=”0″ thumbnail_width=”120″ thumbnail_height=”90″ thumbnail_crop=”1″ images_per_page=”20″ number_of_columns=”0″ ajax_pagination=”0″ show_all_in_lightbox=”0″ use_imagebrowser_effect=”0″ show_slideshow_link=”1″ slideshow_link_text=”[Show as slideshow]” order_by=”sortorder” order_direction=”ASC” returns=”included” maximum_entity_count=”500″ display_type=”photocrati-nextgen_basic_thumbnails”]

All in all, a great conference and hope to see you next year…

#Weblica 2017 notes @weblica https://t.co/2UooGO7k6R

— Nikola Brežnjak (@HitmanHR) May 29, 2017

Miscellaneou$

This tool will save you tons of typing in Terminal

Even though this may come off as a clickbait title, I’m honestly telling you that this tool will save you lots of time typing in the terminal.

Tell me, how many times you did something like this:

mkdir testProject
cd testProject
mkdir app
cd app
mkdir config
mkdir js
mkdir css
cd js
mkdir vendor
cd vendor
cd ../../../

Let’s assume that you did all that on the ~/Desktop folder; then you’re currently at the ~/Desktop/testProject/ folder.

Now, say you want to go back to the vendor folder to add some other files/folders (or do some other stuff). Naturally, you would write cd app/js/vendor.

What if I tell you that you could achieve the same this by typing something like z vend?

Enter the Z tool. This simple script allows you to do just that – move to some folder without having to type the whole path in.

Just imagine, how many times you found yourself going through the terminal and changing directories and then telling yourself “Wouldn’t it be nice if I could just go back to that directory by just clicking on it (as you can in any GUI tool)?”. Well, now you can.

This cool tool was presented to me by my coworker Shawn Milochik, and I’m using it ever since. Here’s his YouTube video which will show you how to install and run this tool in under 3 minutes.

For the sake of brevity, here are the installation steps:

  • download the z.sh to your local folder (for example /Users/nikola/CoolScripts/z.sh)
  • source it in your .bash_profile or .zshrc config file by adding this line: source /Users/nikola/CoolScripts/z.sh
  • start a new terminal window and make good use of Z

Hope this helps you and saves you some typing time as it does for me ?

This tool will save you tons of typing in Terminal – thanks to @ShawnMilo for showing it to me https://t.co/XPEegWPJRq

— Nikola Brežnjak (@HitmanHR) May 8, 2017

Miscellaneou$

Git branching done right with Gitflow & improving code quality with code reviews

Meetup notes

Last Thursday (06.04.2017) we had our 8th MeCoDe meetup, and this time it was all about Git branching with Gitflow and Code reviews.

This time the presenter was yours truly 🙂 and it seems the topic was quite intriguing as this was our most attended meetup so far

NextGEN Gallery

    ## Presentation By popular demand 🙂 here’s the link to the presentation slides. ## Tutorial I already blogged about Gitflow briefly in this post, but in this one, I’m going to explain a little bit about how to use git from the command line. Then I’ll cover the basic commands that you need to know to be able to work with git. After that, I’ll show how to use gitflow for managing branches, and in the end, I show how to do code reviews. ### Source control I hope that everybody is on board with source control or at least you’re considering to do it. But honestly, I think that everyone these days uses some form of source control. Don’t worry we won’t do any show of hands 😛 ### Git Git is a distributed version control system (VCS). Version control means that you use it to store versions of your documents. True, it seems it’s very popular among developers, but designers and other people (that are a bit more tech savvy) also use it to track versions of their files. This whole distributed part is one of the things that makes it different from other VCS. Rather than have only one single place for the full version history of the software, as is common in once-popular VCS like CVS or Subversion, in Git every developer’s working copy is also a repository that can contain the full history of all changes. This well-spoken gentleman created Git: Of course, he is Linus Torvalds, the creator of Linux. ### So, how do we start? First, make sure you’ve installed Git for your operating system. Then, all you need to do to create your repository is to execute: git init in a certain folder. Let’s do that now; go to your command line and say that on Desktop (yeah, we’re gonna be original) you create a folder called GitflowMeetup. Inside the folder, execute git init. Now we have an empty git repository. ### Adding files Now create a simple README.md file and write something like: # GitflowMeetup I love these meetups! and save the file. One useful command that you’ll use a lot is git status, which will you tell you the status of your git project. If you execute that in your command line (while being in a Git project) you will see that the README.md file is untracked by Git. This file is now not in Git, but how do we tell it to add it? Well, we use the command git add README.md. Of course, if you were to have multiple files you would not have to list each and every one of them, you would just use git add . If you run the git status command again, you’ll see that we have a new file which we’ve added. ### Committing changes To commit the added changes to your local repository, just run: git commit -m "Added the README.md file" Of course, the commit message can be anything, but please do yourself a favor and write some meaningful commit messages. ### Pushing to a remote repo In this example, we’re gonna use Github (Bitbucket and Gitlab are few other popular options that I know of). First, if you don’t have it, create an account on Github. Then, click on the Start a project button on the homepage and select some name for your project. You can leave all other options as they are by default: Since we already created a project locally, we’ll use the second option (...or push an existing) for adding a remote origin: ### Branches Git makes this whole notion of branching very easy. Say we’re on a master branch right now, and we want to try out some new feature based on our master branch: > You just use a simple command to create a new branch and then you do some work there. When you finish a feature, you just merge it back to the master branch.

Let’s do that now; make a new branch: git checkout -b new_feature. This will create a new branch called new_feature out of the master branch (or the branch on which you currently are) and it will check it out (meaning, you’ll be ‘positioned’ in new_feature branch instead of master).

Make some changes to your README.md file, save it and use the following commands to commit the changes in the current branch and merge them back to master:

git add .
git commit -m "New feature changes"
git checkout master
git merge new_feature

Gitflow

Now that you’ve seen how these branches are easy to work with, it shouldn’t come as a surprise that a lot of people came up with their own ways to manage branches.

However, it seems that one of them is quite popular in the community. So, let me introduce you to a popular git branching model called Gitflow by Vincent Driessen:

This picture is a mess when you look at it for the first time, so let’s go step by step. You have two main branches:

  • master
  • develop

The master branch contains the same exact state of the source code that is currently in production.

All the work happens on the develop branch.

You use the so called feature branches which are created from the develop branch. You can have multiple feature branches.

Then you have a release branch which is branch used to prepare for a new release.

Finally, you have a hotfix branch which is used when, for example, you find some bug in the production code, and you need to fix it #ASAP.

Here’s how one usual workflow would happen with Gitflow in theory:

  • First, you have to have a Git repository
  • Then you would initialize the Gitflow repository
  • You would start developing on a develop branch
  • Then, say you wanna try out a new feature – you would make a new feature branch and do some commits there
  • When done, you would merge back to develop by finishing a feature
  • If you’re happy with your current version and you want to do an update then you would use the release branch. Also, you would do any bug fixing here
  • And, when perfectly done you would finish the release branch which would mean that you would merge to master and back to develop
  • Also, you would tag your master branch at that point

Gitflow – the tool

Now we’re going to do that step by step, but first, you need to make sure you install Gitflow tool (in a lack of a better name for it :)) on your computer. It’s very easy, and for example, on Mac it’s literally a simple brew install git-flow-avh.

So, what’s the difference between Gitflow model and the tool, you ask?? Well, the tool is actually:

a collection of Git extensions to provide high-level repository operations for Vincent Driessen’s branching model

The tool makes your life easier as it executes some repetitive commands so that you don’t have to. For example, when you finish a feature it makes sure that it merges it back to develop and deletes it. Sure, you could follow the Gitflow model yourself, without the Gitflow tool, but this tool saves you some keystrokes and makes sure you don’t miss a step when following the Gitflow model.

There have been scores of posts and tutorials written about Gitflow, but this one has a nice little graphical cheat-sheet which you may want to check out.

As a prerequisite for Gitflow, you need to have a Git repository. Fortunately, if you’ve been a good sport and followed thus far then, you have one ready. Next, you need to init the Gitflow repository by executing:

git-flow init

You will be asked a few questions on which you can answer with a default option. It will just set up branch names following the Gitflow model.

In case git-flow doesn’t exist on your machine try git flow. This depends on how you installed Gitflow tool.

When you’re done with this you can see that you’re on the develop branch. Now, let’s start a new feature by doing:

git-flow feature start new_docs

Next, open up the README.md file and add some new text. Then, commit your changes locally:

git add .
git commit -m "Added new documentation"

And now, since we’re happy with this feature changes, let’s finish the feature:

git-flow feature finish new_docs

This command now did, as you’ll see in your command line output, a few things:

  • it merged the new_docs branch to the develop branch
  • it deleted the new_docs branch locally
  • it checked out out the develop branch so you can continue working

Say now that we’re really happy with our feature, we have tested it on our test servers (I won’t go into this, but some people tend to have continuous deployment set up so that once you push to develop it pushes to the staging server where the testers can check if the feature does what it needs to do) and now we want to make a new release.

First, we have to execute:

git-flow release start 2.0

Here we need to add any last potential fixes, update the version (makes sense when dealing with mobile apps), etc.

When done, we just have to execute:

git-flow release finish 2.0

You will need to add few merge messages and a tag message, but when that is done Gitflow tool will:

  • merge the release branch to master
  • tag the release branch as 2.0
  • merge the release branch to develop
  • delete the release branch
  • check out the develop branch

Collaborators

Even though we might have collaborators on our projects, it so very often feels like this:

In Github, you could add someone that you know to your Collaborators by going to Settings-Collaborators. That way they would get the permission to push to your repository or you could create a team organization on Github for that, and thus on every new project you would be able to choose to what team has (and what kind) access.

Of course, this can work well if you know a person that’s going to be committing to your repo. However, it’s still not a good solution if you ask me because I doubt it that you’d like your junior developers to commit to master without you at least checking the code.

So, there’s a better solution for this which not only solves a problem of people just committing to master but also improves code quality. These are called pull requests and code reviews.

What this means in practice is that you create a new feature branch and submit a so-called pull request on Github requesting that this feature branch is merged into master (or, well, any other branch). Then someone else from the team, be it a lead developer or some other senior developer code reviews your code, gives you some comments and eventually merges it.

Yeah, this seems nice BUT

Trust me; I’ve heard it all. Ranging from

to

You may have even heard that

but the truth is often somewhat in a gray-ish area.

So, will you just give up on this? I’d advise not to and just calculate the time that it will take you to do these code reviews into your estimate of how long a certain feature will take. Sure, I’m aware that it’s easy to say ‘just do it’, but then again if you have a problem with getting some well-formed practices into your team, well, you may need to reconsider some things…

This will not only help you on the long run, but it will also help your team get a sense of code ownership and knowledge sharing and it will help your junior developers get up to speed faster. Besides, last I checked – you (yes, you dear reader) are in for it for a long run; this (programming) is something that you love, and you’re here to master your craft, right?

If you’re still not sold, please read Why code reviews matter (and actually save time!).

Demo or it didn’t happen

Anyways, so now we’re gonna do a demo showing this in practice.

So, let’s create a new feature branch.

git-flow feature start NewFeatureDocs

Repeat the process from before of changing some text and committing your change.

And now we will do something different from before. We will now publish this branch to our remote repo with this command:

git-flow feature publish NewFeatureDocs

If you check Github now, you’ll see that we’ve pushed this new branch.

Now, click on the Compare &amp; pull request button:

Here you can add some comment summarizing your pull request.

And now (if we’re playing by the book) someone else from your team would come and review your code. At this point, you could let someone know about this via your Project Management Tool (JIRA, Trello, Leankit, Kanbanflow, etc…) by putting this task/card in the appropriate column.

When the pull request is approved, you as the author just do: git-flow feature finish NewFeatureDocs in your command line. From this you can see that Github closed the pull request and deleted the branch:

Sure, you could have just accepted the pull request on Github, but then that wouldn’t fit with this whole git-flow workflow.

Other solutions

Few workflows are very well explained here in a graphical way. Also, here is the post about Gitflow vs Github flow in case you’re interested in more learning.

Conclusion

Either way, I’m not saying that the Gitflow workflow is the silver bullet. Nothing is these days. I’m just saying that you probably would benefit if you check what’s out there (truth, OFC, what else ;)).

Anyways, even if you don’t adopt this whole git-flow approach, I urge you to give the pull requests/code reviews a shot and see if it will help you.

Parting wisdom

This image nails it:

A piece of some hard learned advice is to keep your pull requests small in terms of changed code and commit as often as possible.

Otherwise, be prepared for this 😉

Questions !?

I’m far from being an expert on the subject, but in case you have some questions please ping, and I’ll do my best attempt at answering them.

Git branching done right with #Gitflow & improving code quality with #code #reviews https://t.co/1zPbhEDfq4

— Nikola Brežnjak (@HitmanHR) April 14, 2017

Miscellaneou$

Self-Hosted Image Upload and Resize Script in Go

Recently I researched solutions for image upload and resizing, and I’ve looked at a few open source solutions and settled for this one: picfit.

It’s written in Go, it’s simple to set up and use, and it has S3 support out of the box.

The official introduction tutorial is here. However, I’m going to outline my steps here as well since I installed it on my Digital Ocean droplet differently than it’s written in the tutorial.

Installation

I’m using DigitalOcean for all my testing. If you signup using this link you’ll get 10$ which will be enough to run a test ‘droplet’ for two months.

My Droplet runs on Ubuntu, so I installed it by following the official Digital Ocean tutorial:

Install Go

sudo apt-get update
sudo apt-get -y upgrade
sudo curl -O https://storage.googleapis.com/golang/go1.8.linux-amd64.tar.gz
sudo tar -xvf go1.8.linux-amd64.tar.gz
sudo mv go /usr/local

Add Go to the PATH variable

Aappend this line to the ~/.profile file:

export PATH=$PATH:/usr/local/go/bin

Enable terminal to pull new settings

source ~/.profile

Download picfit

  • Create new folder for Go programs: mkdir $HOME/work
  • Set the path to it in the GOPATH variable: export GOPATH=$HOME/work
  • Get picfit via go: go get github.com/thoas/picfit
  • Make a build:
cd ~/work/src/github.com/thoas/picfit
make build
cd bin

Set the configuration

Create the config.json file inside the bin folder:

{
  "port": 3117,
  "storage": {
    "src": {
      "type": "fs",
      "location": "/home/nikola/work/src/github.com/thoas/picfit/bin"
    }
  },
  "kvstore": {
    "type": "cache"
  }
}

Run it

Finally, run picfit with: ./picfit -c config.json

If everything goes fine you should see an output like this:

[GIN-debug] [WARNING] Running in "debug" mode. Switch to "release" mode in production.
 - using env:    export GIN_MODE=release
 - using code:    gin.SetMode(gin.ReleaseMode)

[GIN-debug] GET    /stats                    --> github.com/thoas/picfit/server.Router.func2 (10 handlers)
[GIN-debug] GET    /redirect                 --> github.com/thoas/picfit/views.RedirectView (16 handlers)
[GIN-debug] GET    /redirect/*parameters     --> github.com/thoas/picfit/views.RedirectView (16 handlers)
[GIN-debug] GET    /display                  --> github.com/thoas/picfit/views.DisplayView (16 handlers)
[GIN-debug] GET    /display/*parameters      --> github.com/thoas/picfit/views.DisplayView (16 handlers)
[GIN-debug] GET    /get                      --> github.com/thoas/picfit/views.GetView (16 handlers)
[GIN-debug] GET    /get/*parameters          --> github.com/thoas/picfit/views.GetView (16 handlers)
[GIN-debug] Listening and serving HTTP on :3117

Usage

Copied from the official tutorial:

http://localhost:3117/{method}?url={url}&path={path}&w={width}&h={height}&upscale={upscale}&sig={sig}&op={operation}&fmt={format}

  • path – file path to load the image using your source storage (optional, if you haven’t configured a source storage)
  • method – operation to perform: display, redirect or get
  • sig – signature key which is the representation of your query string and your secret key (optional, if you haven’t configured a secret key)
  • url – url of the image which will be retrieved by HTTP (optional, if path is provided)
  • width – desired width of the image, if 0 is provided the service will calculate the ratio with height
  • height – desired height of the image, if 0 is provided the service will calculate the ratio with width
    upscale — If your image is smaller than your desired dimensions, the service will upscale it by default to fit your dimensions, you can disable this behavior by providing 0 (optional)
  • format – output format to save the image, by default the format will be the source format, for example, a GIF image source will be saved as GIF (optional)

Examples

The links are for your localhost (change to your IP if you’ll be testing this somewhere else):

  • Create smaller image
  • Upscale
  • Don’t upscale

Conclusion

Sure, this solution doesn’t have all the bells and whistles that you may want. But, the awesome thing is that it can extend to your liking.

For example, if you want to add some watermark to a particular image, you could do that (of course, given that you know Go. If not, there are some other solutions for other languages like for example this one for PHP.

If you don’t like messing with your solution, I would recommend you check out Cloudinary (cloudinary.com). It’s a paid solution, but it even has a free tier which you can use for testing, and it has some really advanced image manipulation features.

Do you maybe have some other to recommend?

Self-Hosted #Image Upload and #Resize Script in #Go – https://t.co/Wxh5FMMhHk

— Nikola Brežnjak (@HitmanHR) March 10, 2017

Pluralsight

Notes from Kanban Fundamentals course on Pluralsight

Here are my notes from the very good Pluralsight course Kanban fundamentals by Steve Smith.

  • Kanban = kan (visual) & ban (card)
  • Taiichi Ono from Toyota 1920ies
  • Kanban is about maximizing flow
  • It’s for visualizing work and limiting WIP (work in progress)
  • Little’s Law states that queue length (L) = arival rate * avg. wait time.
  • Cycle time = WIP / Throughput
Lead time vs Cycle time
Ticket created Start work Ticket implemented
Lead time
  Cycle time

Personal Kanban

  • Visualize work
  • Limit WIP

  • Book reference: Personal Kanban

Personal Kanban getting started

  • Gather materials (sticky notes, whiteboard, pens)
  • Establish Value stream (Ready/Doing/Done)
  • Make your backlog explicit (put them on sticky notes, focus on completeness, not organization)
  • Establish WIP limit
  • Begin pulling tasks
  • Reflect

Create a blocked state too – prioritize them and set a WIP on them as well!

Potentially, add a Today column:

  • Important and Urgent matrix by Dwight Eisenhower
  • Quadrant of Kaizen – important but not urgent.

Prioritization lanes:

Kanban for software teams

  • Book Reference: Kanban – Successful Evolutionary Change for Your Technology Business

Usually, the upstream process (UP) would produce as fast as they could without worrying about the downstream process (DP) – this lead to a lot of waste = overproduction.

However, in the pull model, the DP requests more parts, and the UP produces just enough items to keep the store populated with some limited number of parts.

The Kanban Method** Properties

  • Visualize workflow
  • Limit WIP
  • Measure and manage flow
  • Make process policies explicit
  • Use models to recognize improvement opportunities

Recipe for success

  • Focus on quality – reduces defects
  • Reduce WIP – reduces defects as well
  • Deliver often – as that builds trust
  • Balance demand against throughput – don’t accept work at a rate higher than the rate your team produces work. This will yield bottlenecks
  • Prioritize
  • Attack sources of variability to improve predictability –

Microsoft case study 2004:

  • remove estimations
  • limit WIP
  • More frequent cadence

Implementing Kanban

  • Define your process and endpoints
  • Identify types of the workflow
  • Create a card wall
  • Establish and visualize queues/buffers

Examples

Example usage for ‘swimlanes’ (horizontal lines denoting ‘critical’ tasks that eventually happen):

An example of post it notes on the actual physical board in case that’s used.

Online Tools

The author mentioned the following tools:

  • AgileZen
  • LeanKit
  • Trello
  • Targetprocess

However, this list is rather old. Even so much so that at the time Trello was free, and it just got sold yesterday 🙂

I’d like to add one kanban tool that I use for personal usage: https://kanbanflow.com. And one that I’m about to start using, and will write my thoughts about how well is fitting in our workflow after I do some work with it: https://www.blossom.co/.

Conclusion

Very good introduction to Kanban, which may be just as much as you’ll ever need.

My notes from Kanban Fundamentals course on Pluralsight https://t.co/tOQ0Nen0nY

— Nikola Brežnjak (@HitmanHR) January 11, 2017

Page 2 of 8«1234»...Last »

Recent posts

  • Discipline is also a talent
  • Play for the fun of it
  • The importance of failing
  • A fresh start
  • Perseverance

Categories

  • Android (3)
  • Books (114)
    • Programming (22)
  • CodeProject (35)
  • Daily Thoughts (77)
  • Go (3)
  • iOS (5)
  • JavaScript (127)
    • Angular (4)
    • Angular 2 (3)
    • Ionic (61)
    • Ionic2 (2)
    • Ionic3 (8)
    • MEAN (3)
    • NodeJS (27)
    • Phaser (1)
    • React (1)
    • Three.js (1)
    • Vue.js (2)
  • Leadership (1)
  • Meetups (8)
  • Miscellaneou$ (77)
    • Breaking News (8)
    • CodeSchool (2)
    • Hacker Games (3)
    • Pluralsight (7)
    • Projects (2)
    • Sublime Text (2)
  • PHP (6)
  • Quick tips (40)
  • Servers (8)
    • Heroku (1)
    • Linux (3)
  • Stack Overflow (81)
  • Unity3D (9)
  • Windows (8)
    • C# (2)
    • WPF (3)
  • Wordpress (2)

"There's no short-term solution for a long-term result." ~ Greg Plitt

"Everything around you that you call life was made up by people that were no smarter than you." ~ S. Jobs

"Hard work beats talent when talent doesn't work hard." ~ Tim Notke

© since 2016 - Nikola Brežnjak