Nikola Brežnjak blog - Tackling software development with a dose of humor
  • Home
  • Daily Thoughts
  • Ionic
  • Stack Overflow
  • Books
  • About me
Home
Daily Thoughts
Ionic
Stack Overflow
Books
About me
  • Home
  • Daily Thoughts
  • Ionic
  • Stack Overflow
  • Books
  • About me
Nikola Brežnjak blog - Tackling software development with a dose of humor
CodeProject, NodeJS

Raneto Google OAuth login

TL;DR

Raneto allows only basic username/password authentication, so I added Google OAuth support. This option can be turned on by setting the googleoauth option in the config.default.js file to true, and by supplying the OAuth config object as outlined in the guides below. Additionally, you can allow only emails from the certain domain to use the service with one config setting.

The basic idea was taken from the Google Cloud Platform Node.js guide.

This has been submitted as a pull request on the official Raneto Github repository. This is my way of saying thanks to an awesome author of Raneto. edit: 13.09.2016: The pull request was approved and merged!.

Steps on how to reproduce this on fresh copy

Below are the steps one needs to take to get this working on a fresh copy of Raneto. In case this won’t make it to the official repo, you can clone my fork here. Just make sure you set your Google OAuth credentials properly (more about this in the X section).

Install packages via npm

Make sure you first install Raneto dependencies after you clone it.

Install the following packages:

  • npm install passport --save-dev
  • npm install passport-google-oauth20 --save-dev

Editing the app/index.js file

  • Add passport: var passport=require('passport'); just after raneto is required.
  • Add oauth2 middleware: var oauth2= require('./middleware/oauth2.js'); in the config block, just afer error_handler.js middleware.
  • Change secret to secret:config.secret, in the // HTTP Authentication section.
  • >>> Remove the rn-login route app.post('/rn-login', route_login);
  • >>> Remove the logout route: app.get('/logout', route_logout);
  • Add the following Oauth settings, just before the app.post('/rn-login', route_login); line:
// OAuth2
if (config.googleoauth === true) {
app.use(passport.initialize());
app.use(passport.session());
app.use(oauth2.router(config));
app.use(oauth2.template);
}
  • Change the Online Editor Routes to look like this now:
// Online Editor Routes
if (config.allow_editing === true) {
if (config.googleoauth === true) {
app.post('/rn-edit', oauth2.required, route_page_edit);
app.post('/rn-delete', oauth2.required, route_page_delete);
app.post('/rn-add-page', oauth2.required, route_page_create);
app.post('/rn-add-category', oauth2.required, route_category_create);
}
else {
app.post('/rn-edit', authenticate, route_page_edit);
app.post('/rn-delete', authenticate, route_page_delete);
app.post('/rn-add-page', authenticate, route_page_create);
app.post('/rn-add-category', authenticate, route_category_create);
}
}
  • Set the root routes to be like this:
// Router for / and /index with or without search parameter
if (config.googleoauth === true) {
app.get('/:var(index)?', oauth2.required, route_search, route_home);
app.get(/^([^.]*)/, oauth2.required, route_wildcard);
}
else {
app.get('/:var(index)?', route_search, route_home);
app.get(/^([^.]*)/, route_wildcard);
}

Editing the app/middleware/authenticate.js file

Change the res.redirect(403, '/login'); line to be:

if (config.googleoauth === true) {
res.redirect('/login');
}
else {
res.redirect(403, '/login');
}

Editing the app/routes/login_page.route.js file

Add the googleoauth variable to the return object like this:

return res.render('login', {
layout : null,
lang : config.lang,
rtl_layout : config.rtl_layout,
googleoauth : config.googleoauth
});

Add the oauth2.js file

Create a new file oauth2.js in the app/middleware folder with the following content:

// Copyright 2015-2016, Google, Inc.
// Licensed under the Apache License, Version 2.0 (the "License");
// you may not use this file except in compliance with the License.
// You may obtain a copy of the License at
//
// http://www.apache.org/licenses/LICENSE-2.0
//
// Unless required by applicable law or agreed to in writing, software
// distributed under the License is distributed on an "AS IS" BASIS,
// WITHOUT WARRANTIES OR CONDITIONS OF ANY KIND, either express or implied.
// See the License for the specific language governing permissions and
// limitations under the License.

'use strict';

var express = require('express');
var debug = require('debug')('raneto');

// [START setup]
var passport = require('passport');
var GoogleStrategy = require('passport-google-oauth20').Strategy;

function extractProfile (profile) {
var imageUrl = '';
if (profile.photos && profile.photos.length) {
imageUrl = profile.photos[0].value;
}
return {
id: profile.id,
displayName: profile.displayName,
image: imageUrl
};
}

// [START middleware]
// Middleware that requires the user to be logged in. If the user is not logged
// in, it will redirect the user to authorize the application and then return
// them to the original URL they requested.
function authRequired (req, res, next) {
if (!req.user) {
req.session.oauth2return = req.originalUrl;
return res.redirect('/login');
}
next();
}

// Middleware that exposes the user's profile as well as login/logout URLs to
// any templates. These are available as `profile`, `login`, and `logout`.
function addTemplateVariables (req, res, next) {
res.locals.profile = req.user;
res.locals.login = '/auth/login?return=' +
encodeURIComponent(req.originalUrl);
res.locals.logout = '/auth/logout?return=' +
encodeURIComponent(req.originalUrl);
next();
}
// [END middleware]

function router(config) {
// Configure the Google strategy for use by Passport.js.
//
// OAuth 2-based strategies require a `verify` function which receives the
// credential (`accessToken`) for accessing the Google API on the user's behalf,
// along with the user's profile. The function must invoke `cb` with a user
// object, which will be set at `req.user` in route handlers after
// authentication.
passport.use(new GoogleStrategy({
clientID: config.oauth2.client_id,
clientSecret: config.oauth2.client_secret,
callbackURL: config.oauth2.callback,
hostedDomain: config.hostedDomain || '',
accessType: 'offline',

}, function (accessToken, refreshToken, profile, cb) {
// Extract the minimal profile information we need from the profile object
// provided by Google
cb(null, extractProfile(profile));
}));

passport.serializeUser(function (user, cb) {
cb(null, user);
});
passport.deserializeUser(function (obj, cb) {
cb(null, obj);
});
// [END setup]

var router = express.Router();

// Begins the authorization flow. The user will be redirected to Google where
// they can authorize the application to have access to their basic profile
// information. Upon approval the user is redirected to `/auth/google/callback`.
// If the `return` query parameter is specified when sending a user to this URL
// then they will be redirected to that URL when the flow is finished.
// [START authorize]
router.get(
// Login url
'/auth/login',

// Save the url of the user's current page so the app can redirect back to
// it after authorization
function (req, res, next) {
if (req.query.return) {
req.session.oauth2return = req.query.return;
}
next();
},

// Start OAuth 2 flow using Passport.js
passport.authenticate('google', { scope: ['email', 'profile'] })
);
// [END authorize]

// [START callback]
router.get(
// OAuth 2 callback url. Use this url to configure your OAuth client in the
// Google Developers console
'/auth/google/callback',

// Finish OAuth 2 flow using Passport.js
passport.authenticate('google'),

// Redirect back to the original page, if any
function (req, res) {
req.session.loggedIn = true;
var redirect = req.session.oauth2return || '/';
delete req.session.oauth2return;
res.redirect(redirect);
}
);
// [END callback]

// Deletes the user's credentials and profile from the session.
// This does not revoke any active tokens.
router.get('/auth/logout', function (req, res) {
req.session.loggedIn = false;
req.logout();
res.redirect('/login');
});
return router;
}

module.exports = {
extractProfile: extractProfile,
router: router,
required: authRequired,
template: addTemplateVariables
};

This is a changed file based on the Google Node.js official example file. Notable differences are in Google strategy settings which basically load settings from our settings config:

clientID: config.oauth2.client_id,
clientSecret: config.oauth2.client_secret,
callbackURL: config.oauth2.callback,
hostedDomain: config.hostedDomain || '',

We’ll define these settings the config.default.js file now.

Editing the example/config.default.js file

Change/add the following settings:

allow_editing : true,
authentication : true,
googleoauth: true,
oauth2 : {
client_id: 'GOOGLE_CLIENT_ID',
client_secret: 'GOOGLE_CLIENT_SECRET',
callback: 'http://localhost:3000/auth/google/callback',
hostedDomain: 'google.com'
},
secret: 'someCoolSecretRightHere',

Google OAuth2 Credentials

Oauth2 settings (GOOGLE_CLIENT_ID and GOOGLE_CLIENT_SECRET) can be found in your Google Cloud Console->API Manager->Credentials project settings (create a project if you don’t have one yet):

The callback, if testing locally, can be set as shown above (http://localhost:3000/auth/google/callback). The hostedDomain option allows certain domains – for your use case you may want to set this to your domain.

Google+ API

If you get an error like:

Access Not Configured. Google+ API has not been used in project 701766813496 before, or it is disabled. Enable it by visiting https://console.developers.google.com/apis/api/plus/overview?project=701766813496 then retry. If you enabled this API recently, wait a few minutes for the action to propagate to our systems and retry.

Make sure you enable Google+ API for your project:

Adding Zocial CSS

To add support for the nice Zocial social buttons, download this file from their Github repo to the themes/default/public/styles/ folder.

Editing the themes/default/templates/layout.html file

Replace the login form with:

We added two scenarios for when we have Google OAuth enabled (config.googleoauth) and when we don’t (defaulting to the current Raneto behavior).

Editing the themes/default/templates/login.html file

Add zocial reference:

“

Replace the whole form-bottom classed div with the following code:

Same thing here as well. If we have Google OAuth enabled (config.googleoauth) then we show the new Google login button and hide the rest. Otherwise, we default it to the current Raneto behavior.

Testing

Congratulations, you’re done! Now, to test this locally just run the npm start from the root of your project and go to http://localhost:3000 and you should see this:

After logging in, you should see something like this:

Hope this helps someone!

#Raneto Google OAuth login step by step https://t.co/rWnoXFl0LO

— Nikola Brežnjak (@HitmanHR) September 7, 2016

CodeProject, NodeJS

Wrap your web application into an executable with nativefier in a single command

In this post I’ll show you how you can quickly turn any website into an executable with nativefier in a single command.

I just stumbled upon an awesome npm package called nativefier that lets you (as stated by the author):

to easily create a desktop application for any web site with succinct and minimal configuration. Apps are wrapped by Electron in an OS executable (.app, .exe, etc.) for use on Windows, OSX and Linux.

At first I must admit I was a bit sceptical, but I tried it immediately and installed it with:

npm install nativefier -g

And, then I tried it out on my Carcassonne Scoring Board web application (run the command from the command line, OFC):

nativefier http://carcassonne-scoring-board.com/

And sure enough, after just a few seconds I got a response:

C:\Users\Nikola\Desktop>nativefier http://carcassonne-scoring-board.com/
Packaging app for platform win32 x64 using electron v0.36.4
App built to C:\Users\Nikola\Desktop\Nikola Brežnjak's Carcassonne Scoring Board-win32-x64

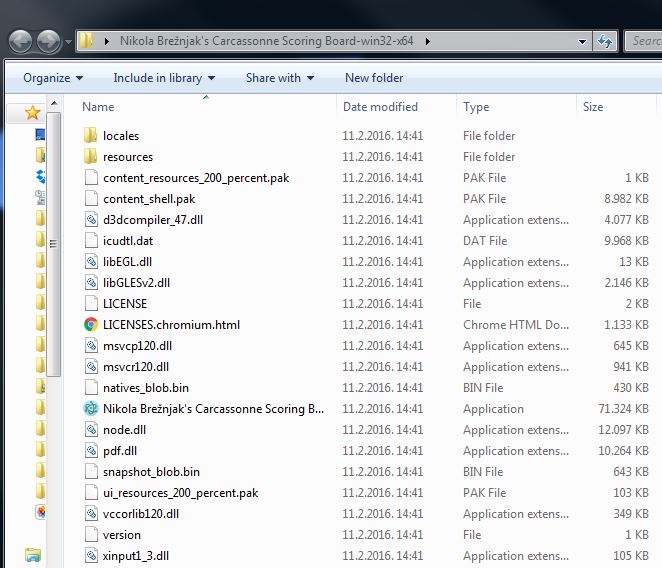
The contents of the created folder looks like this:

nativefier

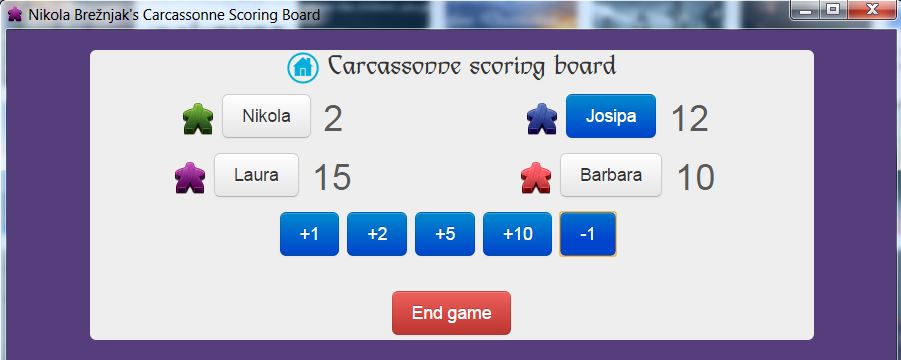
The app (just double click the Application file – has the nice electron logo) looks like this when run:

nativefier-run

and like this in action:
nativefier-action

I’m truly impressed with this and my thanks to the author!

Wrap your #web application into an executable with #nativefier in a single command https://t.co/Y01YDfokGr pic.twitter.com/9iP7AfUrkL

— Nikola Brežnjak (@HitmanHR) February 11, 2016

NodeJS, Stack Overflow

Why am I getting Unexpected token ‘\u0000’ when using npm install -g package

In this StackOverflow question I answered what to do when you get an unexpected token ‘\u0000’ error when using npm install -g to install some package.

profile for Nikola at Stack Overflow, Q&A for professional and enthusiast programmers
I’m a big fan of Stack Overflow and I tend to contribute regularly (am currently in the top 0.X%). In this category (stackoverflow) of posts, I will be posting my top rated questions and answers. This, btw, is allowed as explained in the meta thread here.

As you may know, I’m really into Ionic framework lately and am helping out on StackOverflow with the knowledge I gained so far with the framework. I’m currently #3 in the top All time answerers list.

I answered this question by user Bruce Whealton:

This is probably a Windows specific issue but I haven’t found any information when googling this issue. I had been using ionic framework which relies on Cordova (or Phonegap). However, the problem is not specific to any of these packages. I see this error quite often. So, the error is when I run a command such as the following:

npm install -g cordova

However, I could substitute various other packages and get the same error. I’ll paste the snippet (very brief) below of the error message. What is strange is that I had an ionic project working in that directory earlier. Then today it told me that ionic could not be found. My hunch is that this is a different issue than the main issue I am describing here.

I installed git bash so I do have a linux-like environment that I could try. I would just select Git Bash for a bash window with various bash commands. If there is an easier way to fix this for Windows users, please let me know. I have seen courses on Pluralsight where the instructors seem to be happily using npm with no problems. Also, when I use yeoman, I also at some point, in many cases, get the same error.
The error is

npm ERR! Failed to parse json
npm Unexpected token '\u0000' at 1:1
npm ERR!
npm ERR! ^
npm ERR! File: c:\Users\Bruce\AppData\Roaming\npm-cache\amdefine\1.0.0\package\package.json
npm ERR! Failed to parse package.json data.
npm ERR! package.json must be actual JSON, not just JavaScript.
npm ERR!
npm ERR! This is not a bug in npm
npm ERR! Tell the package author to fix their package.json file. JSON.parse.

Thanks in advance for any help/advice, Bruce

My answer was:

Via this question on SO it could be that you just have to do:

npm cache clean

But, also try the other methods suggested there like adding the registry option:

npm install <packagename> --registry http://registry.npmjs.org/.

Or, if you’ve been mingling with the package.json file by yourself, check if it’s valid.

Why am I getting Unexpected token ‘u0000’ when using #npm install -g package #node https://t.co/mjvmpMKuAT pic.twitter.com/HlqJ5S7PZ5

— Nikola Brežnjak (@HitmanHR) February 9, 2016

Ionic, NodeJS, Stack Overflow

How to run Node.js server in Ionic mobile app?

profile for Nikola at Stack Overflow, Q&A for professional and enthusiast programmers
I’m a big fan of Stack Overflow and I tend to contribute regularly (am currently in the top 0.X%). In this category (stackoverflow) of posts, I will be posting my top rated questions and answers. This, btw, is allowed as explained in the meta thread here.

As you may know, I’m really into Ionic framework lately and am helping out on StackOverflow with the knowledge I gained so far with the framework. I’m currently #1 in the top All time answerers list.

I answered this question by user Shubham:

I am making an app using MEAN and ionic framework where nodejs is a middleware to connect to the database(mongoDb). I need to run the nodejs server using node server.js and the app using ionic serve. This is my server.js.

var express          = require('express'),
app              = express(),
bodyParser       = require('body-parser'),
mongoose         = require('mongoose'),
CohortController =require('./www/server/controller/CohortController');

mongoose.connect('mongodb://localhost:27017/persistent');

app.use(bodyParser());

app.get('/api/cohorts',CohortController.list);
app.post('/api/cohorts',CohortController.create);

app.listen(3000,function(){
console.log('Listening...');
})

Now this is my app.js. I use http://localhost:3000 to get the JSON.

app.controller('CohortController',['$scope','$resource',
  function($scope,$resource){
    var Cohort=$resource('http://localhost:3000/api/cohorts');
    Cohort.query(function(results){
      $scope.cohorts=results;
    });
    $scope.cohorts=[];

    $scope.createCohort= function () {
      var cohort=new Cohort();
      cohort.name=$scope.CohortName;
      cohort.id=$scope.CohortId;
      cohort.$save(function(result){
        $scope.cohorts.push(result);
        $scope.CohortName='';
        $scope.CohortId='';
      });
    }
  }]);

How can I run the node server when I convert it into a mobile application? How the application will use the API?

My answer was:

You will have to have your Node.js app running on a server which you would then access (from your Ionic app) via it’s public IP. So, you wouldn’t use http://localhost:3000 to get the JSON, instead you would use something like http://123.456.789.123:3000.

But, usually, this is not the way you would do it (with the port 3000). What you would additionally do is put (for example) Nginx in front of your Node.js app (see an example here) in order to serve your api from the standard HTTP port (80).

So, basically, you can’t actually “run Node.js server in Ionic app” – the way you do it is run the Node.js app separate from Ionic and expose its functionality via a standardized API (usually these days RESTis what you would want to achieve) which you then “consume” via Ionic’s (well, to be exact, it’s actually Angular’s) $resource module.

Hope this helps clear things up a bit.

How to run #Node.js server in #Ionic mobile app? https://t.co/8SOUYGM3Vf

— Nikola Brežnjak (@HitmanHR) January 12, 2016

NodeJS

How to check for outdated packages via npm

In this post I’ll show you the modules which help in finding the outdated packages via npm. This is an excerpt from the book Deploying Node.js by Sandro Pasquali. I was a technical reviewer for this book and you can read my review here.

This command will list globally installed packages:

npm root -g


This following command will give a full list of other dependencies in a tree list:

npm list --global

There are also some aliases to this command like ls, la. You can learn more about it from the official documentation.


This command will list outdated packages:

npm outdated


A very useful global tool for performing these sorts of checks is npm-check, which delivers more detailed information.  You can install it with npm install npm-check  and run it simply by running npm-check. It tells you what modules are out of date and provides a link to the package’s documentation so you can decide if you want the update.


To remove packages that are installed but no longer listed in package.json file you can use the command npm prune. Note that this is simply a technique for cleaning up the node_modules folder within an individual package’s folder; it is not a smart, global tool for removing unused packages across the entire tree.


The dependency-check module is a great tool for finding unnecessary packages. Once you install it you run it like this:

dependency-check package.json --unused

and, if some modules aren’t used you’ll get a message like:

Fail! Modules in package.json not used in code: express

The entry point to your application has to be listed in package.json, as dependency-check needs to know the root of your application.


The npm dedupe module attempts to reduce the number of redundant package installs, “flattening” the tree, and therefore reducing install time.

How to check for #outdated #packages via #npm #nodejs #node.js https://t.co/bNJ8aiGBmm

— Nikola Brežnjak (@HitmanHR) December 30, 2015

NodeJS, Stack Overflow

Why am I getting Unexpected token ‘\u0000’ when using npm install -g package

profile for Nikola at Stack Overflow, Q&A for professional and enthusiast programmers
I’m a big fan of Stack Overflow and I tend to contribute regularly (am currently in the top 0.X%). In this category (stackoverflow) of posts, I will be posting my top rated questions and answers. This, btw, is allowed as explained in the meta thread here.

I answered this question by user user5148540:

This is probably a Windows specific issue but I haven’t found any information when googling this issue. I had been using ionic framework which relies on Cordova (or Phonegap). However, the problem is not specific to any of these packages. I see this error quite often. So, the error is when I run a command such as the following:

npm install -g cordova

However, I could substitute various other packages and get the same error. I’ll paste the snippet (very brief) below of the error message. What is strange is that I had an ionic project working in that directory earlier. Then today it told me that ionic could not be found. My hunch is that this is a different issue than the main issue I am describing here.

I installed git bash so I do have a linux-like environment that I could try. I would just select Git Bash for a bash window with various bash commands. If there is an easier way to fix this for Windows users, please let me know. I have seen courses on Pluralsight where the instructors seem to be happily using npm with no problems. Also, when I use yeoman, I also at some point, in many cases, get the same error.
The error is

npm ERR! Failed to parse json
npm Unexpected token '\u0000' at 1:1
npm ERR!
npm ERR! ^
npm ERR! File: c:\Users\Bruce\AppData\Roaming\npm-cache\amdefine\1.0.0\package\package.json
npm ERR! Failed to parse package.json data.
npm ERR! package.json must be actual JSON, not just JavaScript.
npm ERR!
npm ERR! This is not a bug in npm
npm ERR! Tell the package author to fix their package.json file. JSON.parse.

Thanks in advance for any help/advice, Bruce

My answer was:

 Via this question on SO it could be that you just have to do:

npm cache clean

But, also try the other methods suggested there like adding the registry option:

npm install <packagename> --registry http://registry.npmjs.org/

Or, if you’ve been mingling with the package.json file by yourself, check if it’s valid.

https://twitter.com/HitmanHR/status/655111949139599364

NodeJS

List globally installed Node.js packages on your machine

To list globally installed Node.js packages on your machine you can run the following command:

ls `npm root -g`

and it will just list globally installed packages, like for example:

drwxr-xr-x   19 nikola  staff   646 May  3 21:07 bower
drwxr-xr-x   29 nikola  staff   986 May 20 20:59 casperjs
drwxr-xr-x    9 nikola  staff   306 Feb 27  2015 compass
drwxr-xr-x   16 nikola  staff   544 Feb  6  2015 cordova
drwxr-xr-x    9 nikola  staff   306 May  1 16:50 express
drwxr-xr-x    8 nikola  staff   272 May  1 16:48 express-generator
drwxr-xr-x   12 nikola  staff   408 Dec 15  2014 forever
drwxr-xr-x   23 nikola  staff   782 Feb 27  2015 generator-angular
drwxr-xr-x    6 nikola  staff   204 Feb 27  2015 generator-gulp-angular

If, however, you use the following command:

npm list --global

it will give you the full list of other dependencies in a tree list, like for example:

├─┬ [email protected]
│ └─┬ [email protected]
│   ├─┬ [email protected]
│   │ └── [email protected]
│   ├── [email protected]
│   ├─┬ [email protected]
│   │ └─┬ [email protected]
│   │   ├── [email protected]
│   │   └── [email protected]
│   └─┬ [email protected]
│     └── [email protected]
├─┬ [email protected]
│ ├── [email protected]
│ ├─┬ [email protected]
│ │ ├── [email protected]
│ │ ├─┬ [email protected]
│ │ │ ├── [email protected]
│ │ │ └── [email protected]
│ │ └── [email protected]
│ ├── [email protected]
│ ├─┬ [email protected]
│ │ ├── [email protected]
│ │ └── [email protected]
│ ├── [email protected]

List #globally installed #Node.js #packages on your machine http://t.co/vdUvLbUZe6

— Nikola Brežnjak (@HitmanHR) September 27, 2015

NodeJS

npm ERR! peerinvalid The package node-inspector does not satisfy its siblings’ peerDependencies requirements

Recently I was reinstalling ionic and cordova with:

npm install -g cordova ionic

but I got the following error:

    E:\IonicTesting>npm install -g cordova ionic
    npm WARN engine [email protected]: wanted: {"node":"~0.10.x"} (current: {"node":"0.12.7","npm":"2.11.3"})
    npm WARN engine [email protected]: wanted: {"node":">=0.6","npm":"1"} (current: {"node":"0.12.7","npm":"2.11.3"})
    npm WARN engine [email protected]: wanted: {"node":"0.8.x || 0.10.x"} (current: {"node":"0.12.7","npm":"2.11.3"})
    npm WARN engine [email protected]: wanted: {"node":"~0.10.x"} (current: {"node":"0.12.7","npm":"2.11.3"})
    npm WARN engine [email protected]: wanted: {"node":">=0.6","npm":"1"} (current: {"node":"0.12.7","npm":"2.11.3"})
    npm WARN installMany normalize-package-data was bundled with [email protected], but bundled package wasn't found in unpacked tre
    e
    C:\Users\Nikola\AppData\Roaming\npm\cordova -> C:\Users\Nikola\AppData\Roaming\npm\node_modules\cordova\bin\cordova
    npm WARN engine [email protected]: wanted: {"node":"0.8.x || 0.10.x"} (current: {"node":"0.12.7","npm":"2.11.3"})
    npm WARN installMany normalize-package-data was bundled with [email protected], but bundled package wasn't found in unpacked tre
    e
    C:\Users\Nikola\AppData\Roaming\npm\ionic -> C:\Users\Nikola\AppData\Roaming\npm\node_modules\ionic\bin\ionic
    npm WARN unmet dependency C:\Users\Nikola\AppData\Roaming\npm\node_modules\generator-ionic requires cordova@'^4.2.0' but
     will load
    npm WARN unmet dependency C:\Users\Nikola\AppData\Roaming\npm\node_modules\cordova,
    npm WARN unmet dependency which is version 5.1.1
    npm ERR! Windows_NT 6.1.7601
    npm ERR! argv "C:\\NodeJS\\\\node.exe" "C:\\NodeJS\\node_modules\\npm\\bin\\npm-cli.js" "install" "-g" "cordova" "ionic"
    
    npm ERR! node v0.12.7
    npm ERR! npm  v2.11.3
    npm ERR! code EPEERINVALID
    
    npm ERR! peerinvalid The package node-inspector does not satisfy its siblings' peerDependencies requirements!
    npm ERR! peerinvalid Peer [email protected] wants node-inspector@~0.7.0
    
    npm ERR! Please include the following file with any support request:
    npm ERR!     E:\IonicTesting\npm-debug.log

At first I thought the reason is that I may have had an older version of node or npm but wasn’t the case because my versions were up to date (date of this post: 03.08.2015):

E:\IonicTesting>node -v
v0.12.7
E:\IonicTesting>npm -v
2.11.3

Also, I did try:

npm update -g

and

npm cache clean

as noted in the few StackOverflow answers, but it didn’t help. After a bit of googling and messing around I realized (an idea came from this StackOverflow answer) that I could try uninstalling the dependencies which were messing with me:

npm uninstall -g node-inspector
npm uninstall -g strong-cli
npm install -g generator-karma

After this I ran

npm update -g

and then, to finally install Ionic and Cordova, I ran:

npm install -g cordova ionic

And, what do you know – it worked. Hope this helps someone!

NodeJS, Quick tips

Using nginx as a reverse proxy in front of your Node.js application

This is a straight to point short tutorial on how to set up NGINX as a reverse proxy in front of a Node.js application, and although this is not mandatory, there are several benefits of doing so, as answered in this Stack Overflow question:

  • Not having to worry about privileges/setuid for the Node.js process. Only root can bind to port 80 typically. If you let nginx/Apache worry about starting as root, binding to port 80, and then relinquishing its root privileges, it means your Node app doesn’t have to worry about it.
  • Serving static files like images, CSS, js, and HTML. Node may be less efficient compared to using a proper static file web server (Node may also be faster in select scenarios, but this is unlikely to be the norm). On top of files serving more efficiently, you won’t have to worry about handling eTags or cache control headers the way you would if you were servings things out of Node. Some frameworks may handle this for you, but you would want to be sure. Regardless, still probably slower.
  • More easily display meaningful error pages or fall back onto a static site if your node service crashes. Otherwise users may just get a timed out connection.
  • Running another web server in front of Node may help to mitigate security flaws and DoS attacks against Node. For a real-world example, CVE-2013-4450 is prevented by running something like Nginx in front of Node.

So, with being convinced that having NGINX in front of Node.js application is a good thing, following are the steps on how to install and configure it.

First, update the apt-get package lists with the following command:

sudo apt-get update

Then install NGINX using apt-get:

sudo apt-get install nginx

Now open the default server block configuration file for editing:

sudo vi /etc/nginx/sites-available/default

and add this to it:

server {
    listen 80;

    server_name meantodo.com;

    location / {
        proxy_pass http://127.0.0.1:1337;
        proxy_http_version 1.1;
        proxy_set_header Upgrade $http_upgrade;
        proxy_set_header Connection 'upgrade';
        proxy_set_header Host $host;
        proxy_cache_bypass $http_upgrade;
    }
}

This configures the web server to respond to requests at its root. Assuming our server is available at http://meantodo.com, accessing it via a web browser would send the request to the application server’s private IP address on port 1337, which would be received and replied to by the Node.js application.

Once you’re done with the setting you have to run the following command which will restart NGINX:

sudo service nginx restart

You can learn more about additional NGINX setting from quite a load of tutorials.

CodeProject, NodeJS

Using PM2 to run your Node.js apps like a pro

Previously I wrote about running Node.js apps with Nodemon and Forever but nowdays I’m using the ever so slightly more professional PM2.

Running your Node.js application by hand is, well, not the way we roll. Imagine restarting the app every time something happens, or god forbid application crashes in the middle of the night and you find about it only in the morning – ah the horror. PM2 solves this by:

  • allowing you to keep applications alive forever
  • reloading applications without downtime
  • facilitating common system admin tasks

To install PM2, run the following command:

sudo npm install pm2 -g

To start your process with PM2, run the following command (once in the root of your application):

pm2 start server.js

As you can see from the output shown on the image below, PM2 automatically assigns an App name (based on the filename, without the .js extension) and a PM2 id. PM2 also maintains other information, such as the PID of the process, its current status, and memory usage.

PM2

As I mentioned before, the application running under PM2 will be restarted automatically if the application crashes or is killed, but an additional step needs to be taken to get the application to launch on system startup (boot or reboot). The command to do that is the following:

pm2 startup ubuntu

The output of this command will instruct you to execute an additional command which will enable the actual startup on boot or reboot. In my case the note for the additional command was:

sudo env PATH=$PATH:/usr/local/bin pm2 startup ubuntu -u nikola

If you want to learn more about the additional PM2 options you can take a look at this post.

Page 1 of 3123»

Recent posts

  • Discipline is also a talent
  • Play for the fun of it
  • The importance of failing
  • A fresh start
  • Perseverance

Categories

  • Android (3)
  • Books (114)
    • Programming (22)
  • CodeProject (35)
  • Daily Thoughts (77)
  • Go (3)
  • iOS (5)
  • JavaScript (127)
    • Angular (4)
    • Angular 2 (3)
    • Ionic (61)
    • Ionic2 (2)
    • Ionic3 (8)
    • MEAN (3)
    • NodeJS (27)
    • Phaser (1)
    • React (1)
    • Three.js (1)
    • Vue.js (2)
  • Leadership (1)
  • Meetups (8)
  • Miscellaneou$ (77)
    • Breaking News (8)
    • CodeSchool (2)
    • Hacker Games (3)
    • Pluralsight (7)
    • Projects (2)
    • Sublime Text (2)
  • PHP (6)
  • Quick tips (40)
  • Servers (8)
    • Heroku (1)
    • Linux (3)
  • Stack Overflow (81)
  • Unity3D (9)
  • Windows (8)
    • C# (2)
    • WPF (3)
  • Wordpress (2)

"There's no short-term solution for a long-term result." ~ Greg Plitt

"Everything around you that you call life was made up by people that were no smarter than you." ~ S. Jobs

"Hard work beats talent when talent doesn't work hard." ~ Tim Notke

© since 2016 - Nikola Brežnjak