Nikola Brežnjak blog - Tackling software development with a dose of humor
  • Home
  • Daily Thoughts
  • Ionic
  • Stack Overflow
  • Books
  • About me
Home
Daily Thoughts
Ionic
Stack Overflow
Books
About me
  • Home
  • Daily Thoughts
  • Ionic
  • Stack Overflow
  • Books
  • About me
Nikola Brežnjak blog - Tackling software development with a dose of humor
Ionic, Stack Overflow

Use Ionic or Cordova?

profile for Nikola at Stack Overflow, Q&A for professional and enthusiast programmers
I’m a big fan of Stack Overflow and I tend to contribute regularly (am currently in the top 0.X%). In this category (stackoverflow) of posts, I will be posting my top rated questions and answers. This, btw, is allowed as explained in the meta thread here.

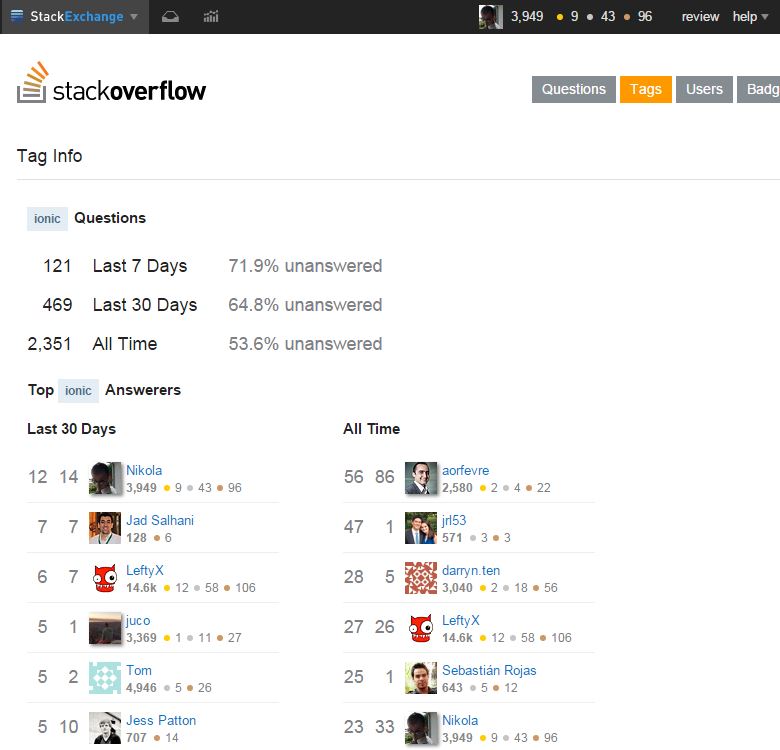
As you may be aware of, lately I’m really into Ionic framework and am helping out on StackOverflow with the knowledge I gained so far with the framework. In the last 30 days, I’m the top answerer in the ionic tag, and am currently #6 All time answerer:

soIonic

I answered this question by user user1365697:

We want to build a simple application that use a lot of videos and images. The application should run on different mobile devices running Andriod and iPhone operating systems. Does Ionic also convert each application to all mobiles options? What do you suggest to use Cordova or Ionic?

My answer was:


Disclamer: This will sound like advertisement, so I have to say I’m in no way affiliated with Ionic, I just happen to like it so much that I’m sharing the love for it.

Ionic is so much more than “just” an UI framework. Ionic allows you to:

  • generate icons and splash screens for all devices and device sizes with a single command: ionic resources. This alone saves you at least a day of image preparing for various sizes.
  • instantly update your apps with code changes, even when running directly on your device with ionic run --livereload
  • build and test iOS and Android versions side-by-side and see changes instantly with ionic serve --lab
  • share your Ionic apps with clients, customers, and testers all around the world without ever going through the App Store with ionic share
  • easily accessing the full native functionality of the device using ngCordova (here you get to use any Cordova plugin – so Ionic is indeed much more than Cordova per se)

Also, they’re building a full-stack backend services and tools for your Ionic app like Deploy (for deploying a new version without going through Apple review process!), Analytics, Push notifications.

Ionic CLI (command line interface) uses Cordova in the backend and allows you to build (directly using Ionic CLI) apps for iOS and Android (you by doing ionic build ios or ionic build androidand woila).

Ionic uses Angular as a frontend framework so if you’re familiar with it it will come as a bonus. They’reworking closely with the Angular 2.0 team too.

All in all, I personally think Ionic has a bright future, so if nothing else – give it a try I bet you’ll like the ease of making an app with it.

Ionic, Stack Overflow

Show Interstitial Ad via AdMob in Ionic every 2 minutes

profile for Nikola at Stack Overflow, Q&A for professional and enthusiast programmers
I’m a big fan of Stack Overflow and I tend to contribute regularly (am currently in the top 0.X%). In this category (stackoverflow) of posts I will will be posting my top rated questions and answers. This, btw, is allowed as explained in the meta thread here.

I actually answered this question by userArlind a:

I’m using AdMob plugin in Ionic and with this code I show an Interstital ad:

function initAd(){

 // it will display smart banner at top center, using the default options
 if(AdMob) AdMob.createBanner( {
                          adId: admobid.banner,
                          bannerId: admobid.banner,
                          position:AdMob.AD_POSITION.BOTTOM_CENTER,
                          autoShow: true,
                          isTesting: false,
                          success: function(){
                          console.log('banner created');
                          },
                          error: function(){
                         console.log('failed to create banner');
                          }
                          } );

                                       window.AdMob.prepareInterstitial( 
                           {adId:admobid.interstitial, autoShow:false} );
    window.AdMob.showInterstitial();

 }

Is there a way to show intersitial ad every 2 minutes? Someone told me to add this:

setInterval(showInterstitial,1*60*1000)

but I don’t know where to add?

My answer was:


If you would like to show it every 2 minutes you should use:

setInterval(window.AdMob.showInterstitial, 2*60*1000);

and you should add it just before the closing bracket of your initAdd function:

function initAd(){


 // it will display smart banner at top center, using the default options
 if(AdMob) AdMob.createBanner( {
                          adId: admobid.banner,
                          bannerId: admobid.banner,
                          position:AdMob.AD_POSITION.BOTTOM_CENTER,
                          autoShow: true,
                          isTesting: false,
                          success: function(){
                          console.log('banner created');
                          },
                          error: function(){
                         console.log('failed to create banner');
                          }
                          } );

                                       window.AdMob.prepareInterstitial( 
                           {adId:admobid.interstitial, autoShow:false} );
    window.AdMob.showInterstitial();


  //!!!add the code here!!! - so, just paste what I wrote above:
  setInterval(window.AdMob.showInterstitial, 2*60*1000);

 }

You can see a simple setInterval usage on this jsFiddle example:

function a(){
    alert("hi every 2 seconds");
};

setInterval(a, 2*1000);

The reason why you shouldn’t call it like this (note the brackets after a): setInterval(a(), 2*1000); is that then your function would be called only once (you would see only one alert popping up). Example on jsFiddle:

function a(){
    alert("hi every 2 seconds");
};

setInterval(a(), 2*1000);
Ionic, Stack Overflow

cordova-plugin-whitelist Error 404 not found

profile for Nikola at Stack Overflow, Q&A for professional and enthusiast programmers
I’m a big fan of Stack Overflow and I tend to contribute regularly (am currently in the top 0.X%). In this category (stackoverflow) of posts I will will be posting my top rated questions and answers. This, btw, is allowed as explained in the meta thread here.

My question was:

I tried to run this code: cordova plugin add cordova-plugin-whitelist but what I keep getting is this:

Fetching plugin "cordova-plugin-whitelist" via plugin registry Error: 404 Not Found: cordova-plugin-whitelist at RegClient.<anonymous> (/usr/local/lib/node_modules/cordova/node_modules/cordova-lib/node_modules/npm/node_modules/npm-registry-client/lib/request.js:304:14) at Request._callback (/usr/local/lib/node_modules/cordova/node_modules/cordova-lib/node_modules/npm/node_modules/npm-registry-client/lib/request.js:246:65) at Request.self.callback (/usr/local/lib/node_modules/cordova/node_modules/cordova-lib/node_modules/npm/node_modules/request/request.js:236:22) at Request.emit (events.js:98:17) at Request.<anonymous> (/usr/local/lib/node_modules/cordova/node_modules/cordova-lib/node_modules/npm/node_modules/request/request.js:1142:14) at Request.emit (events.js:117:20) at IncomingMessage.<anonymous> (/usr/local/lib/node_modules/cordova/node_modules/cordova-lib/node_modules/npm/node_modules/request/request.js:1096:12) at IncomingMessage.emit (events.js:117:20) at _stream_readable.js:943:16 at process._tickCallback (node.js:419:13)

Any ideas?

I actually found the answer to this myself:

From an official blog post, Cordova is moving their plugins to npm.

I installed the cordova-plugin-whitelist easily now with npm:

npm install cordova-plugin-whitelist
Ionic, Stack Overflow

Ionic View Manage Apps

profile for Nikola at Stack Overflow, Q&A for professional and enthusiast programmers
I’m a big fan of Stack Overflow and I tend to contribute regularly (am currently in the top 0.X%). In this category (stackoverflow) of posts I will will be posting my top rated questions and answers. This, btw, is allowed as explained in the meta thread here.

My question was:

I uploaded a test app to Ionic (don’t know the exact name for this) with the command ionic upload from the command line, and I can access them nicely with the Ionic View application I have installed on my iPhone.

However, I remember that they have a web interface for this too, but can’t find the link for the life of me. I searched the website, went through my emails, googled, but nothing. I even found the same question on the official forum – sadly unanswered.

I actually found the answer to this myself:

And, sure enough, after going through my deleted emails I found a welcome email from Ionic stating that the login is at https://apps.ionic.io/login. Will reply to that official post too…

CodeProject, Ionic

Adding AdMob to Ionic framework application step by step

In case you’re looking for a way to implement Google AdMob ads in Ionic framework 3, then check out this tutorial: How to make money with Google AdMob ads in Ionic framework 3.

If you want, you can take a look at the screencast of this tutorial. This is actually my first shocked screencast blog post so go easy on me 🙂

I’ve been searching for a start to end tutorial on this but with no luck. Now, when I finally figured out how to use it, I’m documenting the exact steps which I did in order to get the AdMob working inside my Ionic app. You can fork the project from GitHub or download and test the .apk file on your device.

I broke down the steps in two parts: AdMob settings and Ionic settings.

AdMob settings

Let’s start with AdMob settings:

  1. Sign in /Sign up for AdMob at https://www.google.com/admob/
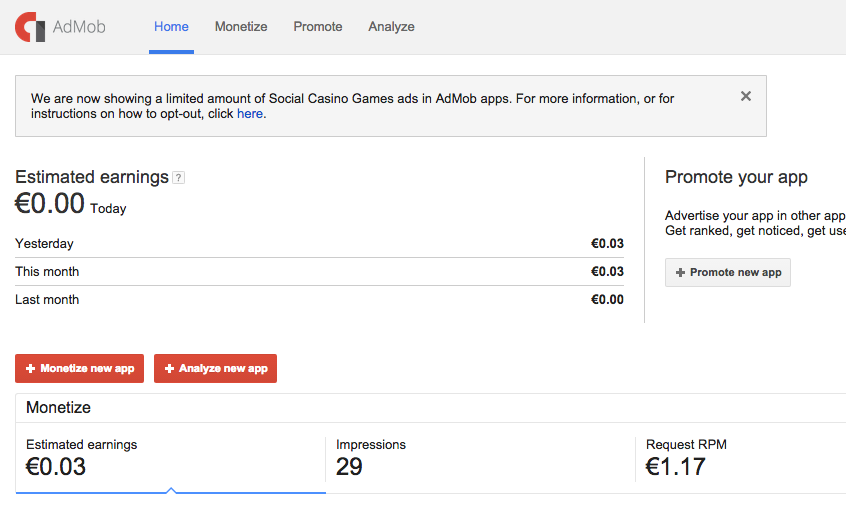
  2. Click the Monetize new app button:
    Screen Shot 2015-05-05 at 23.21.06
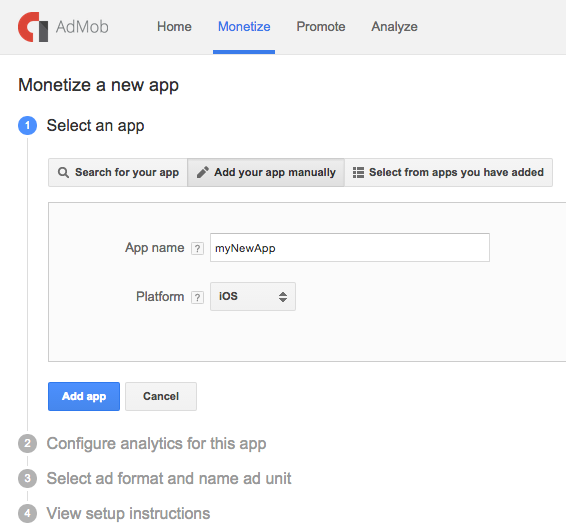
  3. If your app is not yet published you can add it manually:
    Screen Shot 2015-05-05 at 23.23.07
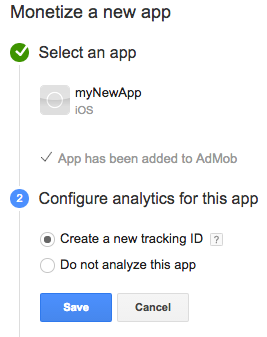
  4. Create new tracking ID:
    Screen Shot 2015-05-05 at 23.25.20
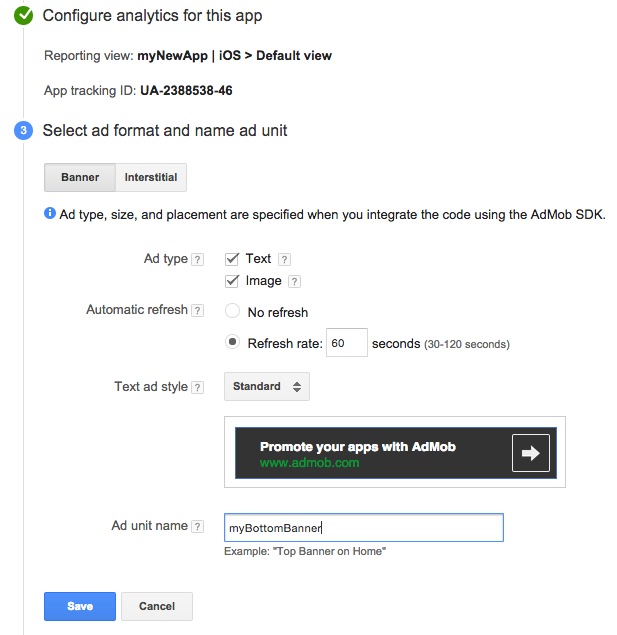
  5. Configure the adds type, size, placement, style, name:
    Screen Shot 2015-05-05 at 23.26.29
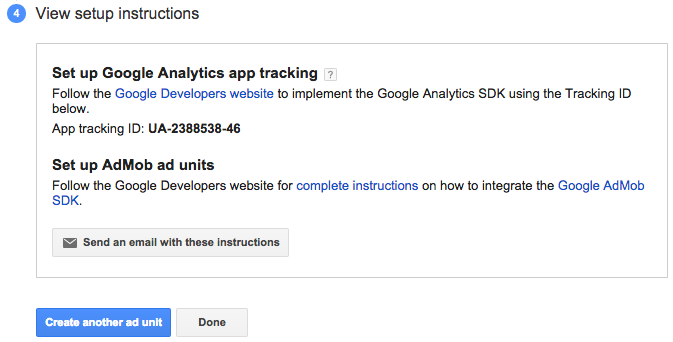
  6. You can read additional info on how to implement GA and AdMob, but for now let’s just click Done:
    Screen Shot 2015-05-05 at 23.28.10
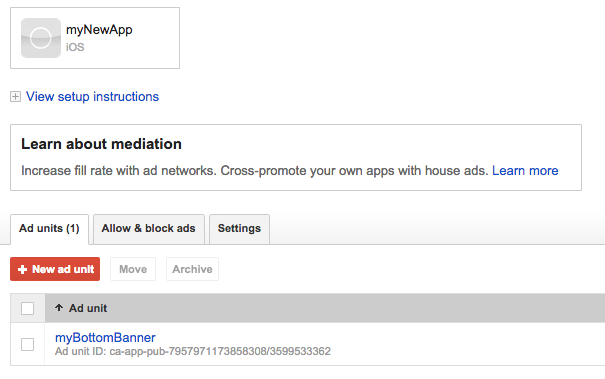
  7. You will now see the following similar screen:
    Screen Shot 2015-05-05 at 23.30.11
    The most important thing to note here is this Ad unit ID, which in my test case is
    ca-app-pub-7957971173858308/3599533362

Ionic settings

I’m counting on the fact that you know how to use Ionic since you’re looking for a specific topic like this, so am going skip the part of actually explaining how to use the Ionic cli. Ok, enough chit-chat, now I’m going to show you the steps on how to implement AdMob in your Ionic project:

  1. Start a new Ionic blank project:
    ionic create IonicAdMobTest blank
  2. Add the platform for which you want to build the application:
  3. ionic platform add android

    In case you’re developing on a Mac, you can also choose to add:

    ionic platform add ios
  4. Add the cordova-plugin-admob plugin by entering the following command in your command prompt when in the root folder of your project:
    cordova plugin add com.rjfun.cordova.plugin.admob

    As a side note, you can always check the list of all installed plugins by executing:

    cordova plugin list
  5. Add the following code to your app.js file (located in the www folder) inside the .run function:
    .run(function($ionicPlatform) {
        $ionicPlatform.ready(function() {
            // Hide the accessory bar by default (remove this to show the accessory bar above the keyboard
            // for form inputs)
            if (window.cordova && window.cordova.plugins.Keyboard) {
                cordova.plugins.Keyboard.hideKeyboardAccessoryBar(true);
            }
            if (window.StatusBar) {
                // org.apache.cordova.statusbar required
                StatusBar.styleDefault();
            }
    
            if(window.plugins && window.plugins.AdMob) {
                var admob_key = device.platform == "Android" ? "ca-app-pub-7957971173858308/3666912163" : "ca-app-pub-7957971173858308/3666912163";
                var admob = window.plugins.AdMob;
                admob.createBannerView( 
                    {
                        'publisherId': admob_key,
                        'adSize': admob.AD_SIZE.BANNER,
                        'bannerAtTop': false
                    }, 
                    function() {
                        admob.requestAd(
                            { 'isTesting': false }, 
                            function() {
                                admob.showAd(true);
                            }, 
                            function() { console.log('failed to request ad'); }
                        );
                    }, 
                    function() { console.log('failed to create banner view'); }
                );
            }
        });
    })

    Of course, change it according to your own admob_key which you obtained in the first part (step 8).

  6. Start the emulator by running:
    ionic build ios && ionic emulate ios
    
    //or, for android
    ionic build android && ionic emulate android
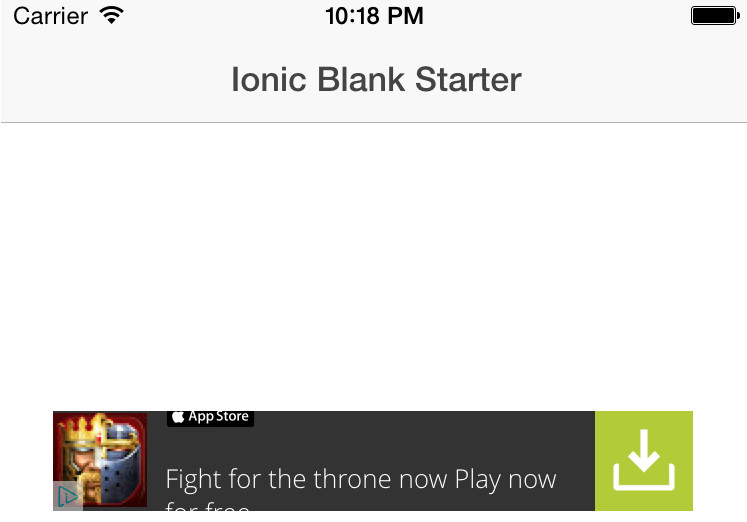
  7. and you should get the following screen in your emulated application:
    IonicAdMobTest
  8. You can clone the project from GitHub, or download the .apk (unzip needed) file and test on your Android device.

That’s all folks, hope this helps someone by saving time on endless testing as I did :/

Breaking News, Ionic

Ionic Analytics Alpha

From an official blog post, Ionic Analytics Alpha

gives you all the data you need to better understand and optimize your push notifications, deployments, and much, much more.

The go on to say that

You can chart your app’s progress, from the time of its initial release, and see which marketing strategies were most (or least) effective. You can even gain insights into your app’s demographics, allowing you to see how well your app is doing within a given population.

Some of the data this will be able to provide is:

  • How many people log into my app every day?
  • How many of those continue to use my app after a week? A month? A year?
  • With which parts of my app are users interacting the most?
  • What are users doing right now in my app?

If you were like me – thinking that this will cost some amount, here’s what they say:

During the alpha period, Ionic Analytics will be 100% free. In the future, we’ll release tiered pricing based on usage and will continue to offer a free tier.

All this is indeed remarkable, as Ionic team released push support and live updates just few weeks ago. Also, for developers alike, they announced Ionic Market where you’ll be able to make plugins for other users (and, I guess sell them too?). So, IMHO Ionic is building an awesome ecosystem and I bet they’ll become the best hybrid platform! What is left to see is how will the actual price tiers look like.


CodeProject, Ionic

Posting data from Ionic app to PHP server

TL;DR

This is the simplest example which shows how to POST data from an Ionic app to a PHP server.

The tutorial covering the Ionic version 2 can be found here. The tutorial covering the Ionic version 3 can be found here.

Quickstart

To see it in action:

    1. Clone the finished project from Github
    2. Run ionic serve
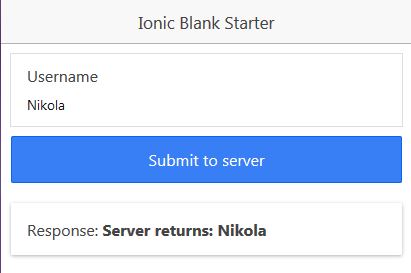
  1. You should see something like this:
    ionic_phpDemo

If you want to make it work from your server:

  1. Clone the finished project from Github
  2. Upload the PHP/api.php file to your server
  3. In the www/js/app.js file adjust the link variable to point to your server
  4. Run ionic serve

Step by step on how to create this yourself from scratch

  1. Create a new blank Ionic project with:
    ionic start ionicServerSendTest blank
  2. Copy the following code (you’ll already have the .run() part, the .controller() part is novelty here) in www/js/app.js file:
    // Ionic Starter App
    
    // angular.module is a global place for creating, registering and retrieving Angular modules
    // 'starter' is the name of this angular module example (also set in a <body> attribute in index.html)
    // the 2nd parameter is an array of 'requires'
    angular.module('starter', ['ionic'])
    
    .run(function($ionicPlatform) {
        $ionicPlatform.ready(function() {
            // Hide the accessory bar by default (remove this to show the accessory bar above the keyboard
            // for form inputs)
            if (window.cordova && window.cordova.plugins.Keyboard) {
                cordova.plugins.Keyboard.hideKeyboardAccessoryBar(true);
            }
            if (window.StatusBar) {
                StatusBar.styleDefault();
            }
        });
    })
    
    .controller('AppCtrl', function($scope, $http) {
        $scope.data = {};
    
        $scope.submit = function(){
            var link = 'http://nikola-breznjak.com/_testings/ionicPHP/api.php';
    
            $http.post(link, {username : $scope.data.username}).then(function (res){
                $scope.response = res.data;
            });
        };
    });
  3. On your server, create a api.php file with the following content:
    <?php
        //http://stackoverflow.com/questions/18382740/cors-not-working-php
        if (isset($_SERVER['HTTP_ORIGIN'])) {
            header("Access-Control-Allow-Origin: {$_SERVER['HTTP_ORIGIN']}");
            header('Access-Control-Allow-Credentials: true');
            header('Access-Control-Max-Age: 86400');    // cache for 1 day
        }
    
        // Access-Control headers are received during OPTIONS requests
        if ($_SERVER['REQUEST_METHOD'] == 'OPTIONS') {
    
            if (isset($_SERVER['HTTP_ACCESS_CONTROL_REQUEST_METHOD']))
                header("Access-Control-Allow-Methods: GET, POST, OPTIONS");         
    
            if (isset($_SERVER['HTTP_ACCESS_CONTROL_REQUEST_HEADERS']))
                header("Access-Control-Allow-Headers:        {$_SERVER['HTTP_ACCESS_CONTROL_REQUEST_HEADERS']}");
    
            exit(0);
        }
    
    
        //http://stackoverflow.com/questions/15485354/angular-http-post-to-php-and-undefined
        $postdata = file_get_contents("php://input");
        if (isset($postdata)) {
            $request = json_decode($postdata);
            $username = $request->username;
    
            if ($username != "") {
                echo "Server returns: " . $username;
            }
            else {
                echo "Empty username parameter!";
            }
        }
        else {
            echo "Not called properly with username parameter!";
        }
    ?>

    As you can see from the code, the first part is explained in detail in this StackOverflow question, and it basically solves the CORS issue that you would otherwise run into.

    The second part, explained in detail in this StackOverflow question,  deals with the way you POST data from Ionic (basically an AngularJS app) to your PHP server. The gist is that AngularJS POSTs by default in a JSON format, and thus you have to json_decode  the data that comes to your PHP server.

  4. In www/js/app.js file adjust the link variable to point to the file on your server
  5. In www/index.html file copy the following content:
    <!DOCTYPE html>
    <html>
        <head>
            <meta charset="utf-8">
            <meta name="viewport" content="initial-scale=1, maximum-scale=1, user-scalable=no, width=device-width">
            <title></title>
            <link href="lib/ionic/css/ionic.css" rel="stylesheet">
            <link href="css/style.css" rel="stylesheet">
            <!-- IF using Sass (run gulp sass first), then uncomment below and remove the CSS includes above
            <link href="css/ionic.app.css" rel="stylesheet">
            -->
            <!-- ionic/angularjs js -->
            <script src="lib/ionic/js/ionic.bundle.js"></script>
            <!-- cordova script (this will be a 404 during development) -->
            <script src="cordova.js"></script>
            <!-- your app's js -->
            <script src="js/app.js"></script>
        </head>
        <body ng-app="starter" ng-controller="AppCtrl">
            <ion-pane>
                <ion-header-bar class="bar-stable">
                    <h1 class="title">Ionic Blank Starter</h1>
                </ion-header-bar>
    
                <ion-content padding="true">
                    <form ng-submit="submit()">
                        <label class="item item-input item-stacked-label">
                            <span class="input-label">Username</span>
                            <input type="text" name="username" placeholder="enter username" ng-model="data.username">
                        </label>
    
                        <input class="button button-block button-positive" type="submit" name="submit" value="Submit to server">                    
                    </form>
    
                    <div class="card">
                        <div class="item item-text-wrap">
                            Response: <b ng-bind="response"></b>
                        </div>
                    </div>
                </ion-content>
            </ion-pane>
        </body>
    </html>

    Here you basically created a form with an username input field and with a submit button. Using AngularJS ng-submit you’re saying that once the submit button is clicked AngularJS should handle it within the submit() function which you defined in app.js file before. Input username uses  the ng-model to bind to the variable on the $scope so that you can then use it in your submit() function.

  6. Run ionic serve  from the root directory of your Ionic app (I’m sure you know this, but just in case that’s where the folders like www, plugins, scss reside).
Breaking News, Ionic

Ionic Deploy Alpha enables app update on the fly

Yesterday (10.06.2015) Ionic announced the Deploy Alpha which enables you to update your app without having to wait for the review & approval.

They say that

Ionic Deploy lets you update your app on demand for any changes that do not require binary modifications.

You can roll back to a previous version of your app, automatically apply updates, and control every aspect of the upgrade.

Also, the features that they list as upcoming are stunning to say the least:

  • live A/B tests
  • analytics
  • multiple version deployment to certain “Channels”

This is pretty awesome to be honest, and really shows that there is future for Ionic framework and that it’s a great time to be a hybrid app developer.

You can learn more about it from the official blog post.

Breaking News, Ionic

Ionic has a bright future by partnering with IBM

This is indeed awesome, as it hopefully means that Ionic is here to stay, so that all of us who use it won’t have to fear for it’s future – since it’s all awesome and stuff :). True, this seems more inclined towards business people, but the sole fact that with this more people will know about Ionic and won’t look you strangely when you say you’re developing iOS/Android apps with it by using one codebase.

Some news coverage about this:

  • IBM and Ionic Empower Business Users to Accelerate Mobile App Development
  • Make everyone a hacker: IBM MobileFirst & Ionic empower business users to prototype their own apps
Ionic, Quick tips

Handling Ionic CORS issue

CORS = Cross origin resource sharing – a pain in the butt when trying to do an ajax request when developing locally.

For local testing I ended up using a Chrome plugin: https://chrome.google.com/webstore/detail/allow-control-allow-origi/nlfbmbojpeacfghkpbjhddihlkkiljbi?hl=en.

The site http://enable-cors.org/ gives a lot of info on how to solve the cors issue if you control the API server. Namely, for Apache: http://enable-cors.org/server_apache.html.

But, TBH, all this ended up not working for me, so what I did was I created a “proxy” .php page which is called first (not calling the json file directly) and the PHP code for that page looks like this:

<?php
	header('Access-Control-Allow-Origin: *'); 
	echo file_get_contents("myJSON.json");
?>

edit: I answered a similar question on StackOverflow and I wrote a full tutorial with downloadable project from Github about this.

Page 6 of 7« First...«4567»

Recent posts

  • Discipline is also a talent
  • Play for the fun of it
  • The importance of failing
  • A fresh start
  • Perseverance

Categories

  • Android (3)
  • Books (114)
    • Programming (22)
  • CodeProject (35)
  • Daily Thoughts (77)
  • Go (3)
  • iOS (5)
  • JavaScript (127)
    • Angular (4)
    • Angular 2 (3)
    • Ionic (61)
    • Ionic2 (2)
    • Ionic3 (8)
    • MEAN (3)
    • NodeJS (27)
    • Phaser (1)
    • React (1)
    • Three.js (1)
    • Vue.js (2)
  • Leadership (1)
  • Meetups (8)
  • Miscellaneou$ (77)
    • Breaking News (8)
    • CodeSchool (2)
    • Hacker Games (3)
    • Pluralsight (7)
    • Projects (2)
    • Sublime Text (2)
  • PHP (6)
  • Quick tips (40)
  • Servers (8)
    • Heroku (1)
    • Linux (3)
  • Stack Overflow (81)
  • Unity3D (9)
  • Windows (8)
    • C# (2)
    • WPF (3)
  • Wordpress (2)

"There's no short-term solution for a long-term result." ~ Greg Plitt

"Everything around you that you call life was made up by people that were no smarter than you." ~ S. Jobs

"Hard work beats talent when talent doesn't work hard." ~ Tim Notke

© since 2016 - Nikola Brežnjak