Nikola Brežnjak blog - Tackling software development with a dose of humor
  • Home
  • Daily Thoughts
  • Ionic
  • Stack Overflow
  • Books
  • About me
Home
Daily Thoughts
Ionic
Stack Overflow
Books
About me
  • Home
  • Daily Thoughts
  • Ionic
  • Stack Overflow
  • Books
  • About me
Nikola Brežnjak blog - Tackling software development with a dose of humor
CodeProject, Unity3D

How to create bouncing balls in Unity3D step by step

Followed this official tutorial: http://unity3d.com/learn/tutorials/modules/beginner/physics/assignments/bouncing-ball

My own version on GitHub, and you can see it in action here (watch for 10 seconds to see what happens with the balls in the way the interact).

Steps to make this:

  1. Create a new empty 3D project
  2. Save the scene as Main.unity
  3. Hierarchy -> Create -> 3D object -> Plane
  4. Hierarchy -> Create -> 3D object -> Sphere
    1. drag it up the y axis
  5. Hierarchy -> Create -> Light -> Directional light
    1. drag it up the y axis above the sphere
    2. set x rotation to 90
  6. Click on the Sphere
    1. Add Component -> Physics -> Rigidbody
    2. Add Component -> Physics -> Sphere collider
  7. Assets -> Create -> Physics material
    1. Set Bounciness to 0.8 (to bounce forever set to 1)
    2. Set Bounce combine to Maximum
    3. drag it to the Material of the Sphere collider of the Sphere object
  8. Create a folder called Prefabs in the Assets folder
    1. Drag the Cube to this folder and delete it from the Hierarchy
    2. Drag the prefab Cube from the Prefabs folder to the Hierarcy and you can now duplicate it with the same behavior
CodeProject, Unity3D

How to build a 2D Space shooter with efficiency calculation in Unity3D

In this blog post I’m going to show you how to build a 2D Space shooter with efficiency calculation in Unity3D.

I followed these two blog posts: post #1 and post #2, and updated it for the use with Unity 4.5 and added the counters for number of bullets fired and number of rocks generated and showed the precision efficiency.

You can try my version, or you can download the project on GitHub. Following are the steps on how to make it your self:

    1. Start a new 2D project in Unity3D
    2. Create folders Scripts, Scenes, Prefabs, Textures
    3. Put all the texture assets to Textures folder
    4. Save the (ctrl +s) scene to Scenes folder with some name
    5. Drag background to Hierarchy
    6. Drag ship to Hierarchy
      1. set y to -4
      2. add Rigidbody2D
      3. check IsKinematic (the gravity doesn’t affect it)
    7. Add script to ship:
      #pragma strict
      // A variable that will contain our bullet prefab
      public var bullet : GameObject;
      public var brzina: int;
      var score : int;
      
      function Start(){
          	score = 0;
      }
      
      function Update() {  
          // Move the spaceship horizontally  
          rigidbody2D.velocity.x = Input.GetAxis("Horizontal") * 10;
          rigidbody2D.velocity.y = Input.GetAxis("Vertical") * 10;
      
      	//add support for mobile phone tilting
      	transform.Translate(Input.acceleration.x*Time.deltaTime*20, 0, 0);
          
          if (Input.GetKeyDown("space") || Input.GetMouseButtonDown(0)) {   
          	Instantiate(bullet, transform.position, Quaternion.identity);
          }    
      }
    8. Add bullet to Hierarchy
      1. add Physics2D -> Rigidbody 2D
      2. add script:
        public var speed : int = 6;
        
        // Gets called once when the bullet is created
        function Start () {  
            // Set the Y velocity to make the bullet move upward
            rigidbody2D.velocity.y = speed;
        }
        
        // Gets called when the object goes out of the screen
        function OnBecameInvisible() {  
            // Destroy the bullet 
            Destroy(gameObject);
        }
      3. add bullet to Prefabs folder and delete it from the Hierarchy
      4. drag the bullet from Prefabs folder to the bullet variable in Inspector when the spaceship is selected
    9. Add an enemy (from Textures) to the Hierarchy
      1. add Rigidbody 2D
      2. set IsKinematic
      3. add script:
        // Public variable that contains the speed of the enemy
        public var speed : int = -5;
        
        // Function called when the enemy is created
        function Start () {  
            // Add a vertical speed to the enemy
            rigidbody2D.velocity.y = speed;
        
            // Make the enemy rotate on itself
            rigidbody2D.angularVelocity = Random.Range(-200, 200);
        
            // Destroy the enemy in 3 seconds,
            // when it is no longer visible on the screen
            Destroy(gameObject, 3);
        }
        
        function OnTriggerEnter2D(obj : Collider2D) {  
            var name = obj.gameObject.name;
        
            // If it collided with a bullet
            if (name == "bullet(Clone)") {
                // And destroy the bullet
                Destroy(obj.gameObject);
                
                handleDestroy(gameObject);
            }
        
            // If it collided with the spaceship
            if (name == "spaceship") {
                handleDestroy(gameObject);
            }
        }
        
        function handleDestroy(gameObject: GameObject){
        	gameObject.Find("ScoreText").SendMessage("Hit");
            Destroy(gameObject);
        }
      4. Add enemy from Hierarchy to Prefabs folder and delete it from Hierarchy
    10. Add spawn object to Hierarchy
      1. position it above the background
      2. add script:
      1. public var enemy : GameObject;
        
        // Variable to know how fast we should create new enemies
        public var spawnTime : float = 1.3;
        
        function Start() {  
            // Call the 'addEnemy' function every 'spawnTime' seconds
            InvokeRepeating("addEnemy", spawnTime, spawnTime);
        }
        
        // New function to spawn an enemy
        function addEnemy() {  
            // Variables to store the X position of the spawn object
            // See image below
            var x1 = transform.position.x - renderer.bounds.size.x/2;
            var x2 = transform.position.x + renderer.bounds.size.x/2;
        
            // Randomly pick a point within the spawn object
            var spawnPoint = new Vector2(Random.Range(x1, x2), transform.position.y);
        
            // Create an enemy at the 'spawnPoint' position
            Instantiate(enemy, spawnPoint, Quaternion.identity);
        }
      2. drag enemy prefab to spawn object
    11. For the spaceship, the enemy prefab, and the bullet prefab do the following
      1. add Component -> Physics 2D -> Box Collider 2D
      2. for enemy Box Collider 2D check IsTrigger and this will give you the OnTriggerEnter2D function
    12. Create -> UI -> Text (name it ScoreText)
      1. Canvas -> RenederMode -> World space, no camera
      2. Rect transform – 450×340 (WxH)
      3. Add -> Script -> ScoreScript.js:

        import UnityEngine.UI.Text;
        
        var Counter : int;
        var text : UnityEngine.UI.Text;
        
        function Start () {
        	text = GetComponent(UnityEngine.UI.Text);
        	Counter = 0;
        }
        
        function Update () {    
             text.text = "Kills: "+Counter;
        }   
                 
        function Hit () {            
            Counter++;
        }
    13. Create -> UI -> Text (name it RocksText)
      1. Add -> Script -> RocksScript.js:

        import UnityEngine.UI.Text;
        
        var Counter : int;
        private var text : UnityEngine.UI.Text;
        
        function Start () {
        	text = GetComponent(UnityEngine.UI.Text);
        	Counter = 0;
        }
        
        function Update () {    
             text.text = "Rocks: "+Counter;
        }   
                 
        function RockAdd () {            
            Counter++;
        }
    14. Create -> UI -> Text (name it EffText)
      1. Add -> Script -> EffScript.js:
        import UnityEngine.UI.Text;
        
        private var Kills : int;
        private var Rocks : int;
        private var Eff : float;
        private var text : UnityEngine.UI.Text;
        
        function Start () {
        	text = GetComponent(UnityEngine.UI.Text);
        	Eff = 0;
        	Kills = 0;
        	Rocks = 0;
        }
        
        function Update () {    
             Kills = gameObject.Find("ScoreText").GetComponent(ScoreScript).Counter;
             Rocks = gameObject.Find("RocksText").GetComponent(RocksScript).Counter;
                  
             if (Kills == 0 || Rocks == 0)
             	Eff = 0;
             else
             	Eff = Kills * 1.0f / Rocks * 100;
             	
             text.text = "Eff: " + Eff.ToString("F0") + "%";
        }
CodeProject, Unity3D

How to make a Unity3D Ball Roller game

I followed http://unity3d.com/learn/tutorials/projects/roll-a-ball, and updated the steps for the newest Unity3D currently available (4.5). You can try the game and download the project on GitHub.

  1. Create a new 3D project and save a scene in a Assets/Scenes folder
  2. Game object – 3d object – Plane, and rename to Ground
  3. Transform – Reset -> sets to 0,0,0 origin point of the world
  4. Edit – Frame selected or character F
  5. Hierarchy -> Create -> 3D object -> Sphere, and again Transform – Reset and again Edit – Frame selected, rename it to Player
  6. Hierarchy -> Create -> Light -> Directional light (name it Main Light)
    1. Rotation x 30, y 60
    2. Shadow – Soft
    3. Very high resolution
  7. Duplicate Main Light and reverse the Rotation x -30, y -60
  8. Color – some blue, intensity 0.1, no shadows
  9. We use Folders in Project tab to organize stuff and Empty game objects in Hierarchy tab
  10. Create empty object and rename to Lighting
    1. reset transform origin, drag other lighting related object in here
    2. set the y position to 100 so that you move the lighting up (they are based on rotation and not position so that if you place it high up it’s just a matter of “not getting in the way” and they will still work as expected)
  11. Player object -> add Component -> Physics -> Rigidbody
  12. [Moving the player] Create a Scripts folder. Create a script (on the Player object add Component -> New Script) and place it in this folder
    1. Update() – here goes the game code (before rendering the frame)
    2. FixedUpdate() – here goes the physics code (before performing any physics calculation)
    3. To read an axis use Input.GetAxis with one of the following default axes: “Horizontal” and “Vertical” are mapped to joystick, A, W, S, D and the arrow keys. “Mouse X” and “Mouse Y” are mapped to the mouse delta. “Fire1”, “Fire2” “Fire3” are mapped to Ctrl, Alt, Cmd keys and three mouse or joystick buttons.
    4. Add this script:
      var speed : float;
      function FixedUpdate () {
      	var moveHorizontal = Input.GetAxis("Horizontal");
      	var moveVertical = Input.GetAxis("Vertical");
      	
      	var movement = Vector3(moveHorizontal, 0.0f, moveVertical);
      	
      	rigidbody.AddForce(movement * speed * Time.deltaTime);
      }
  13. [Moving the camera] Raise the camera a little and tilt it by setting the rotation. Make it the child of the player (drag the Main Camera to Player object). If you run the game at this point you will see all went bazinga. So, we can’t have it as a child – detach it. What we can do however is attach a script to the camera and offset it based on the position of the player object:
    1. Add script to Main Camera:

      var player : GameObject;
      private var offset : Vector3;
      function Start () {
          offset = transform.position;
      }
      
      function LateUpdate () {   
          transform.position = player.transform.position + offset;
      }
  14. [Adding the walls] – Add new empty object Walls
    1. Create -> 3D object -> Cube (rename to West Wall) and add it as a child to Walls
    2. repeat for other 3 walls
  15. [Adding collectible objects]
    1. Create -> 3D object -> Cube (rename to Pickup)
    2. Reset transform origin
    3. Scale to 0.5 on all axes
    4. Rotate 45° on all axes
    5. Add a script (Rotator):
      function Update () {
      	transform.Rotate(Vector3(15,30,45) * Time.deltaTime);
      }
    6. Create a new folder called Prefabs in the root directory and drag the Pickup object inside it in order to, well, create a Prefab which you can think of as a variable which you can then access with all its parameters. So, when you clone the prefab object, it will have all the behavior that the cloned prefab has.
    7. Create an empty object and drag the prefab inside it
    8. Set orientation to global mode and duplicate a few of the collectibles
  16. [Collision detection]
    1. Add the tag ‘PickUp’ to the Pickup prefab
    2. Add the following function to the Player object script:
      function OnTriggerEnter(other : Collider){
          if(other.gameObject.tag == 'PickUp')
              other.gameObject.setActive(false);
      }
    3. Set Box collider Is Trigger to true in the Pickup prefab and this gives you OnTrigger function
    4. Unity caches all the static colliders – everytime we move, rotate or scale the static colliders, the Unity will recalculate the cache – takes resources! We can move, rotate or scale dynamic colliders and Unity will not cache them. Any game object with a collider and a rigid body is considered a dynamic object. Any game object with a collider and no rigid body is considered a static object
    5. Add a rigidbody to the Pickup prefab. If you start the game now, the Pickup object will fall to the ground because of the Gravity. You can uncheck the Gravity option, but a better solution is to keep it and check the Is Kinematic option.
    6. Static colliders shouldn’t move – walls and floors
    7. Dynamic colliders can move and have a rigidbody attached
    8. Standard rigid bodies are moved using physics forces and Kinematic rigid bodies are moved using transform object
  17. [Counting picked up object]
    1. Add a new variable to the PlayerController script and increment it in the OnTriggerEnter function
    2. Add a new empty game object
    3. Choose “Add Component” -> “Rendering” -> “GUIText”
    4. Transform position (x,y,z) = (0,1,0)
    5. Anchor – upper left
    6. Alignment – center
    7. Pixel offset – 5,5
    8. Font size – 20
    9. Add the GUIText variable to the PlayerController script:
      public var scoreText : GUIText;
      function SetCountText(){
      	scoreText.text = 'Score: ' + score.ToString();
      }
    10. Do the same with the winText (create object, add the public variable in PlayerController script) and drag it to the Player object
  18. [Publishing the game]
    1. File -> Build Settings
    2. Select the target platform
    3. Click on the Switch platform button
    4. Click on the Buildbutton
  19. [Added bonus]
    1. To create a Physics Material select Assets->Create->Physics Material from the menu bar. Then drag the Physics Material from the Project View onto a Collider in the scene.
    2. This way you can make the walls bounce the ball
CodeProject, NodeJS

How I built my own testable The Answer To Life The Universe And Everything npm module

TL;DR: In this short tutorial I’ll show you how I built my own testable (Jasmine) npm module which I then published to npm repository. The npm module is here, and the GitHub repository is here.

First, if you haven’t already, set some author info in your terminal:

npm set init.author.name "Nikola Brežnjak"
npm set init.author.email "[email protected]"
npm set init.author.url “http://www.nikola-breznjak.com"

Then, create a new GitHub repository, clone it to your disk and then run npm init. Create a index.js file and copy/paste the following code:

module.exports = function(){
    return 42;
}

Next, install Jasmine by doing:

npm install jasmine-node -g

To test your module, create a folder spec, and a file TheAnswerToLifeTheUniverseAndEverything.spec.js inside it with the following content:

var TheAnswerToLifeTheUniverseAndEverything = require('../index.js');

describe("TheAnswerToLifeTheUniverseAndEverything Suite", function() {
 it("should return a value of 42", function(done) {
 var value = TheAnswerToLifeTheUniverseAndEverything();
 expect(value).toEqual(42);
 done();
 });
});

In order to test your module, run jasmine-node spec/ as shown on the image below:

jasmineTest

In order to publish your npm module you first have to execute the npm adduser command and answer few of the questions, and after that you just have to execute npm publish and you’ll have your npm module listed on npmjs.com:

theAnswerToLifeNPMmodule

Now you can use npm install theanswertolifetheuniverseandeverything to install the module.

If you’re testing this your self and you get an error like “Error: forbidden New packages must have all-lowercase names: TheAnswerToLifeTheUniverseAndEverything” then that means what it says – you must use only lowercase letters when naming your modules.

CodeProject, WPF

Custom YES/NO dialog with DialogResult in WPF

screenshot_blog

A simple example of how to make a custom YES/NO dialog with DialogResult in WPF. Freely (as in beer) available code is on Github: https://github.com/Hitman666/CustomYesNoDialogWPF. The breakdown is that you make a new window (MsgBoxYesNo) and assign DialogResult on the button clicks. You call this window as a dialog from a MainWindow and expect a bool in return upon which you act as you wish… MsgBoxYesNo.xaml:

<Window x:Class="CustomYesNoDialogWPF.MsgBoxYesNo"
        xmlns="http://schemas.microsoft.com/winfx/2006/xaml/presentation"
        xmlns:x="http://schemas.microsoft.com/winfx/2006/xaml"
        Title="MsgBoxYesNo" Height="300" Width="300"
        WindowStyle="None" ResizeMode="NoResize"
        WindowStartupLocation="CenterScreen"
        AllowsTransparency="True" Background="Transparent">

    <Border BorderThickness="5" BorderBrush="Black" CornerRadius="20" Background="SkyBlue">
        <Grid>
            <Grid.RowDefinitions>
                <RowDefinition Height="3*"></RowDefinition>
                <RowDefinition Height="1*"></RowDefinition>
            </Grid.RowDefinitions>

            <Grid.ColumnDefinitions>
                <ColumnDefinition></ColumnDefinition>
            </Grid.ColumnDefinitions>

            <Viewbox>
                <TextBlock x:Name="txtMessage" Width="420" FontSize="50" TextWrapping="Wrap" HorizontalAlignment="Center" VerticalAlignment="Center" TextAlignment="Center" Text="Are you sure you're awesome?"/>
            </Viewbox>

            <Viewbox Grid.Row="1">
                <StackPanel Orientation="Horizontal">
                    <Button Content="Yes" x:Name="Yes" Margin="1" HorizontalAlignment="Left" VerticalAlignment="Top" Width="55" Click="Yes_Click"/>
                    <Button Content="No" x:Name="No" Margin="1" HorizontalAlignment="Left" VerticalAlignment="Top" Width="55" Click="No_Click" IsCancel="True"/>
                </StackPanel>
            </Viewbox>
        </Grid>
    </Border>
</Window>

MsgBoxYesNo.cs:

public partial class MsgBoxYesNo : Window
{
    public MsgBoxYesNo(string message)
    {
        InitializeComponent();

        txtMessage.Text = message;
    }

    private void Yes_Click(object sender, RoutedEventArgs e)
    {
        DialogResult = true;
        this.Close();
    }

    private void No_Click(object sender, RoutedEventArgs e)
    {
        DialogResult = false;
        this.Close();
    }
}

MainWindow.cs:

private void Button_Click(object sender, RoutedEventArgs e)
{
    MsgBoxYesNo msgbox = new MsgBoxYesNo("Are you sure you're awesome?");
    if ((bool)msgbox.ShowDialog())
    {
        MessageBox.Show("Yes, you're awesome!");
    }
    else
    {
        MessageBox.Show("You're kidding, of course you're awesome!");
    }
}
CodeProject, WPF

How to build a font viewer application in WPF without writing any C# code

TL;DR

You can download from Github the demo application (zipped exe) or the whole source code project (Visual Studio project solution), or continue reading to see how it was built step by step.

What is this for an application?

My version of the FontViewer application as initially designed and developed in the book Sams Teach Yourself WPF in 24 Hours, with added IntegerUpDown control from Extended.Wpf.Toolkit NuGet package (for changing the font size).

Disclamer

I’m in no way affiliated with Amazon or this book, I just think it’s great, for beginners especially. This StackOverflow question may be useful if you’re searching for a good book on learning WPF.

Let’s build it step by step

First, create a new WPF Application project in Visual Studio (File -> New Project) as shown on the image below, and name it FontViewer:

FontViewer_1

Full source code listing

Now, copy the following XAML code in your MainWindow.xaml file (explanation comes after):

<Window x:Class="FontViewer.MainWindow"
        xmlns="http://schemas.microsoft.com/winfx/2006/xaml/presentation"
        xmlns:x="http://schemas.microsoft.com/winfx/2006/xaml"
        xmlns:xctk="http://schemas.xceed.com/wpf/xaml/toolkit"
        Title="FontViewer" Height="450" Width="600">
    
    <DockPanel Margin="8">
        <Border DockPanel.Dock="Top"
                CornerRadius="1"
                BorderThickness="2"
                BorderBrush="Black"
                Background="AliceBlue"
                Padding="8"
                Margin="0 0 0 8">
            <TextBlock FontSize="14" TextWrapping="Wrap">
                <Bold><Italic>Instructions:</Italic></Bold>
                <LineBreak />
                
                Select a <Underline>font</Underline> to view from the list <Italic>below</Italic>.
                <Span FontSize="10">
                    You can change the text by typing in the region at the bottom.
                </Span>
            </TextBlock>
        </Border>
        
        <ListBox x:Name="FontList" 
                 DataContext="{x:Static Fonts.SystemFontFamilies}"
                 DockPanel.Dock="Left" 
                 ItemsSource="{Binding}"
                 Width="160">
            <ListBox.ToolTip>
                <ToolTip>
                    <StackPanel Orientation="Horizontal">
                        <TextBlock Text="{Binding Path=Count, Mode=OneTime}"/>
                        <TextBlock Text=" fonts are installed."/>
                    </StackPanel>
                </ToolTip>
            </ListBox.ToolTip>
        </ListBox>

        <StackPanel Orientation="Horizontal"  
                    HorizontalAlignment="Center" 
                    Margin="5"
                    DockPanel.Dock="Top">
            
            <TextBlock Margin="0 0 5 0">Font size:</TextBlock>
            <xctk:IntegerUpDown x:Name="FontSize"
                                Height="20" 
                                Width="50"
                                Increment="1" 
                                Value="20">
            </xctk:IntegerUpDown>
        </StackPanel>

        <TextBox x:Name="SampleText"
                 MinLines="2"
                 Margin="5"
                 TextWrapping="Wrap"
                 ToolTip="Type here to change the preview text."
                 DockPanel.Dock="Top">
            The quick brown fox jumps over the lazy dog.
        </TextBox>

        <TextBlock Text="{Binding ElementName=SampleText, Path=Text}"
                   FontFamily="{Binding ElementName=FontList,Path=SelectedItem}"
                   FontSize="{Binding ElementName=FontSize,Path=Value}"
                   TextWrapping="Wrap"
                   Margin="5"/>
    </DockPanel>
</Window>

Code decomposition

You can see that our main container is DockPanel, which is useful when you want to “dock” certain elements to the sides (top, bottom, left, right) of the window.

Next comes the Border element which contains instructions (on how to use the application) written inside the TextBlock element. If you’re familiar with CSS, the attributes on the Border element should seem natural to you. However, one novelty is the DockPanel.Dock=”Top” property which basically tells the Border element to position itself at the top of the parent DockPanel (in which it is contained).

To populate the list of available fonts which are installed on the machine, we’re using the ListBox element. It’s docked to the left, its name variable (by which we can reference it later in the code) is set to FontList (x:Name=”FontList”), and most importantly the ItemSource attribute is set to {x:Static Fonts.SystemFontFamilies} which basically tells the ListBox that it should display all the items which are returned from the static property SystemFontFamilies provided by .NET framework.

After the ListBox comes a StackPanel which by default “stacks” elements that it contains one below the other. By using the Orientation property (Orientation=”Horizontal”) we can make the contained elements align one next to the other.

Let’s mix it up a little

Since we want to have a numeric Up/Down control as we do in WinForms we will have to download additional component as it doesn’t exist in the standard WPF library. The discussion about this can be found on Stack Overflow. The solution is to go to Tools -> NuGet Package Manager -> Manage NuGet Packages… as shown on the illustration below:

FontViewer_3

On the form that shows up after this you have to do a search for Extended.Wpf.Toolkit and Install it:

FontViewer_2

As stated in the installation instructions you have to:

  1. Add a using statement (“using Xceed.Wpf.Toolkit;” for most of the controls, “using Xceed.Wpf.DataGrid;” for the datagrid control) to the top of .cs files
  2. Add a new xmlns (xmlns:xctk=”http://schemas.xceed.com/wpf/xaml/toolkit” for most of the controls, xmlns:xcdg=”http://schemas.xceed.com/wpf/xaml/datagrid” for the datagrid control) to the top of XAML files
  3. Remember to use the namespace prefix (in the above example, <xctk: …> or <xcdg: …>) in the body of your XAML

As you can see in the full code listing, I added the needed xmlns in MainWindow.xaml. However, the needed using statement (using using Xceed.Wpf.Toolkit;) has to be added in the MainWindow.cs (right click on the MainWindow.xaml file and select View Code) file.

After this installation and proper including is done, you can use the new IntegerUpDown control in your XAML file like this:

<xctk:IntegerUpDown x:Name="FontSize"
                    Height="20" 
                    Width="50"
                    Increment="1" 
                    Value="20">
</xctk:IntegerUpDown>

Increment attribute tells the control by which amount to increment/decrement the number which is set by default in Value attribute.

Let’s enter some text

In order for the user to be able to enter some text and then see how the text looks like in the particular font, we’re using the TextBox element. Most important attribute is the x:Name (x:Name=”SampleText”) because we’ll use it to reference it in the TextBlock below.

Show me how the font looks like

We’re using the TextBlock element to show the user how the text which he entered in the TextBox looks like in the font which he selected from the ListBox. Here lies the core of our application as here we’re setting the so called Data Binding. We’re binding the Text attribute of the TextBlock to whatever is entered in the TextBox named SampleText (Text=”{Binding ElementName=SampleText, Path=Text}”). Next, we’re binding the FontFamily to the selected item in the ListBox named FontList (FontFamily=”{Binding ElementName=FontList,Path=SelectedItem}”), and finally we’re binding the FontSize to the Value of the IntegerUpDown control named FontSize.

Wrap up

If you run your application now you’ll see it works as expected and just like that you’ve made your very own version of the FontViewer application, you’ve seen how to install additional components from within Visual Studio using NuGet package manager, and you’ve seen how to set the data binding between elements.

Hope this proved to be helpful and got you excited about WPF in that manner that you’ll now go and do further exploring on your own.

CodeProject, JavaScript

Simple official Spritz API usage

TL;DR: See it in action here or here, and official site here.

Spritz – change the way people read and make communication faster, easier, and more effective.

So, there has been a lot of buzz about this lately and today I too got my API key to test this out. I must say that using Spritz is really easy, and they have a very good documentation with examples so I will keep this short.

After you register to their developer program you will get your API key. A simple use case to get you started is to make a HTML document with the following content:

<!DOCTYPE html>
<html>
<head>
	<script type="text/javascript" src="jquery-2.1.0.min.js"></script>
	<script type="text/javascript">
        var SpritzSettings = {
            clientId: "4aac1453ff37b364f",
            redirectUri: "http://www.nikola-breznjak.com/codez/spritz/login_success.html",
        };
    </script>

 	<script type="text/javascript" src="spritz.min.js"></script>
</head>

<body>
    <h1>Spritz test</h1>

  	<div data-role="spritzer"></div>

    <div>This is some demo text that will be Spritzt</div>
  	</div>
</body>
</html>

Important things to note here are that Spritz uses jQuery and you have to use your clientId and put this rediretUri file to your server (on which you host the domain with which you registered your Spritz application).

A little more advanced example is here: http://www.nikola-breznjak.com/codez/spritz/ (you can just view the source of it and I’m sure you’ll know how to take it from there).

Worth noting is that there are some open source versions of this like Open Spritz, though I think this one is way better as it has whole research and the science behind it.

Using this on a simple HTML page was, well, simple. I tried to incorporate this into my wordpress blog (the one you’re reading right now), and though it works nicely when I put the code in the index.php file (the main template file which lists all of the posts), it does not work when I put the same exact code to the single.php (template for showing specific posts). The error that I’m getting in the latter case is this:

Unable to spritz: Unable to retrieve contentVersion, contentId=5343e07be4b063e2752c379b: HTTP call failed, status: 500, message: Internal Server Error

So, if someone got the same error, how did you go about it?

CodeProject, PHP

POST JSON Data With PHP cURL wrapper class

PHP biceps cURL 🙂

Following is the PHP cURL wrapper class which I use to make GET and POST requests. The examples are below. Disclamer:  be sure that you have permission to scrape and use the content you’re after.

This code is also available on GitHub at this link: https://github.com/Hitman666/PHPcURLWrapper

Class code and simple GET request

//CurlWrapper_static.php

class CurlWrapper {
    private static $useragents = array(            
        "Mozilla/5.0 (Windows NT 6.1; WOW64) AppleWebKit/537.36 (KHTML, like Gecko) Chrome/33.0.1750.154 Safari/537.36",
        "Mozilla/4.0 (compatible; MSIE 6.0; Windows NT 5.0; WOW64; Trident/4.0; SLCC1)",
        "Mozilla/5.0 (Windows NT 6.2; WOW64; rv:28.0) Gecko/20100101 Firefox/28.0",
        "Mozilla/5.0 (Macintosh; Intel Mac OS X 10_9_2) AppleWebKit/537.75.14 (KHTML, like Gecko) Version/7.0.3 Safari/537.75.14"
    );

	private static $cookiesFile = "curlCookies.txt";

    private static function getUserAgent() {
    	$rand = rand(0, count(self::$useragents) - 1);

    	return self::$useragents[$rand];
    }

    public static function SendRequest($url, $ref = "", $type = "GET", $postData = "", $headers = "", $proxy = "") {
        $useragent = self::getUserAgent();

        $ch = curl_init();
		curl_setopt($ch, CURLOPT_URL,$url);
		curl_setopt($ch, CURLOPT_TIMEOUT,120);
		curl_setopt($ch, CURLOPT_USERAGENT, self::getUserAgent());

		curl_setopt($ch, CURLOPT_FOLLOWLOCATION, true); 
		curl_setopt($ch, CURLOPT_RETURNTRANSFER, true);
		curl_setopt($ch, CURLOPT_AUTOREFERER, true);

		curl_setopt($ch, CURLOPT_COOKIEJAR, realpath(self::$cookiesFile)); 
		curl_setopt($ch, CURLOPT_COOKIEFILE, realpath(self::$cookiesFile));

		curl_setopt($ch, CURLOPT_SSL_VERIFYPEER, false);

        //options
        if ($ref != "") {
            curl_setopt($ch, CURLOPT_REFERER, $ref);
        }

		if ($proxy != "") {
			curl_setopt($ch, CURLOPT_PROXY, $proxy);
		}

		if ($type == "POST"){
			curl_setopt($ch, CURLOPT_CUSTOMREQUEST, "POST");
			curl_setopt($ch, CURLOPT_POST, true);
			curl_setopt($ch, CURLOPT_POSTFIELDS, $postData);
		}

		if ($headers != ""){
			curl_setopt($ch, CURLOPT_HTTPHEADER, $headers);
		}

        $result = curl_exec($ch);
		curl_close($ch);

		return $result;
	}
}

Simple GET request:

require("CurlWrapper_static.php");

$googleHTML = CurlWrapper::SendRequest('https://www.google.com');
echo $googleHTML;

If you’re a firm non-static lover here’s a “normal” class:

//CurlWrapper_nonStatic.php

class CurlWrapper{    
    private $_useragents = array(            
        "Mozilla/5.0 (Windows NT 6.1; WOW64) AppleWebKit/537.36 (KHTML, like Gecko) Chrome/33.0.1750.154 Safari/537.36",
        "Mozilla/4.0 (compatible; MSIE 6.0; Windows NT 5.0; WOW64; Trident/4.0; SLCC1)",
        "Mozilla/5.0 (Windows NT 6.2; WOW64; rv:28.0) Gecko/20100101 Firefox/28.0",
        "Mozilla/5.0 (Macintosh; Intel Mac OS X 10_9_2) AppleWebKit/537.75.14 (KHTML, like Gecko) Version/7.0.3 Safari/537.75.14"
    );

	private $_cookiesFile = "curlCookies.txt";

    private function getUserAgent(){
    	$rand = rand(0, count($this->_useragents));

    	return $useragents[$rand];
    }

    public function SendRequest($url, $ref = "", $type = "GET", $postData = "", $headers = "", $proxy = "") {
        $useragent = $this->getUserAgent();
        echo $useragent;

        $ch = curl_init();
		curl_setopt($ch, CURLOPT_URL,$url);
		curl_setopt($ch, CURLOPT_TIMEOUT,120);
		curl_setopt($ch, CURLOPT_USERAGENT, $useragent);

		curl_setopt($ch, CURLOPT_FOLLOWLOCATION, true); 
		curl_setopt($ch, CURLOPT_RETURNTRANSFER, true);
		curl_setopt($ch, CURLOPT_AUTOREFERER, true);

		curl_setopt($ch, CURLOPT_COOKIEJAR, realpath($this->_cookiesFile)); 
		curl_setopt($ch, CURLOPT_COOKIEFILE, realpath($this->_cookiesFile));

		curl_setopt($ch, CURLOPT_SSL_VERIFYPEER, false);

        //options
        if ($ref != "") {
            curl_setopt($ch, CURLOPT_REFERER, $ref);
        }

		if ($proxy != "") {
			curl_setopt($ch, CURLOPT_PROXY, $proxy);
		}

		if ($type == "POST"){
			curl_setopt($ch, CURLOPT_CUSTOMREQUEST, "POST");
			curl_setopt($ch, CURLOPT_POST, true);
			curl_setopt($ch, CURLOPT_POSTFIELDS, $postData);
		}

		if ($headers != ""){
			curl_setopt($ch, CURLOPT_HTTPHEADER, $headers);
		}

        $result = curl_exec($ch);
		curl_close($ch);

		return $result;
	}
}

How to use it with simple GET request:

require("CurlWrapper_nonStatic.php");

$curl = new CurlWrapper();
$googleHTML = $curl->SendRequest('https://www.google.com');
echo $googleHTML;

JSON POST request

Here’s an example of sending a JSON POST request to imaginitive URL ‘http://service.com/getData.json’ with some data array:

	require("CurlWrapper_static.php");

	$cookieSettingUrl = 'http://service.com/';
	$cookie = CurlWrapper::SendRequest($cookieSettingUrl);

	$data = array(
		"year" => 2014,
		"day" => 3,
                "month" => 4,
		"id" => 20
    );
	$postData = json_encode($data);

	$jsonUrl = 'http://service.com/getData.json';
	$headers = array('Accept: application/json','Content-Type: application/json');

	$resultsHTML = CurlWrapper::SendRequest($jsonUrl, $cookieSettingUrl, "POST", $postData, $headers);
	$resultsJson = json_decode($resultsHTML);
	var_dump($resultsJson);

Important to note is that you have to add proper $headers array, and that you json_encode your data array as shown when POSTing to a service which expects JSON data.

Cookies

The reason why I first used these two lines:

$cookieSettingUrl = 'http://service.com/';
$cookie = CurlWrapper::SendRequest($cookieSettingUrl);

is to set any cookies (and you will find that some services do this) that may be needed to be sent along with the request to ‘http://service.com/getData.json’. Cookies are set to ‘curlCookies.txt’ in the CurlWrapper_* class. You can change this to your liking, and you have to make sure that you set proper permissions for this file.

Hope this proves useful to someone.

CodeProject, NodeJS

Deploying MEAN.io to Nodejitsu from Windows machine

Disclaimer: I’m in no way affiliated with Nodejitsu or MEAN.io. I’m just documenting my experience with them – problems (and solutions) I’ve faced while trying these new technologies on a Windows machine.

Great, with that off my chest, we can now start. This is a successor post to the previous one: Getting started with Nodejitsu on Windows by deploying a MEN framework, so you may wanna check that too.

MEAN is a fullstack javascript platform for modern web applications.

MongoDB – leading NoSQL database, empowering businesses to be more agile and scalable

Express – minimal and flexible node.js web application framework, providing a robust set of features for building single and multi-page, and hybrid web applications

Angular – lets you extend HTML vocabulary for your application. The resulting environment is extraordinarily expressive, readable, and quick to develop

Node.js – a platform built on Chrome’s JavaScript runtime for easily building fast, scalable network applications

Following the notes on the official website you have to clone the repo, install all the dependencies withnpm  and then run grunt .

git clone http://github.com/linnovate/mean.git

cd mean

npm install

grunt

If you get an error like this:

C:\Users\Nikola\Desktop\mean>grunt
Running "jshint:all" (jshint) task
>> 42 files lint free.

Running "concurrent:tasks" (concurrent) task
Running "nodemon:dev" (nodemon) task
Running "watch" task
Waiting...[nodemon] v1.0.15
[nodemon] to restart at any time, enter `rs`
[nodemon] watching: *.*
[nodemon] starting `node --debug server.js`
debugger listening on port 5858
Express app started on port 3000

events.js:72
        throw er; // Unhandled 'error' event
              ^
Error: failed to connect to [localhost:27017]
    at null.<anonymous> (C:\Users\Nikola\Desktop\mean\node_modules\mongoose\node
_modules\mongodb\lib\mongodb\connection\server.js:553:74)
    at EventEmitter.emit (events.js:106:17)
    at null.<anonymous> (C:\Users\Nikola\Desktop\mean\node_modules\mongoose\node
_modules\mongodb\lib\mongodb\connection\connection_pool.js:140:15)
    at EventEmitter.emit (events.js:98:17)
    at Socket.<anonymous> (C:\Users\Nikola\Desktop\mean\node_modules\mongoose\no
de_modules\mongodb\lib\mongodb\connection\connection.js:512:10)
    at Socket.EventEmitter.emit (events.js:95:17)
    at net.js:440:14
    at process._tickCallback (node.js:415:13)
[nodemon] app crashed - waiting for file changes before starting...

make sure that you have MongoDB installed and that you have the mongod.exe running on the default port 27017. Instructions on how to install MongoDB on a Windows machine can be found here: http://docs.mongodb.org/manual/tutorial/install-mongodb-on-windows/, but tl;dr is:

  • download the installation zip package
  • unzip in c:\mongodb
  • create c:\data\db  folder
  • run c:\mongodb\bin\mongod.exe

When you have mongod.exe  started in one command window (I use Console2) and you run grunt  in other you will get this in the “mongo” console:

C:\mongodb\bin>mongod.exe
mongod.exe --help for help and startup options
Tue Mar 11 14:50:24.240 [initandlisten] MongoDB starting : pid=10136 port=27017 dbpath=\data\db\ 64-bit host=Nikola-PC
Tue Mar 11 14:50:24.240 [initandlisten] db version v2.4.9
Tue Mar 11 14:50:24.240 [initandlisten] git version: 52fe0d21959e32a5bdbecdc62057db386e4e029c
Tue Mar 11 14:50:24.240 [initandlisten] build info: windows sys.getwindowsversion(major=6, minor=1, build=7601, platform=2, service_pack='Service Pack 1') BOOST_LIB_VERSION=1_49
Tue Mar 11 14:50:24.240 [initandlisten] allocator: system
Tue Mar 11 14:50:24.240 [initandlisten] options: {}
Tue Mar 11 14:50:24.244 [initandlisten] journal dir=\data\db\journal
Tue Mar 11 14:50:24.244 [initandlisten] recover : no journal files present, no recovery needed
Tue Mar 11 14:50:24.323 [initandlisten] waiting for connections on port 27017
Tue Mar 11 14:50:24.324 [websvr] admin web console waiting for connections on port 28017
Tue Mar 11 14:50:40.982 [initandlisten] connection accepted from 127.0.0.1:58323 #1 (1 connection now open)
Tue Mar 11 14:50:41.014 [initandlisten] connection accepted from 127.0.0.1:58324 #2 (2 connections now open)
Tue Mar 11 14:50:41.024 [initandlisten] connection accepted from 127.0.0.1:58325 #3 (3 connections now open)
Tue Mar 11 14:50:41.024 [initandlisten] connection accepted from 127.0.0.1:58326 #4 (4 connections now open)
Tue Mar 11 14:50:41.025 [initandlisten] connection accepted from 127.0.0.1:58327 #5 (5 connections now open)

and this in the “grunt” console:

C:\Users\Nikola\Desktop\mean>grunt
Running "jshint:all" (jshint) task
>> 42 files lint free.

Running "concurrent:tasks" (concurrent) task
Running "nodemon:dev" (nodemon) task
Running "watch" task
Waiting...[nodemon] v1.0.15
[nodemon] to restart at any time, enter `rs`
[nodemon] watching: *.*
[nodemon] starting `node --debug server.js`
debugger listening on port 5858
Express app started on port 3000

You can now take a look at your application by visiting localhost:3000 in your browser: meanHomeView the signup screen: meanSignup and signin screen: meanSignin

Ship it

In order to deploy to Nodejitsu, you have to login to Nodejitsu (jitsu login ) and then run jitsu deploy . At this point I got an error like this:

info:    Starting app mean
error:   Error running command deploy
error:   Errors occured while starting the application
error:   Error output from application. This is usually a user error.
error:   grunt-cli: The grunt command line interface. (v0.1.13)
error:
error:   Fatal error: Unable to find local grunt.
error:
error:   If you're seeing this message, either a Gruntfile wasn't found or grunt
error:   hasn't been installed locally to your project. For more information about
error:   installing and configuring grunt, please see the Getting Started guide:
error:
error:   http://gruntjs.com/getting-started
error:
error:   Error starting application. This could be a user error.
error:   info: Running start for app.
error:   info: Cleaning /opt/run
error:   info: Fetching application snapshot...
error:   info: Application snapshot fetched.
error:   info: Unpacking snapshot...
error:   info: Reading `package.json`...
error:   info: Starting application...
error:   info: Spawn: start --min-uptime 2000 -o /opt/run/forza.log -- forza -h multiplex.nodejitsu.com -p 8556 --start-log /opt/run/start.log --app-user hitman666 --app-name mean -- node node_modules/grunt-cli/bin/grunt
error:   info: `aeternum` pid: 63258
error:   info: Writing pidfile: /root/app.pid
error:   info: Tailing forza log: /opt/run/start.log
error:   info: Tail closing..
error:   info: Retry # 1 with 1000ms interval
error:   info: Tailing forza log: /opt/run/start.log
error:   info: Tail closing..
error:   info: Success:start

and naturally, I went looking if someone had a similar issue and it turns out someone on Stackoverflow asked this question. The OP (original poster) did find a solution him self and he said:

The gist of it was I had to move all grunt, karma, and forever dependencies to my devDependencies in the package.json file and change my start to “node server”.

Now, I tried to communicate with the OP to get some more info, but strangely no reply (yet). I figured it out myself in the end and this is how my package.json  file looks like now:

{
  "name": "mean",
  "description": "MEAN - A fullStack javascript framework powered by  MongoDB, ExpressJS, AngularJS, NodeJS.",
  "version": "0.1.2-1",
  "private": false,
  "repository": {
    "type": "git",
    "url": "https://github.com/linnovate/mean.git"
  },
  "engines": {
    "node": "0.10.x",
    "npm": "1.3.x"
  },
  "scripts": {
    "start": "node server.js",
    "test": "node node_modules/grunt-cli/bin/grunt test",
    "postinstall": "node node_modules/bower/bin/bower install"
  },
  "dependencies": {
    "express": "~3.4.7",
    "bower": "~1.2.8",
    "grunt-cli": "~0.1.11",
    "connect-mongo": "~0.4.0",
    "connect-flash": "~0.1.1",
    "consolidate": "~0.10.0",
    "swig": "~1.3.2",
    "mongoose": "~3.8.3",
    "passport": "~0.1.18",
    "passport-local": "~0.1.6",
    "passport-facebook": "~1.0.2",
    "passport-twitter": "~1.0.2",
    "passport-github": "~0.1.5",
    "passport-google-oauth": "~0.1.5",
    "passport-linkedin": "~0.1.3",
    "lodash": "~2.4.1",
    "forever": "~0.10.11",
    "view-helpers": "~0.1.4",
    "mean-logger": "0.0.1"
  },
  "devDependencies": {
    "grunt-env": "~0.4.1",
    "grunt-cli": "~0.1.11",
    "grunt-contrib-watch": "latest",
    "grunt-contrib-jshint": "latest",
    "grunt-karma": "~0.6.2",
    "grunt-nodemon": "0.2.0",
    "grunt-concurrent": "latest",
    "grunt-mocha-test": "latest",
    "karma": "~0.10.4",
    "karma-coffee-preprocessor": "~0.1.0",
    "karma-coverage": "~0.1.0",
    "karma-script-launcher": "~0.1.0",
    "karma-chrome-launcher": "~0.1.0",
    "karma-firefox-launcher": "~0.1.0",
    "karma-html2js-preprocessor": "~0.1.0",
    "karma-jasmine": "~0.1.3",
    "karma-requirejs": "~0.2.0",
    "karma-phantomjs-launcher": "~0.1.0",
    "forever": "~0.10.11",
    "supertest": "0.8.2",
    "should": "2.1.1"
  },
  "subdomain": "hitman666-mean2"
}

After making this change I deployed my application once more, and everything went without an error, but when I browsed it on Nodejitsu I got an error

502 Reached max retries limit

I realized that I don’t have a correct MongoDB connection string, and in order to change this I had to edit the file production.js which is in the config/env/  folder.MongoDBconnectionString

I copied the MongoDB connection string from Nodejitsu’s admin dashboard (I wrote about how to set this in my previous post: Getting started with Nodejitsu on Windows by deploying a MEN framework).

After this change I deployed my app again, and now everything was working, yay!

CodeProject, NodeJS

Deploying MongoDB and Node.js application on OpenShift

This is a post about getting started with OpenShift Online on a Windows machine by deploying a MongoDB, Node.js and RockMongo application for free. The reason why this wasn’t a title is that it’s just too darn long :). Cool, with getting that off my chest, we can now start…

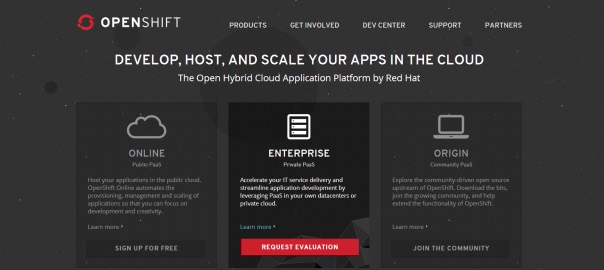
OpenShift Online – Red Hat’s public cloud application development and hosting platform that automates the provisioning, management and scaling of applications so that you can focus on writing the code for your business, startup, or next big idea.

If you’ve tried OpenShift, you may have come across this offical how-to video only to find it completely useless. The accompanying official blog post is way better but still lacks some exact example code on, for example, how to connect to MongoDB from Node.js. Read on to see how I did it.

First, you have to create a new OpenShift account in case you don’t have one already.

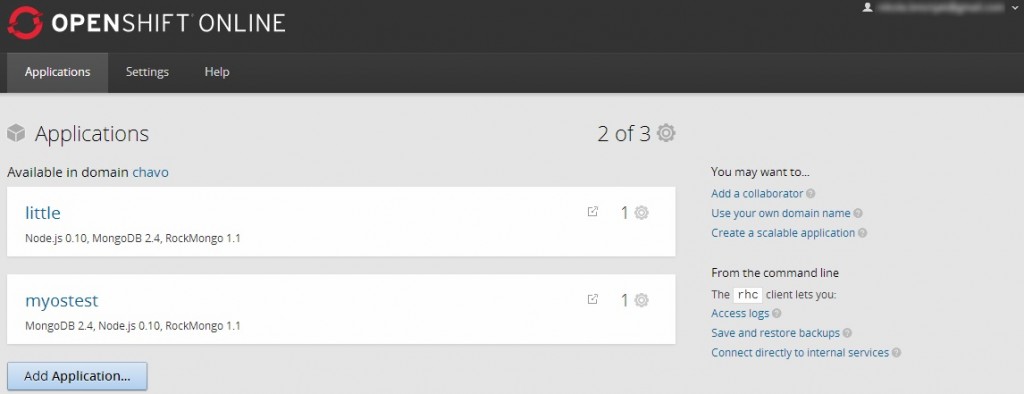
Once you login to the site you get a nice looking dashboard and in order to create a new application you could click on the Add application button:
openshift_login

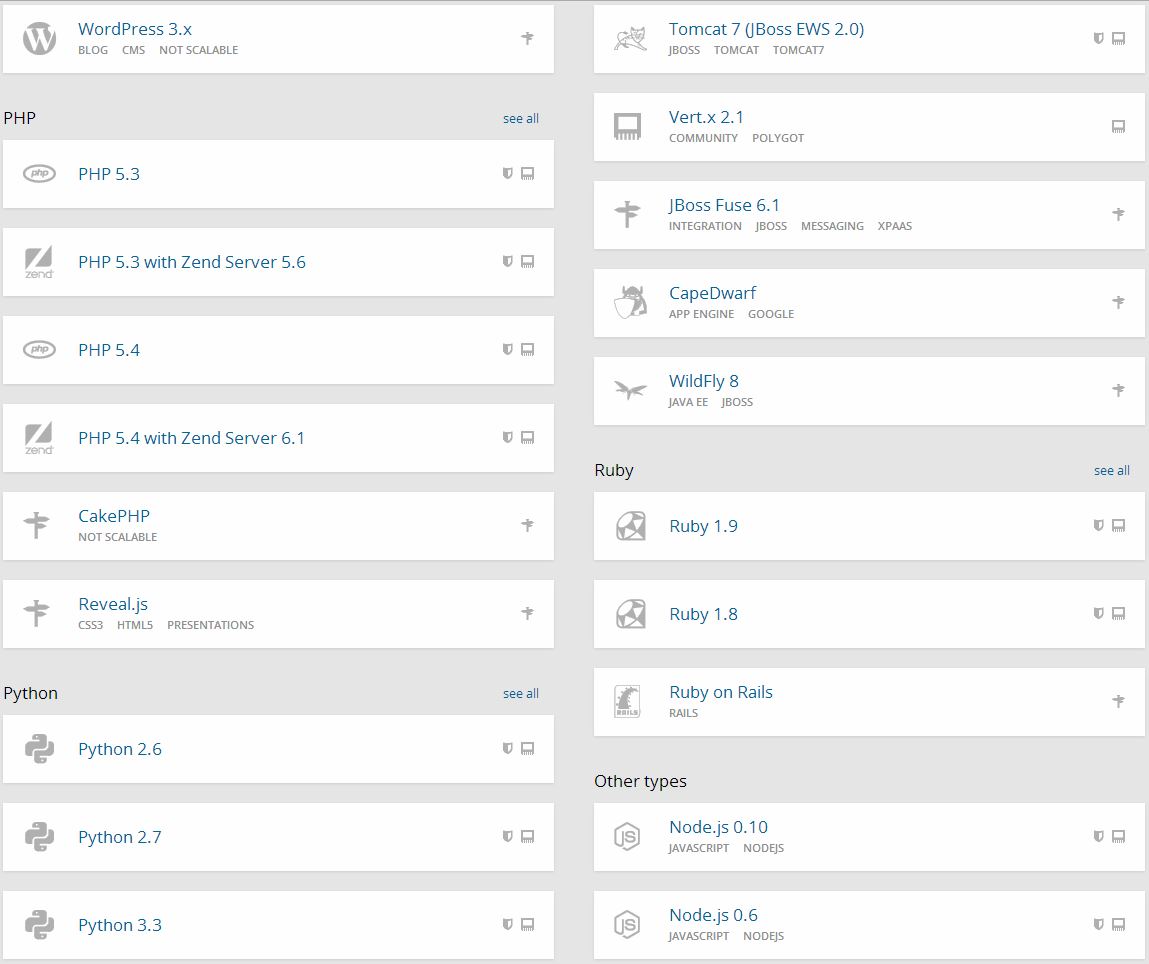
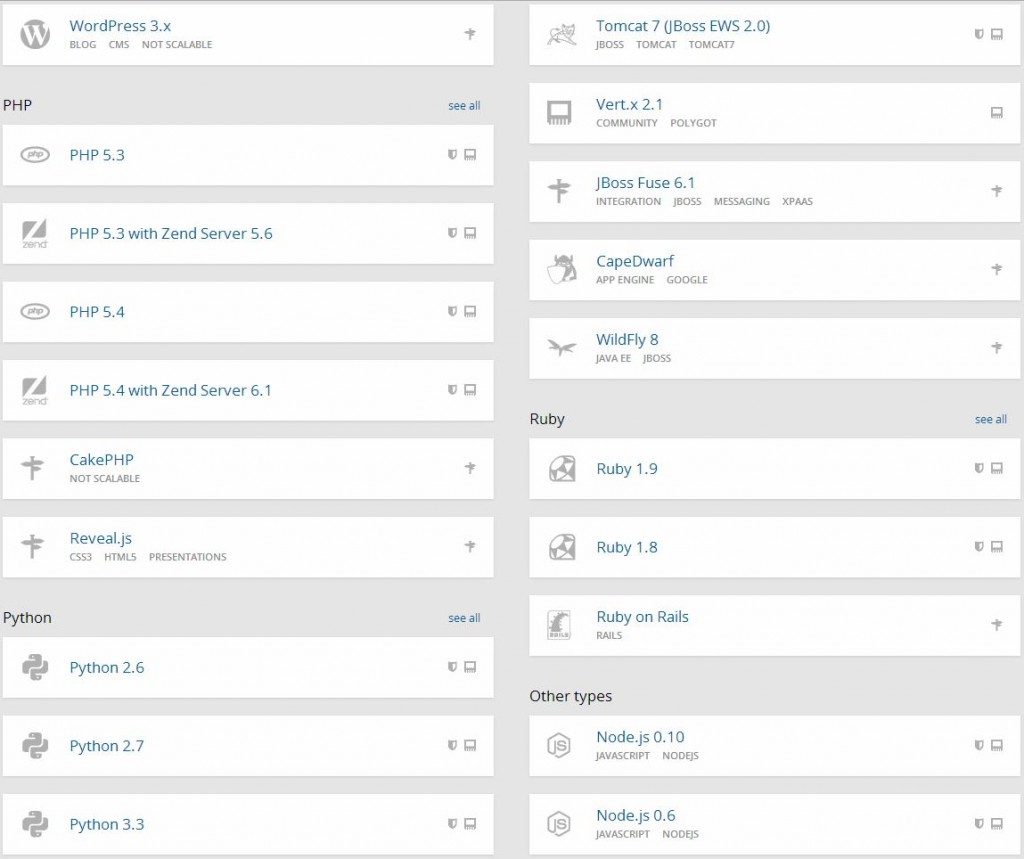
which would then offer really a lot of options:
openshift_applist

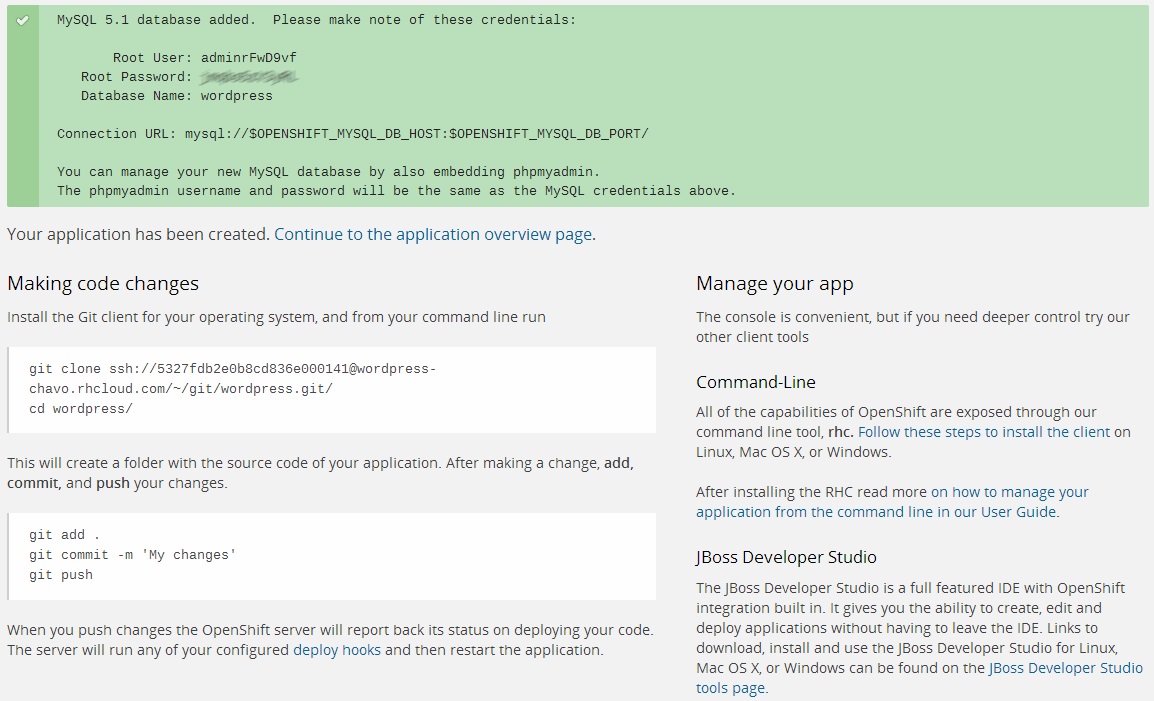
Setting up WordPress is easy as clicking the WordPress icon and naming your app on the next page:
openshift_wp
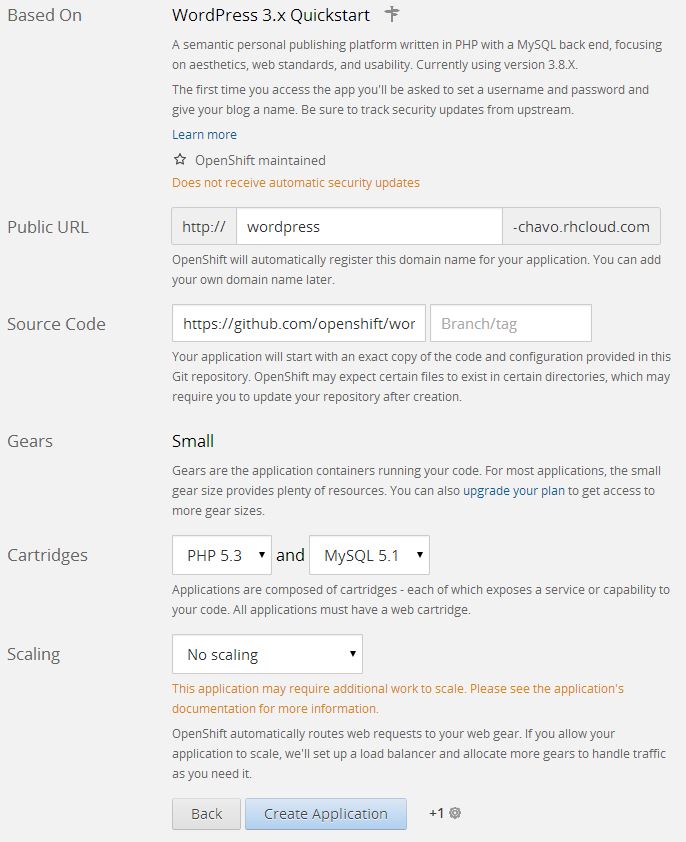
and clicking the Create Application button. After the process finishes (few mins) you get the instructions on how to alter the application:
openshift_wp_done
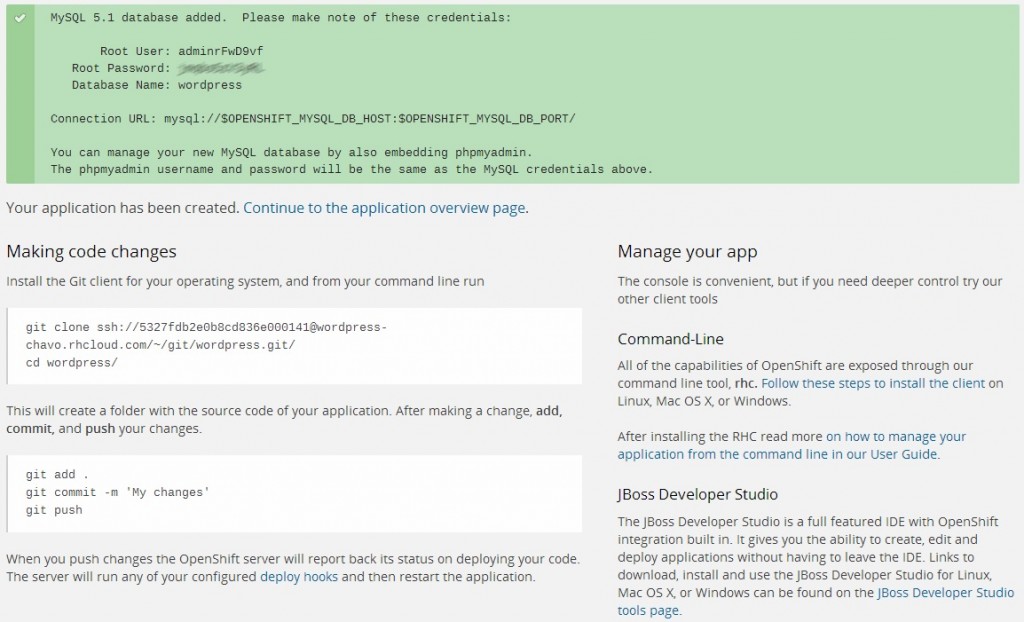
Basically, you clone the application’s source code with git and after doing some changes you push them back. At this point, all you have to do is visit the link of your newly created application (you can see the link in your Applications tab in the OpenShift admin interface) and you’ll get the WordPress init install screen:
openshift_wp_isntall

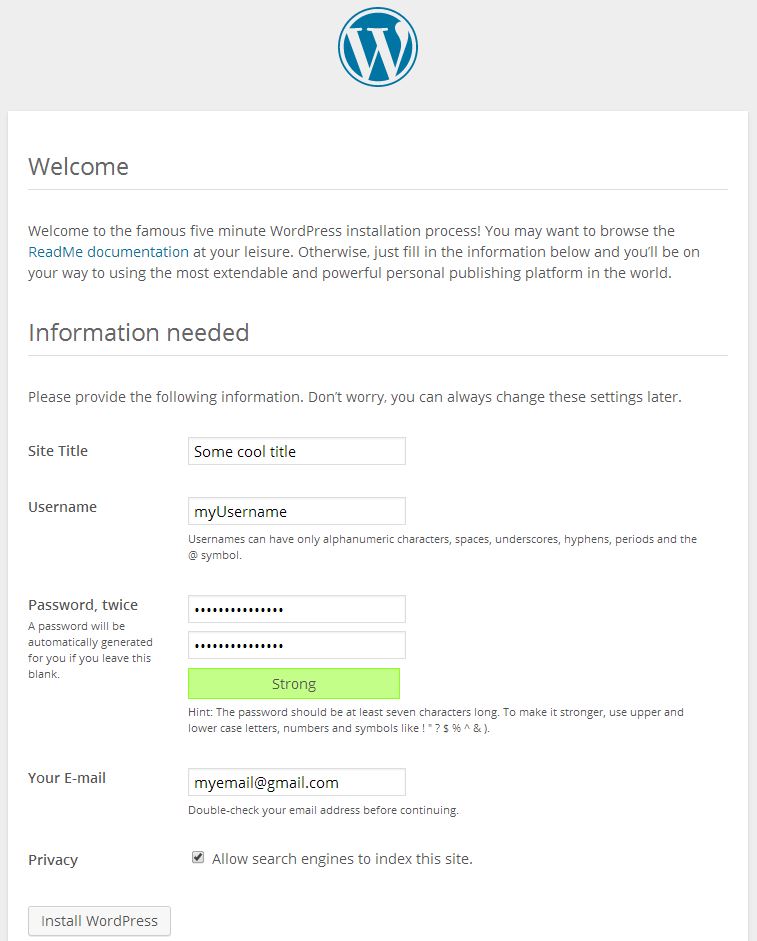
If you ever installed WordPress before everything should be familiar from now on. And there you have it – you have WordPress installed in a matter of few clicks.

Keep calm and roll up your sleves

You may be wondering where’s the MongoDB and Node.js from the title? Hack on…

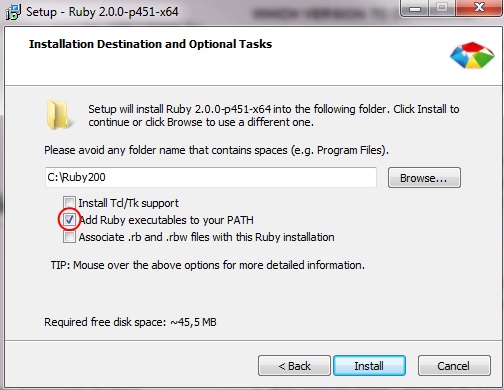
So, we saw how easy it was to create an app from web admin interface, but since we’re devs and we loove terminal (don’t we ;)) we’re gonna take a different route here. OpenShift offers the OpenShift Client tools aka rhc. In order to install rhc you first have to have Ruby installed, and the easiest way to do this on a Windows machine is to install the RubyInstaller:

openshift_rubyinstaller

Just click the big red download button and I’m sure you now how to take it from there. Important note though, while installing just make sure that you check the Add Ruby executables to your PATH option:
openshift_rubypath

After the installation is done you can fire up your terminal (I use Console 2, and you can see my settings here: Customize Console 2 on Windows machine) and run

gem install rhc

and once this is done just run rhc setup  (this is an important part for us Windows users, as the official documentation on Installing OpenShift RHC Client Tools says we should only run rhc , and that does not work – as noted by the comments on that post).

Now we can use rhc to create a new application. To create a new application named myTest with Node.js and MongoDB you have to run:

rhc app create myTest nodejs-0.10 mongodb-2.4

and you’ll get an output similar to this:

C:\Users\Nikola\Desktop>rhc app create myTest nodejs-0.10 mongodb-2.4
DL is deprecated, please use Fiddle
Application Options
-------------------
Domain:     chavo
Cartridges: nodejs-0.10, mongodb-2.4
Gear Size:  default
Scaling:    no

Creating application 'myTest' ... done

  MongoDB 2.4 database added.  Please make note of these credentials:

   Root User:     admin
   Root Password: ..bip..Bip..
   Database Name: mytest

Connection URL: mongodb://$OPENSHIFT_MONGODB_DB_HOST:$OPENSHIFT_MONGODB_DB_PORT/

Waiting for your DNS name to be available ... done

Cloning into 'mytest'...
The authenticity of host 'mytest-chavo.rhcloud.com (54.235.21.98)' can't be established.
RSA key fingerprint is cf:ee:77:cb:0e:fc:02:d7:72:7e:ae:80:c0:90:88:a7.
Are you sure you want to continue connecting (yes/no)? yes
Warning: Permanently added 'mytest-chavo.rhcloud.com,54.235.21.98' (RSA) to the list of known hosts.
Enter passphrase for key '/c/Users/Nikola/.ssh/id_rsa':
remote: Counting objects: 21, done.
remote: Compressing objects: 100% (17/17), done.
Receiving objects: 100% (21/21), 20.22 KiB, done.ceiving objects:  90% (19/21)

Your application 'mytest' is now available.

  URL:        http://mytest-chavo.rhcloud.com/
  SSH to:     [email protected]
  Git remote: ssh://[email protected]/~/git/mytest.git/
  Cloned to:  C:/Users/Nikola/Desktop/mytest

Run 'rhc show-app myTest' for more details about your app.

If you’re concerned about that ‘DL is deprecated, please use Fiddle‘, don’t be as it’s a mere warning as they say on Stackoverflow (or if you want to explore this topic further make sure you check this question on SO).

If you get an error saying that there’s no such cartridge you will get a list of all the available cartridges which you can use, so just adjust the above command accordingly

C:\Users\Nikola\Desktop>rhc app create
DL is deprecated, please use Fiddle
When creating an application, you must provide a name and a cartridge from the
list below:

Short Name      Full name
==========      =========
diy-0.1         Do-It-Yourself 0.1
jbossas-7       JBoss Application Server 7
jbosseap-6      JBoss Enterprise Application Platform 6
jenkins-1       Jenkins Server
nodejs-0.10     Node.js 0.10
nodejs-0.6      Node.js 0.6
perl-5.10       Perl 5.10
php-5.3         PHP 5.3
zend-5.6        PHP 5.3 with Zend Server 5.6
php-5.4         PHP 5.4
zend-6.1        PHP 5.4 with Zend Server 6.1
python-2.6      Python 2.6
python-2.7      Python 2.7
python-3.3      Python 3.3
ruby-1.8        Ruby 1.8
ruby-1.9        Ruby 1.9
jbossews-1.0    Tomcat 6 (JBoss EWS 1.0)
jbossews-2.0    Tomcat 7 (JBoss EWS 2.0)
jboss-vertx-2.1 Vert.x 2.1

Please specify the name of the application and the web cartridge to install
Usage: rhc app-create <name> <cartridge> [... <cartridge>] [... VARIABLE=VALUE]
[-n namespace]
Pass '--help' to see the full list of options

Keep on rockin’ on

MongoDB is an open-source document database, and the leading NoSQL database. In order to add RockMongo MongoDB administration, which is a web front-end for interacting with your MongoDB, you have to execute this command:

rhc cartridge add rockmongo

after which you get an output similar to this:

C:\Users\Nikola\Desktop\mytest>rhc cartridge add rockmongo
DL is deprecated, please use Fiddle
Using rockmongo-1.1 (RockMongo 1.1) for 'rockmongo'
Adding rockmongo-1.1 to application 'mytest' ... done

rockmongo-1.1 (RockMongo 1.1)
-----------------------------
  Gears:          Located with mongodb-2.4, nodejs-0.10
  Connection URL: https://mytest-chavo.rhcloud.com/rockmongo/

Please make note of these MongoDB credentials:
  RockMongo User: admin
  RockMongo Password: ..i.aint.telin'..
URL: https://mytest-chavo.rhcloud.com/rockmongo/

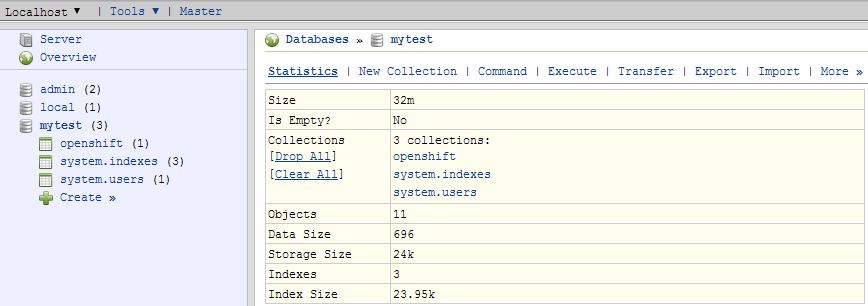
If you login to RockMongo by using the username and pass provided you will get a simple but useful interface:
openshift_rockmongo

However, if you prefer to do it via shell, you can do this:

rhc ssh

and after that start interactive command-line interface by typing mongo :

[mytest-chavo.rhcloud.com 532812f94382eca22b000657]\> mongo
MongoDB shell version: 2.4.6
connecting to: 127.9.197.130:27017/admin
Welcome to the MongoDB shell.
For interactive help, type "help".
For more comprehensive documentation, see
        http://docs.mongodb.org/
Questions? Try the support group
        http://groups.google.com/group/mongodb-user

Now let’s select a database, which will be same as your app’s name.

> use mytest
switched to db mytest

To insert some record we can do something like this:

> var a = {"user":"nikola", points:10};
> db.scores.insert(a);

and check if it was successfully inserted:

> db.scores.find();
{ "_id" : ObjectId("53284189d6e5e4aedb1fbafd"), "user" : "nikola", "points" : 10 }

To query this information with Node.js you first have to install mongojs with npm install mongojs . Then open up the server.js  file (it is in the root folder of your application) and add these lines in the self.createRoutes  object:

self.routes['/db'] = function(req, res) {
    var mongojs = require('mongojs');
    var dbName = "/mytest";
    var connection_string = process.env.OPENSHIFT_MONGODB_DB_USERNAME + ":" +  process.env.OPENSHIFT_MONGODB_DB_PASSWORD + "@" + process.env.OPENSHIFT_MONGODB_DB_HOST + dbName;
    var db = mongojs(connection_string, ['scores']);
    var books = db.collection('scores');

    db.scores.find(function(err, docs) {
       res.send(docs); 
    });
};

All aboard, and ready to take-off

Now it’s time to add the changes to the staging state with git add . (you may wanna check Git if this looks daunting). You can check the status of the files with git status . To commit the changes you have to execute:  git commit -a -m “Added code to talk to db” and finally git push  to send the changes to OpenShift for deployment.

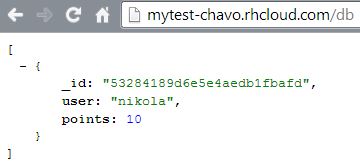
Now, if you followed this tutorial, on the link http://mytest-chavo.rhcloud.com/db (notice this db here, and ofc exact link would reflect to your app) you should get this output:

openshift_dboutput

And a quick closing with with one useful command to get the overview of the app settings:

C:\Users\Nikola\Desktop\mytest>rhc app show
DL is deprecated, please use Fiddle
mytest @ http://mytest-chavo.rhcloud.com/ (uuid: 532812f94382eca22b000657)
--------------------------------------------------------------------------
  Domain:     chavo
  Created:    10:33 AM
  Gears:      1 (defaults to small)
  Git URL:    ssh://[email protected]/~/git/mytest.git/
  SSH:        [email protected]
  Deployment: auto (on git push)

  mongodb-2.4 (MongoDB 2.4)
  -------------------------
    Gears:          Located with nodejs-0.10, rockmongo-1.1
    Connection URL: mongodb://$OPENSHIFT_MONGODB_DB_HOST:$OPENSHIFT_MONGODB_DB_PORT/
    Database Name:  mytest
    Password:       ..ccc...
    Username:       admin

  nodejs-0.10 (Node.js 0.10)
  --------------------------
    Gears: Located with mongodb-2.4, rockmongo-1.1

  rockmongo-1.1 (RockMongo 1.1)
  -----------------------------
    Gears:          Located with mongodb-2.4, nodejs-0.10
    Connection URL: https://mytest-chavo.rhcloud.com/rockmongo/

And this is it, now it’s your time to make something useful with it!

Page 3 of 4«1234»

Recent posts

  • When espanso Breaks on Long Replacement Strings (and How to Fix It)
  • 2024 Top Author on dev.to
  • Hara hachi bun me
  • Discipline is also a talent
  • Play for the fun of it

Categories

  • Android (3)
  • Books (114)
    • Programming (22)
  • CodeProject (36)
  • Daily Thoughts (78)
  • Go (3)
  • iOS (5)
  • JavaScript (128)
    • Angular (4)
    • Angular 2 (3)
    • Ionic (61)
    • Ionic2 (2)
    • Ionic3 (8)
    • MEAN (3)
    • NodeJS (27)
    • Phaser (1)
    • React (1)
    • Three.js (1)
    • Vue.js (3)
  • Leadership (1)
  • Meetups (8)
  • Miscellaneou$ (78)
    • Breaking News (8)
    • CodeSchool (2)
    • Hacker Games (3)
    • Pluralsight (7)
    • Projects (2)
    • Sublime Text (2)
  • PHP (6)
  • Quick tips (41)
  • Servers (8)
    • Heroku (1)
    • Linux (3)
  • Stack Overflow (81)
  • Unity3D (9)
  • Windows (8)
    • C# (2)
    • WPF (3)
  • Wordpress (2)

"There's no short-term solution for a long-term result." ~ Greg Plitt

"Everything around you that you call life was made up by people that were no smarter than you." ~ S. Jobs

"Hard work beats talent when talent doesn't work hard." ~ Tim Notke

© since 2016 - Nikola Brežnjak