Nikola Brežnjak blog - Tackling software development with a dose of humor
  • Home
  • Daily Thoughts
  • Ionic
  • Stack Overflow
  • Books
  • About me
Home
Daily Thoughts
Ionic
Stack Overflow
Books
About me
  • Home
  • Daily Thoughts
  • Ionic
  • Stack Overflow
  • Books
  • About me
Nikola Brežnjak blog - Tackling software development with a dose of humor
Books

The Science of Getting Rich – Wallace Wattles

My favourite quotes from the book The Science of Getting Rich by Wallace Wattles:

One is all and all is one. One substance manifests itself as the seeming many elements of the material world.

The fact remains that it is not possible to live a really complete or a successful life unless one is rich. No man can rise to his greatest possible height in talent or soul development unless he has plenty of money. For to unfold the soul and to develop talent, he must have many things to use, and he cannot have these things if he hasn’t got the money to buy them with. A man develops mind, soul and body by making use of these things. And the society is so organised that the man must have money in order to become the possessor of things. Therefore the basis of all advancement for men must be science of getting rich.

To be really rich does not mean to be satisfied or contempt with a little. No man ought to be satisfied with little if he is capable of using and enjoying more.

To be content with less is sinful.

We should live equally for the mind, body and soul.

You can render to God and humanity no greater service than to make the most of yourself.

Getting rich is not a result of saving. Nor is getting due to doing things which others failed to do.

You will do best in the business you like.

You do not want to get rich in order to live “sweinlishly”.

Get rid of the idea that God wants you to sacrifice for others, and then you can secure his favor by doing so. What she wants is to make the most of yourself, for yourself and for others, and you can help others more by making the most of yourself.

You can make the best of yourself only by getting rich.

You are to become a creator, not competitor.

You do not have to get something for nothing. You can give a man more use value than the cash value that you take from him.

It is your father’s pleasure to give you the kingdom, said Jesus.

Surround yourself with the best in order to become the best.

Know what you want, be definite and ask for it.

Think that the thing it is already yours. Live in the house mentally until it takes the form around you physically.

Whatsoever things you ask for when you pray, believe that you will receive them and you shall have them, said Jesus.

You cannot impress the mind of God by having a special Sabath day set apart to tell him what you want and then forgetting him during the week. You need to pray without seizing.

If you want to get rich, don’t study poverty, health is not obtained by thinking about disease.

Never take sudden or radical action to as when you are in doubt of wisdom of doing so.

Only those who gain more retain any. From him who had not shall be taken even that which he have.

Don’t please your employer, advance yourself.

Never admit the possibility of failure or speak in the way of failure as a possibility. Never speak of times as being hard or business conditions being doubtful.

There is a thinking stuff from which all things are made and which in its original state permeate penetrate and fills the inter spaces of the universe.

A thought in its substance produces the thing that is imaged by the thought.

Man can form things in his thought and by impressing his thought upon formless substance can cause the thing he thinks about to be created. In order to do this man must pass from competitive to creative mind, otherwise he cannot be in harmony with the formless intelligence which is always creative and never competitive in spirit.

Man may come into full harmony with the formless substance by entertaining a lively and sincere gratitude for the blessings it bestoves upon him. Gratitude unifies the mind of men within intelligence of substance so that mans thoughts are received by the formless.

Man must form a clear and definite image of the things he wishes to have, to do, or to become and he must hold this image in his thoughts while being deeply grateful for the supreme that all his desires are granted to him.

The man who wishes to get rich must spend his leisure hours in contemplating his vision and in earnest thanksgiving that the reality is being given to him. Too much stress must not be laid upon the importance of frequent contemplation of the mental image.

You have to do this day all that can be done this day, with doing each act in a successful manner.

CodeProject, WPF

How to build a font viewer application in WPF without writing any C# code

TL;DR

You can download from Github the demo application (zipped exe) or the whole source code project (Visual Studio project solution), or continue reading to see how it was built step by step.

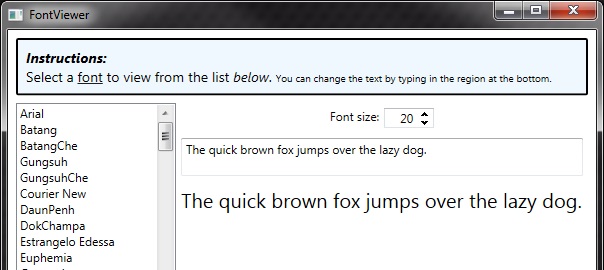
What is this for an application?

My version of the FontViewer application as initially designed and developed in the book Sams Teach Yourself WPF in 24 Hours, with added IntegerUpDown control from Extended.Wpf.Toolkit NuGet package (for changing the font size).

Disclamer

I’m in no way affiliated with Amazon or this book, I just think it’s great, for beginners especially. This StackOverflow question may be useful if you’re searching for a good book on learning WPF.

Let’s build it step by step

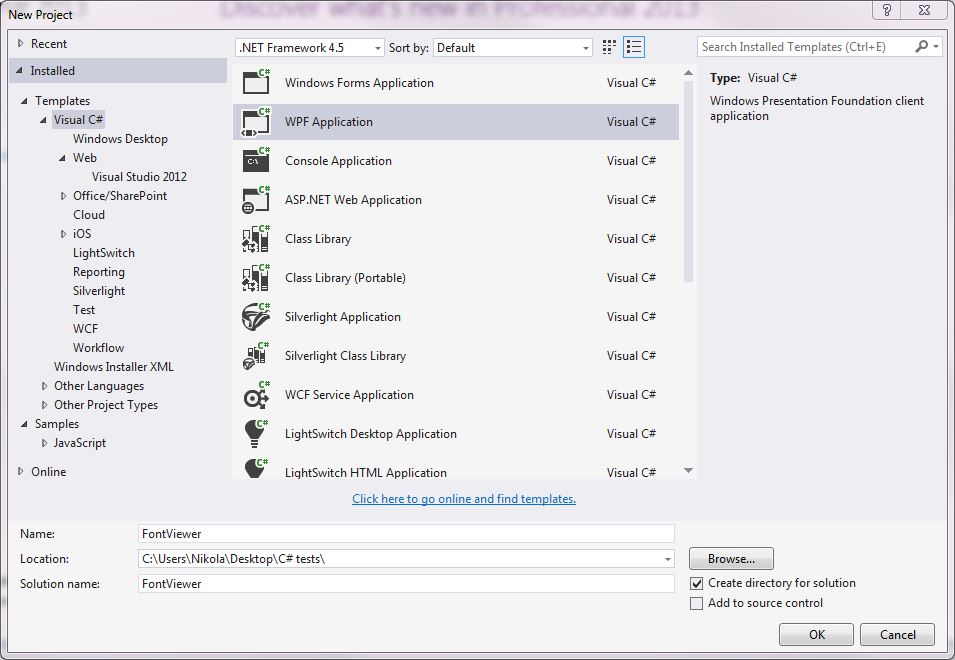
First, create a new WPF Application project in Visual Studio (File -> New Project) as shown on the image below, and name it FontViewer:

FontViewer_1

Full source code listing

Now, copy the following XAML code in your MainWindow.xaml file (explanation comes after):

<Window x:Class="FontViewer.MainWindow"
        xmlns="http://schemas.microsoft.com/winfx/2006/xaml/presentation"
        xmlns:x="http://schemas.microsoft.com/winfx/2006/xaml"
        xmlns:xctk="http://schemas.xceed.com/wpf/xaml/toolkit"
        Title="FontViewer" Height="450" Width="600">
    
    <DockPanel Margin="8">
        <Border DockPanel.Dock="Top"
                CornerRadius="1"
                BorderThickness="2"
                BorderBrush="Black"
                Background="AliceBlue"
                Padding="8"
                Margin="0 0 0 8">
            <TextBlock FontSize="14" TextWrapping="Wrap">
                <Bold><Italic>Instructions:</Italic></Bold>
                <LineBreak />
                
                Select a <Underline>font</Underline> to view from the list <Italic>below</Italic>.
                <Span FontSize="10">
                    You can change the text by typing in the region at the bottom.
                </Span>
            </TextBlock>
        </Border>
        
        <ListBox x:Name="FontList" 
                 DataContext="{x:Static Fonts.SystemFontFamilies}"
                 DockPanel.Dock="Left" 
                 ItemsSource="{Binding}"
                 Width="160">
            <ListBox.ToolTip>
                <ToolTip>
                    <StackPanel Orientation="Horizontal">
                        <TextBlock Text="{Binding Path=Count, Mode=OneTime}"/>
                        <TextBlock Text=" fonts are installed."/>
                    </StackPanel>
                </ToolTip>
            </ListBox.ToolTip>
        </ListBox>

        <StackPanel Orientation="Horizontal"  
                    HorizontalAlignment="Center" 
                    Margin="5"
                    DockPanel.Dock="Top">
            
            <TextBlock Margin="0 0 5 0">Font size:</TextBlock>
            <xctk:IntegerUpDown x:Name="FontSize"
                                Height="20" 
                                Width="50"
                                Increment="1" 
                                Value="20">
            </xctk:IntegerUpDown>
        </StackPanel>

        <TextBox x:Name="SampleText"
                 MinLines="2"
                 Margin="5"
                 TextWrapping="Wrap"
                 ToolTip="Type here to change the preview text."
                 DockPanel.Dock="Top">
            The quick brown fox jumps over the lazy dog.
        </TextBox>

        <TextBlock Text="{Binding ElementName=SampleText, Path=Text}"
                   FontFamily="{Binding ElementName=FontList,Path=SelectedItem}"
                   FontSize="{Binding ElementName=FontSize,Path=Value}"
                   TextWrapping="Wrap"
                   Margin="5"/>
    </DockPanel>
</Window>

Code decomposition

You can see that our main container is DockPanel, which is useful when you want to “dock” certain elements to the sides (top, bottom, left, right) of the window.

Next comes the Border element which contains instructions (on how to use the application) written inside the TextBlock element. If you’re familiar with CSS, the attributes on the Border element should seem natural to you. However, one novelty is the DockPanel.Dock=”Top” property which basically tells the Border element to position itself at the top of the parent DockPanel (in which it is contained).

To populate the list of available fonts which are installed on the machine, we’re using the ListBox element. It’s docked to the left, its name variable (by which we can reference it later in the code) is set to FontList (x:Name=”FontList”), and most importantly the ItemSource attribute is set to {x:Static Fonts.SystemFontFamilies} which basically tells the ListBox that it should display all the items which are returned from the static property SystemFontFamilies provided by .NET framework.

After the ListBox comes a StackPanel which by default “stacks” elements that it contains one below the other. By using the Orientation property (Orientation=”Horizontal”) we can make the contained elements align one next to the other.

Let’s mix it up a little

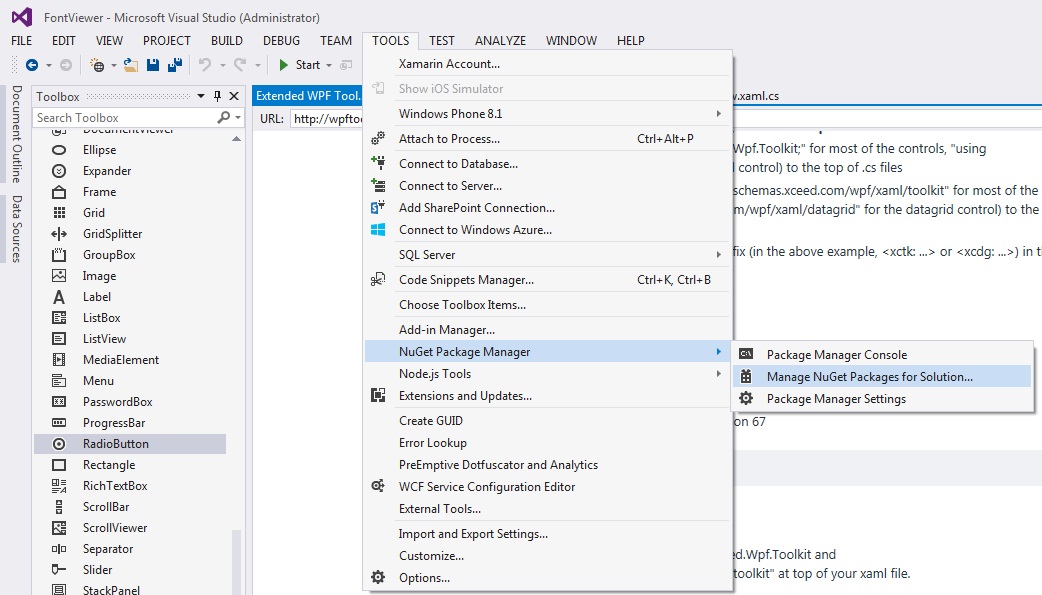
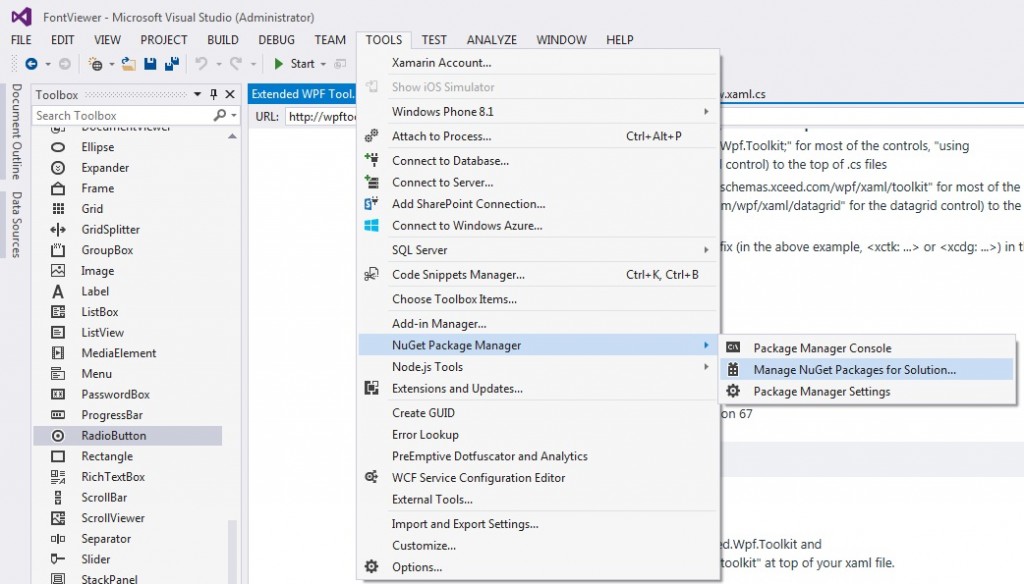
Since we want to have a numeric Up/Down control as we do in WinForms we will have to download additional component as it doesn’t exist in the standard WPF library. The discussion about this can be found on Stack Overflow. The solution is to go to Tools -> NuGet Package Manager -> Manage NuGet Packages… as shown on the illustration below:

FontViewer_3

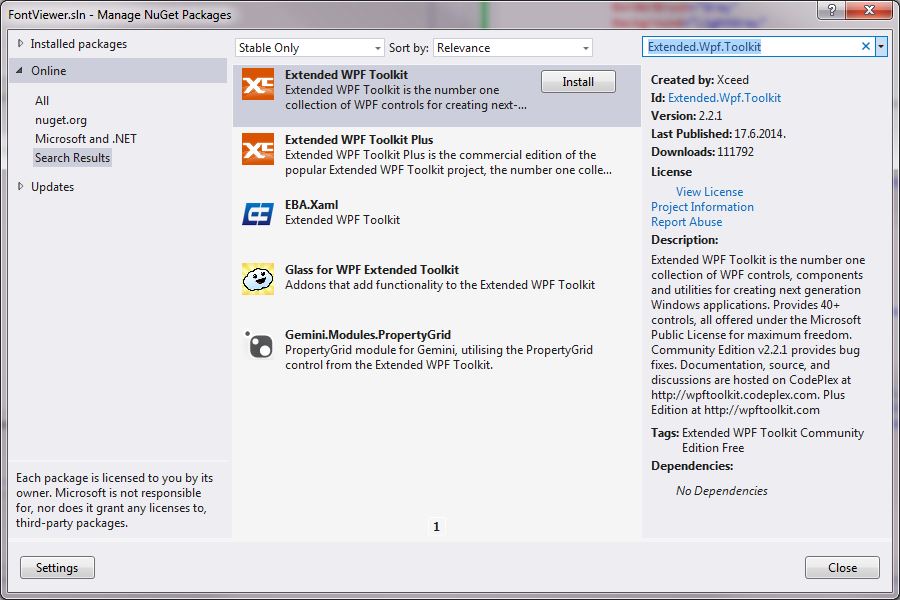
On the form that shows up after this you have to do a search for Extended.Wpf.Toolkit and Install it:

FontViewer_2

As stated in the installation instructions you have to:

  1. Add a using statement (“using Xceed.Wpf.Toolkit;” for most of the controls, “using Xceed.Wpf.DataGrid;” for the datagrid control) to the top of .cs files
  2. Add a new xmlns (xmlns:xctk=”http://schemas.xceed.com/wpf/xaml/toolkit” for most of the controls, xmlns:xcdg=”http://schemas.xceed.com/wpf/xaml/datagrid” for the datagrid control) to the top of XAML files
  3. Remember to use the namespace prefix (in the above example, <xctk: …> or <xcdg: …>) in the body of your XAML

As you can see in the full code listing, I added the needed xmlns in MainWindow.xaml. However, the needed using statement (using using Xceed.Wpf.Toolkit;) has to be added in the MainWindow.cs (right click on the MainWindow.xaml file and select View Code) file.

After this installation and proper including is done, you can use the new IntegerUpDown control in your XAML file like this:

<xctk:IntegerUpDown x:Name="FontSize"
                    Height="20" 
                    Width="50"
                    Increment="1" 
                    Value="20">
</xctk:IntegerUpDown>

Increment attribute tells the control by which amount to increment/decrement the number which is set by default in Value attribute.

Let’s enter some text

In order for the user to be able to enter some text and then see how the text looks like in the particular font, we’re using the TextBox element. Most important attribute is the x:Name (x:Name=”SampleText”) because we’ll use it to reference it in the TextBlock below.

Show me how the font looks like

We’re using the TextBlock element to show the user how the text which he entered in the TextBox looks like in the font which he selected from the ListBox. Here lies the core of our application as here we’re setting the so called Data Binding. We’re binding the Text attribute of the TextBlock to whatever is entered in the TextBox named SampleText (Text=”{Binding ElementName=SampleText, Path=Text}”). Next, we’re binding the FontFamily to the selected item in the ListBox named FontList (FontFamily=”{Binding ElementName=FontList,Path=SelectedItem}”), and finally we’re binding the FontSize to the Value of the IntegerUpDown control named FontSize.

Wrap up

If you run your application now you’ll see it works as expected and just like that you’ve made your very own version of the FontViewer application, you’ve seen how to install additional components from within Visual Studio using NuGet package manager, and you’ve seen how to set the data binding between elements.

Hope this proved to be helpful and got you excited about WPF in that manner that you’ll now go and do further exploring on your own.

Quick tips

Enable continuous scrolling by default in Adobe Reader

Whenever I opened some pdf file and scrolled with the mouse the scrolling was per one page. Sure, you can change this by going to View -> Page Display -> Enable Scrolling:

enableScrolling

but once you reopen Adobe Reader it’s back to as it was.

The solution is to make the default setting for all documents to have this setting and you do this by going to Edit -> Preferences and selecting Accessibility -> Override Page Display and setting it to Single Page Continuous.

adobeReaderDefaultSettings

edit: Thanks to Hugo André’s comment, it seems that in newer versions this is found by going to: “Go to the tab Adobe Reader -> Preferences”.

Quick tips

How to make a print screen on a Mac keyboard on the Windows machine

This has been haunting me for some time now – there’s just no Print Screen key on this keyboard which works on a Windows machine.

If you take a look at this thread you’ll see numerous attempts of which only installing AppleKeys2 worked for me. Now I only press F13 and woila – it works the same as Print Screen on a normal Windows keyboard.

If for some reason the link for AppleKeys2 is not working anymore, you can download it here.

Quick tips, WPF

Maximizing WPF Window to second monitor

So, if you have this in the code behind:

if (System.Windows.Forms.Screen.AllScreens.Length >= Config.ScreenNumber)
{
    System.Drawing.Rectangle screenBounds = System.Windows.Forms.Screen.AllScreens[Config.ScreenNumber - 1].Bounds;
    this.Left = screenBounds.Left;
    this.Top = screenBounds.Top;
}

And this in your XAML file on Window:

<Window WindowState="Maximized" ...

Asuming that Config.ScreenNumber equals 2, it will not position itself on the second screen no matter what you do, it will maximize on your main screen. What helped in the end was to remove the WindowState from the XAML definition and to add Loaded event handler:

private void Window_Loaded(object sender, RoutedEventArgs e)
{
    this.WindowState = WindowState.Maximized;
}
C#

Proper singleton implementation in C#

Taken from: http://msdn.microsoft.com/en-us/library/ff650316.aspx

public class Singleton
{
   private static Singleton instance;

   private Singleton() {}

   public static Singleton Instance
   {
      get 
      {
         if (instance == null)
         {
            instance = new Singleton();
         }
         return instance;
      }
   }
}

Static initialization

public sealed class Singleton
{
   private static readonly Singleton instance = new Singleton();
   
   private Singleton(){}

   public static Singleton Instance
   {
      get 
      {
         return instance; 
      }
   }
}

Multithreaded singleton

public sealed class Singleton
{
   private static volatile Singleton instance;
   private static object syncRoot = new Object();

   private Singleton() {}

   public static Singleton Instance
   {
      get 
      {
         if (instance == null) 
         {
            lock (syncRoot) 
            {
               if (instance == null) 
                  instance = new Singleton();
            }
         }

         return instance;
      }
   }
}

Test program; on first form you have two buttons, one which sets the amount of singleton, and second button which opens up another form which then sets the amount again. Once returned to the first form, the value updates to the one set on second form.

//Form1.cs
public partial class Form1 : Form
{
    myClass mc;
    public Form1()
    {
        InitializeComponent();
        mc = myClass.Instance;
    }

    private void button1_Click(object sender, EventArgs e)
    {
        mc.iznos = 10;
        updateUI();
    }

    public void updateUI()
    {
        label1.Text = mc.iznos.ToString();
    }

    private void button2_Click(object sender, EventArgs e)
    {
        Form2 f2 = new Form2();
        f2.ShowDialog();
    }

    private void Form1_Activated(object sender, EventArgs e)
    {
        updateUI();
    }
}


//Form2.cs
public partial class Form2 : Form
{
    myClass mc;
    public Form2()
    {
        InitializeComponent();
        
        mc = myClass.Instance;
    }

    private void Form2_Load(object sender, EventArgs e)
    {
        mc.iznos = 5;
        updateUI();
    }

    public void updateUI()
    {
        label1.Text = mc.iznos.ToString();
    }
}
public class myClass{
    private static readonly myClass _instance = new myClass();

    private myClass(){}
    public static myClass Instance
    {
        get 
        {
            return _instance; 
        }
    }

    public int iznos { get; set; }
}
Miscellaneou$

Look up

Especially today, when you’re reading this post on your computer/laptop/mobile phone/tablet, this message may be one of the last wake up calls for us. I myself sit at the desk for way too much hours a day, and even though I try to compensate by using a standing desk at home, I still somehow feel that we should try to go (at least few times a week) back to the old days when we were kids and we played in the playground, or built bows in the forest… Meh, I’ll stop writing here and go out for the rest of the day…

C#

How to use App.config in Visual Studio C# .NET

Add reference to System.Configuration :

references

and include it using the using statement:

using System.Configuration;

Edit App.config so that you add your settings in the appSettings  node in an add  element with key  and value  parameters.

<?xml version="1.0" encoding="utf-8" ?>
<configuration>
    <startup> 
        <supportedRuntime version="v4.0" sku=".NETFramework,Version=v4.5" />
    </startup>

    <appSettings>
      <add key="server" value="localhost" />
      <add key="port" value="5432" />
      <add key="username" value="myusername" />
      <add key="password" value="mypass" />
      <add key="database" value="mydb" />
    </appSettings>
</configuration>

Now you can access your settings in code like this:

string server = ConfigurationManager.AppSettings["server"].ToString();
string port = ConfigurationManager.AppSettings["port"].ToString();
string username = ConfigurationManager.AppSettings["username"].ToString();
string password = ConfigurationManager.AppSettings["password"].ToString();
string database = ConfigurationManager.AppSettings["database"].ToString();


Linux, Quick tips

Installing CasperJS on RHEL Linux distribution

First you have to install NodeJS. You can do that via package manager for your distribution. In my case (RHEL) it is easily done with:

sudo yum install nodejs npm --enablerepo=epel

Installing CasperJS is easy via npm (Node package manager):

sudo npm install -g casperjs

You will get output similar to this:

Copying extracted folder /usr/lib/node_modules/casperjs/node_modules/phantomjs/phantomjs/phantomjs-1.9.7-linux-x86_64.tar.bz2-extract-1396259124118/phantomjs-1.9.7-linux-x86_64 -> /usr/lib/node_modules/casperjs/node_modules/phantomjs/lib/phantom
Writing location.js file
Done. Phantomjs binary available at /usr/lib/node_modules/casperjs/node_modules/phantomjs/lib/phantom/bin/phantomjs
/usr/bin/casperjs -> /usr/lib/node_modules/casperjs/bin/casperjs
npm WARN unmet dependency /usr/lib/node_modules/block-stream requires inherits@'~2.0.0' but will load
npm WARN unmet dependency undefined,
npm WARN unmet dependency which is version undefined
npm WARN unmet dependency /usr/lib/node_modules/fstream requires inherits@'~2.0.0' but will load
npm WARN unmet dependency undefined,
npm WARN unmet dependency which is version undefined
npm WARN unmet dependency /usr/lib/node_modules/fstream-ignore requires inherits@'2' but will load
npm WARN unmet dependency undefined,
npm WARN unmet dependency which is version undefined
npm WARN unmet dependency /usr/lib/node_modules/fstream-npm requires inherits@'2' but will load
npm WARN unmet dependency undefined,
npm WARN unmet dependency which is version undefined
npm WARN unmet dependency /usr/lib/node_modules/glob requires inherits@'2' but will load
npm WARN unmet dependency undefined,
npm WARN unmet dependency which is version undefined
npm WARN unmet dependency /usr/lib/node_modules/npmconf requires inherits@'~2.0.0' but will load
npm WARN unmet dependency undefined,
npm WARN unmet dependency which is version undefined
npm WARN unmet dependency /usr/lib/node_modules/tar requires inherits@'2' but will load
npm WARN unmet dependency undefined,
npm WARN unmet dependency which is version undefined
[email protected] /usr/lib/node_modules/casperjs
âââ [email protected] ([email protected], [email protected], [email protected], [email protected], [email protected], [email protected], [email protected])
[[email protected] ~]$ casperjs
Fatal: [Errno 2] No such file or directory; did you install phantomjs?
[[email protected] ~]$ /usr/bin/casperjs
Fatal: [Errno 2] No such file or directory; did you install phantomjs?
[[email protected] ~]$ /usr/lib/node_modules/casperjs/node_modules/phantomjs/lib/phantom/bin/phantomjs
phantomjs>
[[email protected] ~]$ /usr/lib/node_modules/casperjs/node_modules/phantomjs/lib/phantom/bin/phantomjs --version
1.9.7

To have the binaries in my path every time I log in I added this alias to my .bashrc:

alias phantomset="export PATH=$PATH:/usr/lib/node_modules/casperjs/node_modules/phantomjs/lib/phantom/bin/"

and my .bash_profile looks like this:

# User specific environment and startup programs
PATH=$PATH:$HOME/bin
export PATH
phantomset
Books

The Art of War – Sun Tzu

My favourite quotes from the book The Art of War by Sun Tzu:

Hold out baits to entice the enemy. Faint disorder, and crush him.

If it is to your advantage, make a forward move; if not, stay where you’re.

If you know you’re enemy and you know yourself, you need not to fear the result of hundredth of battles . If you know yourself but not the enemy, for every victory gained you’ll also suffer a defeat. If you know neither your enemy nor yourself you will succumb in every battle.

Care about your team but also be a “hardass”.

Hire only great people.

Plan ahead.

Know your enemy.

All warfare is based on deception.

Exploit enemy’s weaknesses, avoid his strengths

Page 48 of 51« First...102030«47484950»...Last »

Recent posts

  • When espanso Breaks on Long Replacement Strings (and How to Fix It)
  • 2024 Top Author on dev.to
  • Hara hachi bun me
  • Discipline is also a talent
  • Play for the fun of it

Categories

  • Android (3)
  • Books (114)
    • Programming (22)
  • CodeProject (36)
  • Daily Thoughts (78)
  • Go (3)
  • iOS (5)
  • JavaScript (128)
    • Angular (4)
    • Angular 2 (3)
    • Ionic (61)
    • Ionic2 (2)
    • Ionic3 (8)
    • MEAN (3)
    • NodeJS (27)
    • Phaser (1)
    • React (1)
    • Three.js (1)
    • Vue.js (3)
  • Leadership (1)
  • Meetups (8)
  • Miscellaneou$ (78)
    • Breaking News (8)
    • CodeSchool (2)
    • Hacker Games (3)
    • Pluralsight (7)
    • Projects (2)
    • Sublime Text (2)
  • PHP (6)
  • Quick tips (41)
  • Servers (8)
    • Heroku (1)
    • Linux (3)
  • Stack Overflow (81)
  • Unity3D (9)
  • Windows (8)
    • C# (2)
    • WPF (3)
  • Wordpress (2)

"There's no short-term solution for a long-term result." ~ Greg Plitt

"Everything around you that you call life was made up by people that were no smarter than you." ~ S. Jobs

"Hard work beats talent when talent doesn't work hard." ~ Tim Notke

© since 2016 - Nikola Brežnjak