Nikola Brežnjak blog - Tackling software development with a dose of humor
  • Home
  • Daily Thoughts
  • Ionic
  • Stack Overflow
  • Books
  • About me
Home
Daily Thoughts
Ionic
Stack Overflow
Books
About me
  • Home
  • Daily Thoughts
  • Ionic
  • Stack Overflow
  • Books
  • About me
Nikola Brežnjak blog - Tackling software development with a dose of humor
Linux

50+ commands ChatGPT thinks you should know about Terminal aka Command Line

TL;DR

Hey there and happy Wednesday* 👋

*a day on which, historically, most people wed on; thus: Wed nes day
Not really, but it would be a fun fact actually 🙂

OK, back on point; in this post, I’m going to take you through the basics of using the Terminal aka (as the cool kids using Windows call it) the Command Line. We’ll cover some basic commands, why it’s super useful, and how you can start flexing your command line muscles in no time!

Reality Check

Nowadays, on your first day at a new tech job, you probably aren’t going to be asked to ‘just SSH into the server and deploy the latest build.’. However, that doesn’t mean that knowing the basics of moving around the Linux system is something you shouldn’t learn. If nothing else, it’ll give you additional knowledge; and that’s why you came into this industry, right?

Great, then let’s go 💪

Why Terminal, You Ask?

Yes, the command line can seem intimidating with its blinking cursor and lack of buttons, but it’s really not that scary. Think of it as a conversation with your computer – you just need to know the right words.

Installing the Terminal 😏

Usually, you don’t need to install it; it comes with your operating system. But if you’re on Windows, you might want to look into installing something like Git Bash or PowerShell for a better experience. Or, better yet (if you don’t have a Linux server handy), try it out in a sandbox…

Experimenting in the Sandbox

The best way to learn is by doing. Don’t be afraid to experiment with commands.

The worst that can happen? You might delete your whole system 🙂. So, I suggest using something like https://cocalc.com/ (there are many more options like this, Google them) to test it out in a so-called sandbox environment.

Essentials

1. Opening the Terminal

First things first. To start using the Terminal, you need to open it. On macOS, you’ll find it in Applications > Utilities. Windows folks, look for Command Prompt or PowerShell`. Linux users, you probably already know what you’re doing 🙂

2. The Basic Commands

  • pwd (Print Working Directory)
    • This command tells you where you are. It’s like asking, "Hey Terminal, where the heck am I in this file system maze?"
    • You’ll get an output something like: /home/nikola
  • ls (List)
    • Want to know what files are lurking in the current directory? Just type ls. It’s like peeking into a room to see what’s inside.
  • cd (Change Directory)
    • Need to move around? Use cd followed by the directory’s path. It’s your ‘teleport’ command.
    • If you press ENTER after just the cd command, it will place you in your home directory (/home/nikola in my case)
  • mkdir (Make Directory)
    • To create a new folder, use mkdir followed by the name you want to give it. It’s like conjuring a box out of thin air.
    • For example: mkdir newFolder

3. Editing and Viewing Files

  • touch
    • Create an empty file; for example: touch file.md
  • nano, vim, or emacs
    • These are text editors available right in the Terminal. It might not be as fancy as your VS Code, but it gets the job done. For example, to open the file file.md type nano file.md
    • If you’re really just starting out, go with nano, or be lost in vim forever
    • Jokes aside, there’s a certain level of satisfaction and productivity among folks that master vim
  • cat (Concatenate)
    • Want to quickly view the contents of a file? cat followed by the file name will display it for you. No need to open it in an editor.
    • Example: cat file.md

4. File Manipulation

  • cp (Copy)
    • Use this to copy files or directories.
    • Example: cp file.md file-copy.md
  • mv (Move)
    • Use this to move or rename files or directories.
    • Example: cp file.md file2.md
  • rm (Remove)
    • ⚠️ Be careful with this one as it deletes files or directories. There’s no going back, so use it wisely!

5. Getting Help

  • man (Manual)
    • Stuck with what a command does? Type man followed by the command, and you’ll get a detailed manual. It’s like asking for directions.
    • Example: man ls will give you all the info about the ls command

6. The Power Moves

  • echo
    • output to the console whatever you put in quotes
    • Example: echo "testing" will output ‘testing’ to the console output
  • >
    • redirect the output of a command to another file or program
    • Example: echo "testing" > file.md will overwrite the file.md with the word ‘testing’
    • If you want to append, instead of overwrite, use >>
  • grep
    • This command lets you search through files for specific text. It’s like having a searchlight.
    • Example: grep 'testing' file.md
  • | (Pipe)
    • This symbol is used to take the output of one command and use it as the input for another. It’s like connecting Lego blocks to build something cool.
    • Example: ls | grep "myFile"
    • this command sequence will list all files and directories, but only display those whose names include "myFile".

7. SSH and Remote Servers

  • ssh (Secure Shell)
    • This is how you remotely log into another machine. It’s like teleporting to a different computer.
    • Example: ssh -p port_number username@remote_host

8. Understanding File Paths

File paths can be tricky for beginners. Remember, there are absolute paths (which start from the root directory aka /) and relative paths (which start from your current directory). For example, /Users/nikola/Documents is an absolute path, while Documents from your home directory is a relative path.

If you’re currently positioned in /var/www, then doing cd Documents will probably give you an error that the Documents folder doesn’t exist. However, if you use the full path (cd /Users/nikola/Documents), it will work.

9. Advanced File Operations

  • find
    • A powerful tool for searching files and directories. It’s like having a GPS for your files.
    • Examples:
    • find . -name "filename.txt" – find files by name
    • find /path/to/search -name "*.txt" – find files with a specific parttern
    • find /path/to/search -size +100M – find files based on size
    • find /path/to/search -perm 644 – find files with a certain permission
  • locate
    • Used for finding the location of files and directories
    • Example: locate filename.md

10. Networking Commands

  • ping
    • Check if you can reach another computer or server.
    • Example: ping example.com
  • curl
    • Fetch data from or send data to a server, especially useful for testing APIs.
    • Examples:
    • curl http://example.com – fetch a web page
    • curl -O http://example.com/somefile.zip – download a file
    • curl -d "param1=value1&param2=value2" -X POST http://example.com/form – send POST data
    • curl -H "Content-Type: application/json" -X POST -d '{"username":"xyz","password":"xyz"}' http://example.com/api/login – pass headers
    • curl -b "name=value" http://example.com – use cookies

Additional things that could be useful to you

11. Exploring Environment Variables

  • Environment variables are key-value pairs used by your operating system to manage various system properties. They come in handy for storing data like file paths and configurations.
  • Example: use echo $VARIABLE_NAME to view the value of an environment variable, and export VARIABLE_NAME=value to set one.

12. File Compression and Archiving

  • tar, gzip, zip
    • These commands are used for compressing and decompressing files. They are crucial for managing file sizes and preparing data for transfer.

13. Remote File Transfer

  • scp (Secure Copy)
    • A command for securely transferring files between your local machine and a remote server. It’s like FedEx for your files.
    • Example: scp username@remote_host:/path/to/remote/file.txt /path/to/local/directory
  • rsync
    • A utility for efficiently transferring and synchronizing files across computer systems.
    • Example: rsync -av /path/to/local/dir username@remote_host:/path/to/remote/dir

14. Monitoring Disk Usage

  • df
    • Displays the amount of disk space used and available on your file systems.
  • du
    • Estimates the space used by files and directories.

15. Managing Processes

  • ps
    • Reports a snapshot of the current processes.
  • kill
    • Send a signal to a process, typically used to stop a process.

16. Networking and Port Management

  • netstat
    • Displays network connections, routing tables, and interface statistics.
  • ifconfig
    • Used to configure, or view the configuration of, a network interface.

17. Exploring System Logs

  • Logs are a goldmine of information. Use cat or less to view log files typically stored in /var/log and understand what’s happening under the hood.

18. Crontab for Scheduling Tasks

  • crontab is used for scheduling tasks to run at specific times. It’s like setting a smart alarm for your scripts.
    • Examples
    • with crontab -e command, you’ll be able to edit the crontab file
    • if you want to run a script /path/to/script.sh every day at 5:30 PM, you would add the following line: 30 17 * * * /path/to/script.sh

19. Command History

  • Your Terminal remembers your past commands. Use the history command to recall previous commands or Ctrl + R to search through your command history interactively.

20. Linking Directories with Symbolic Links:

  • ln -s
    • create symbolic links to files and directories. It’s like creating shortcuts.
    • Example: ln -s /path/to/original.txt /path/to/link.txt

21. Managing Users and Groups

  • useradd, usermod, groupadd
    • These commands are used for creating and modifying users and groups. They’re important for managing access on multi-user systems.

22. Disk Partitioning and Mounting

  • fdisk, mount
    • These commands are for managing disk partitions and mounting filesystems. They’re essential for organizing and accessing different storage devices.

23. Networking with nc and telnet

  • nc and telnet
    • These tools can be used for various network operations like port scanning, sending raw data to ports, etc.

24. Advanced Text Processing

  • cut, sort, uniq, tr
    • These text-processing commands are powerful tools for data analysis and manipulation in the command line. Check them out

25. System Information Commands

  • uname, lscpu, lshw
    • These commands provide detailed information about your system’s hardware and software configuration.

26. Learn/Customize Terminal Shortcuts

  • Learn keyboard shortcuts for your Terminal for efficiency.
  • Examples:
    • Ctrl + A to go to the beginning of the line
    • Ctrl + E for the end
    • Ctrl + K to delete from cursor to the end

27. Checking System Health and Resources

  • vmstat, iostat
    • Use these commands to monitor system performance and resource utilization.

28. Exploring System Services and Daemons

  • systemctl, service
    • These commands help you manage system services and daemons in Linux.

29. Filesystem Check and Repair

  • fsck
    • Check and repair Linux filesystems. It’s an essential tool for system maintenance.

30. Securely Deleting Files

  • shred
    • Securely delete files from your filesystem so that they are nearly impossible to recover.

13 additional things you could look into

  • Customizing Your Terminal
    • You can customize the look and feel of your Terminal. Play around with .bashrc or .zshrc (depending on your so-called shell) to change your prompt, add aliases for commands, or even add some fun colors.
    • Or, just install Oh My ZSH!
  • Scripting and Automation
    • Once you’re comfortable, start exploring shell scripting. You can automate repetitive tasks with simple scripts, making your life a whole lot easier.
  • Version Control with Git
    • The Terminal is a friend of Git, a popular version control system. Here’s one tutorial I wrote: Learn Git fast as if your job depends on it
  • Understanding Permissions
    • Files and directories have permissions that determine who can read, write, or execute them. Commands like chmod and chown help you manage these permissions.
  • System Information and Monitoring
    • top or htop
    • These commands give you a real-time overview of what your system is up to. It’s like a dashboard for your computer’s engine.
  • Working with Text
    • awk, sed
    • These are text-processing utilities. They’re complex but incredibly powerful for manipulating text files.
  • The Power of Wildcards
    • Learn how to use wildcards (*** and ?**) for matching file patterns. It’s like casting a net to catch specific files.
  • The Almighty Root User
    • Be cautious with the sudo command – it gives you root (administrator) privileges. With great power comes great responsibility.
  • Package Management
    • Get familiar with package managers like apt for Ubuntu or brew for macOS. They are like app stores for your Terminal.
  • Understanding Filesystem Hierarchy
    • Explore the standard filesystem hierarchy in Linux/Unix systems (/etc for configurations, /var for variable files, /home for user directories). It’s like learning the layout of a new city.
  • Understanding the Root Directory Structure
    • Each directory under / (root) in Unix-like systems has a specific purpose (/bin for binaries, /lib for libraries). Knowing this structure helps you navigate the filesystem more efficiently.
  • Exploring Regular Expressions
    • Regular expressions are patterns used to match character combinations in text. They are a powerful tool in command-line text processing.
  • Exploring Different Filesystems
    • Learn about different filesystems (ext4, NTFS, FAT32) and their characteristics.

Conclusion

There you have it – an extensive beginner’s guide to the Terminal, pushing well past the basics.

Remember, it’s all about practice and exploration. The command line is a powerful tool in your developer toolkit, so embrace it, play with it, and watch as your computer skills reach new heights.

Welcome to the club of command line aficionados, and as always, happy coding! 💪

NodeJS, Servers

How to host multiple Node.js applications with multiple different domains on one VPS with Nginx

First things first, if you bought your domain elsewhere then you first need to point that domain to your server. You basically have two options here

  • installing, setting up and running a DNS on your VPS and pointing the DNS (from the control panel where you bought a domain) records to your VPS
  • setting your DNS Zone file A record (in the control panel where you bought a domain) to the VPS IP
  • this posts explain what are the pros and cons

Now, if you do that for multiple domains they will all point to your server’s IP and show the same thing, essentially the thing which is running on port 80 (and that, in our main Nginx installation, will be a default Nginx welcome screen). If you have multiple Node.js applications, which are running on different ports, and you want to pinpoint the domains to that particular applications, then this is where the Nginx comes in so that it takes the requests for each domain and routes it to an appropriate port where the appropriate Node.js application is running. Basically, what Nginx does in this case is called reverse proxying.

Useful links:

  • this StackOverflow question
  • http://blog.grabeh.net/Digital-Ocean-VPS-Nginx-Express-apps
  • https://www.digitalocean.com/community/tutorials/how-to-host-multiple-node-js-applications-on-a-single-vps-with-nginx-forever-and-crontab
  • http://ludovf.net/blog/configure-nginx-to-proxy-virtual-hosts-to-apache/
  • http://kbeezie.com/apache-with-nginx/
  • https://www.digitalocean.com/community/tutorials/how-to-set-up-nginx-virtual-hosts-server-blocks-on-centos-6

Use forever:

  • npm install forever -g
  • forever start –spinSleepTime 10000 yourApp.js
  • if the app crashes, forever starts it up again

Lets start:

  • sudo vim /etc/nginx/conf.d/example.com.conf:
    server {
        listen 80;
    
        server_name your-domain.com;
    
        location / {
            proxy_pass http://localhost:{YOUR_PORT};
            proxy_http_version 1.1;
            proxy_set_header Upgrade $http_upgrade;
            proxy_set_header Connection 'upgrade';
            proxy_set_header Host $host;
            proxy_cache_bypass $http_upgrade;
        }
    }
  • to reference multiple domains for one Node.js app (like www.example.com and example.com) you need to add the following code to the file /etc/nginx/nginx.conf in the http section: server_names_hash_bucket_size 64;
  • but, as it always is, the upper statement didn’t work for me, so I ended up using this solution from StackOverflow:
    server {
        #listen 80 is default
        server_name www.example.com;
        return 301 $scheme://example.com$request_uri;
    }
  • sudo service nginx restart

Forever keeps your application running when it crashes but if VPS is rebooted it won’t start anymore. Simple cronjob solves this issue. Create starter.sh in your application’s home folder and copy the following code:

#!/bin/sh

if [ $(ps -e -o uid,cmd | grep $UID | grep node | grep -v grep | wc -l | tr -s "\n") -eq 0 ]
then
export PATH=/usr/local/bin:$PATH
forever start --sourceDir /path/to/your/node/app main.js >> /path/to/log.txt 2>&1
fi

where main.js is your application’s main script. Add to crontab the following line: @reboot /path/to/starter.sh.

Servers

Installing MEN NPP stack (MongoDB, Express, Node.js, Nginx, PostgreSQL, PHP) on CentOS 7 from scratch

I’ve been playing with my VPS that I bought from WeLoveServers.net and I previously wrote about how to set up your VPS from scratch. Here I’ll show just brief commands for installing a MEN NPP stack (MongoDB, Express, Node.js, Nginx, PostgreSQL, PHP) on my CentOS machine.

Nginx

  • high performance web server that is much more flexible and lightweight than Apache
  • SELinux – if you run into issues change the SELinux mode to permissive or disabled
  • sudo rpm -Uvh http://nginx.org/packages/centos/7/noarch/RPMS/nginx-release-centos-7-0.el7.ngx.noarch.rpm
  • sudo yum install nginx
  • sudo systemctl start nginx.service or sudo service nginx start
  • sudo systemctl enable nginx.service (no alternative with sudo service)
  • default server root directory /usr/share/nginx/html defined /etc/nginx/conf.d/default.conf
  • server blocks (known as Virtual Hosts in Apache) are created in /etc/nginx/conf.d. Files that end with .conf in that directory will be loaded when Nginx is started
  • main Nginx configuration file is located at /etc/nginx/nginx.conf
  • sudo vi /etc/nginx/conf.d/default.conf looks like:
    server {
        listen       80;
        server_name  localhost;
    
        location / {
            root   /usr/share/nginx/html;
            index  index.html index.htm;
        }
        error_page   500 502 503 504  /50x.html;
        location = /50x.html {
            root   /usr/share/nginx/html;
        }
    }

    change to:

    server {
        listen       80;
        server_name  server_domain_name_or_IP;
    
        root   /usr/share/nginx/html;
        index index.php index.html index.htm;
    
        location / {
            try_files $uri $uri/ =404;
        }
        error_page 404 /404.html;
        error_page 500 502 503 504 /50x.html;
        location = /50x.html {
            root /usr/share/nginx/html;
        }
    
        location ~ \.php$ {
            try_files $uri =404;
            fastcgi_pass unix:/var/run/php-fpm/php-fpm.sock;
            fastcgi_index index.php;
            fastcgi_param SCRIPT_FILENAME $document_root$fastcgi_script_name;
            include fastcgi_params;
        }
  • sudo systemctl restart nginx
  • sudo nginx -t
    nginx: the configuration file /etc/nginx/nginx.conf syntax is ok
    nginx: configuration file /etc/nginx/nginx.conf test is successful

Node.js

  • just a side note for Mac: brew install node
  • sudo yum install epel-release
  • sudo yum install node
  • sudo yum install npm

Express

  • npm install express

PHP

  • sudo yum install php php-mysql php-fpm
  • sudo vi /etc/php.ini – in order to secure it do cgi.fix_pathinfo=0
  • sudo vi /etc/php-fpm.d/www.conf set line to listen = /var/run/php-fpm/php-fpm.sock
  • sudo systemctl start php-fpm
  • sudo systemctl enable php-fpm.service to start from boot


PostgreSQL

  • exclude the CentOS version of postgres in order to get the most recent version from the project’s website
  • sudo vim /etc/yum.repos.d/CentOS-Base.repo
    At the bottom of the [base] and [updates] sections, add a line that excludes the postgres packages: exclude=postgresql*
  • Find the link for your version of the OS here
  • curl -O http://yum.postgresql.org/9.4/redhat/rhel-7-x86_64/pgdg-centos94-9.4-1.noarch.rpm
  • rpm -ivh pgdg*
  • yum list postgres*
  • install the -server package: sudo postgresql94-server.x86_64
  • sudo /usr/pgsql-9.4/bin/postgresql94-setup initdb
  • chkconfig postgresql-9.3 on
  • service postgresql-9.3 start
  • postgres creates a user and a database called postgres
  • sudo su – postgres
  • psql
  • \?: Get a full list of psql commands, including those not listed here
  • \h: Get help on SQL commands. You can follow this with a specific command to get help with the syntax
  • \q: Quit the psql program and exit to the Linux prompt
  • \d: List available tables, views, and sequences in current database
  • \du: List available roles
  • \dp: List access privileges
  • \dt: List tables
  • \l: List databases
  • \c: Connect to a different database. Follow this by the database name
  • \password: Change the password for the username that follows
  • \conninfo: Get information about the current database and connection
    CREATE TABLE new_table_name (
        table_column_title TYPE_OF_DATA column_constraints,
        next_column_title TYPE_OF_DATA column_constraints,
        table_constraint
        table_constraint
    ) INHERITS existing_table_to_inherit_from;


MongoDB

  • Instructions from here
  • sudo vim /etc/yum.repos.d/mongodb.repo:
    [mongodb]
    name=MongoDB Repository
    baseurl=http://downloads-distro.mongodb.org/repo/redhat/os/x86_64/
    gpgcheck=0
    enabled=1
  • sudo yum install -y mongodb-org
  • to prevent unintended upgrades, add to /etc/yum.conf file:
    exclude=mongodb-org,mongodb-org-server,mongodb-org-shell,mongodb-org-mongos,mongodb-org-tools
  • sudo service mongod start
  • sudo chkconfig mongod on


Servers

How to set up your own VPS from scratch

I bought a VPS on a sale on WeLoveServers.net for a crazy 48$ a year with 2GB of RAM. If you know a cheaper one, please share it in the comments. Anyways, since this is a barebones setup, I had to set it up myself and this is how I did it.

I followed a great tutorial from DigitalOcean: https://www.digitalocean.com/community/tutorials/initial-server-setup-with-centos-7

Login

  • login as root
  • change root’s password with passwd command
  • add new user – useradd myuser
  • change user’s password – passwd myuser
  • on CentOS 7, users who belong to the “wheel” group are allowed to use the sudo command: gpasswd -a myuser wheel or use a normal route of editing with /usr/sbin/visudo and add a line leuser ALL(ALL) ALL
  • ssh-keygen – you get id_rsa and id_rsa.pub files which you upload (only public one OFC!) to .ssh/ folder in your home directory (you should do chmod 700 .ssh after mkdir-ing it)
  • create file authorized_keys and paste the contents of the id_rsa.pub file in it and restrict the access to it by doing chmod 600 .ssh/authorized_keys

SSH settings

  • sudo vi /etc/ssh/sshd_config
    • Port 25000
      Protocol 2
      PermitRootLogin no
      UseDNS no
      AllowUsers myuser
  • systemctl reload sshd.service or service sshd restart

Firewall

  • my version of CentOS ships with iptables, but in the article he works with a firewall called firewalld (yum install firewalld to install it)
  • lock down everything that you do not have a good reason to keep open
  • sudo systemctl start firewalld
  • uses the concept of “zones” to label the trustworthiness of the other hosts
  • sudo firewall-cmd –permanent –add-service=ssh
  • if you use a different port for SSH then
    • sudo firewall-cmd –permanent –remove-service=ssh
      sudo firewall-cmd –permanent –add-port=4444/tcp
  • sudo firewall-cmd –permanent –add-service=http
  • sudo firewall-cmd –permanent –add-service=https
  • sudo firewall-cmd –permanent –add-service=smtp
  • all the services that you can enable: sudo firewall-cmd –get-services
  • list exceptions: sudo firewall-cmd –permanent –list-all
  • sudo firewall-cmd –reload
  • start firewall at boot: sudo systemctl enable firewalld

Timezone

  • sudo timedatectl list-timezones
  • sudo timedatectl set-timezone Europe/Zagreb
  • confirm the change has been done: sudo timedatectl

NTP

  • sudo yum install ntp
  • sudo systemctl start ntpd
  • sudo systemctl enable ntpd

swap

  • allows the system to move the less frequently accessed information of a running program from RAM to a location on disk, especially useful if you plan to host any databases on your system
  • amount equal to or double the amount of RAM on your system is a good starting point
  • sudo fallocate -l 4G /swapfile
  • sudo chmod 600 /swapfile
  • sudo mkswap /swapfile
  • sudo swapon /swapfile
  • in case after the last command you get an error like this: “swapon: /swapfile: swapon failed: Operation not permitted“, that basically means that you’re most probably on openvz and that you can’t create a swap file (more on serverfault.com)
  • if you didn’t get an error then do: sudo sh -c ‘echo “/swapfile none swap sw 0 0” >> /etc/fstab’ to start it at boot

fail2ban

  • it scans through log files and reacts to offending actions such as repeated failed login attempts
  • EPEL (Extra Packages for Enterprise Linux)
  • wget http://dl.fedoraproject.org/pub/epel/7/x86_64/e/epel-release-7-2.noarch.rpm
  • sudo rpm -ivh epel-release-7-2.noarch.rpm
  • sudo yum install fail2ban
  • default configuration file at /etc/fail2ban/jail.conf but copy it
    cp /etc/fail2ban/jail.conf /etc/fail2ban/jail.local
  • vi /etc/fail2ban/jail.local
  • sudo chkconfig fail2ban on
Servers

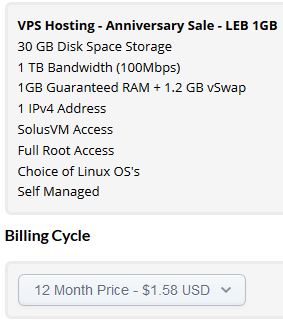
VPS with 1GB of RAM for 19$ per year!?

The guys at WeLoveServers.com are having an anniversary sale. And a sale it is indeed! If someone knows of a better option please share it in the comments!

In order to use the sale, visit their site through my aff link: http://core.weloveservers.net/aff.php?aff=584 and after this click on any of the sale links below.

They’re offering the following two options:

  • LEB 1GB – the link to the sale is here
  • LEB1
  • LEB 2GB – link to the sale is here
    LEB2

So, basically, you get 1GB of RAM VPS for less than 19$ a year, and you get 2GB of RAM VPS for 48$ a year. Important thing to note is that I spoke with their sales representative and he told me that the price after this first year stays the same!?

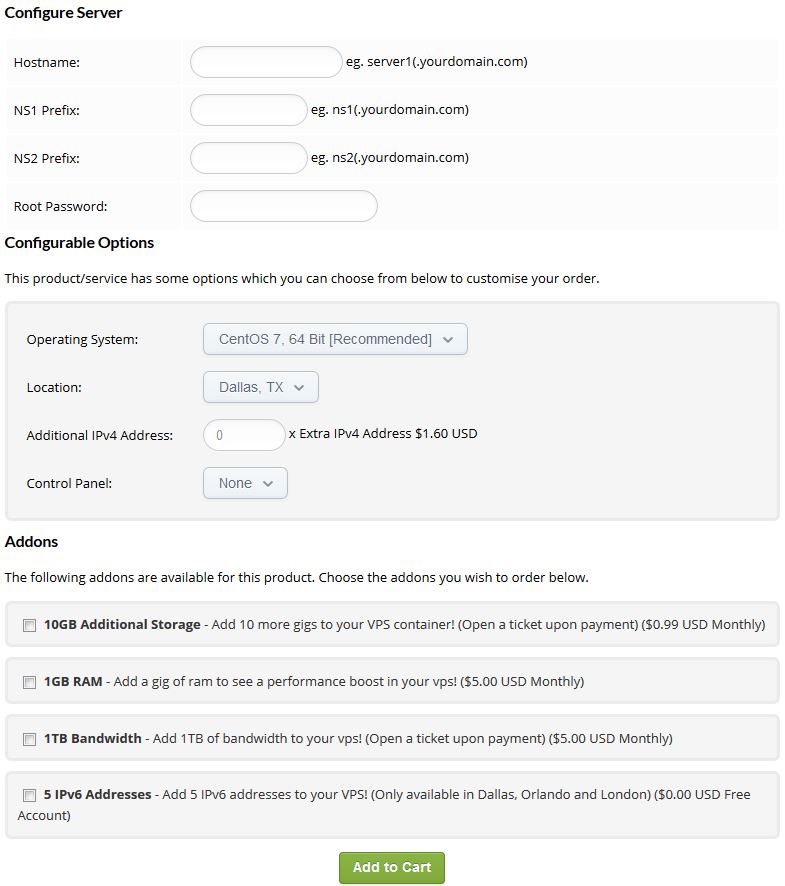
Settings and additional options which you can set during the signup are:

WLSsettings

You can buy additional RAM, storage, bandwidth, IP addresses, and even set a location of your server (TX, CA, NY, FL, UK). True, originally you don’t get any admin panel, but they offer a cPanel for 14.95$ a month if you really need one.

Anyways, I got myself one of the LEB 2GB and so far I’m very pleased with it and I have to say kudos to the customer service.

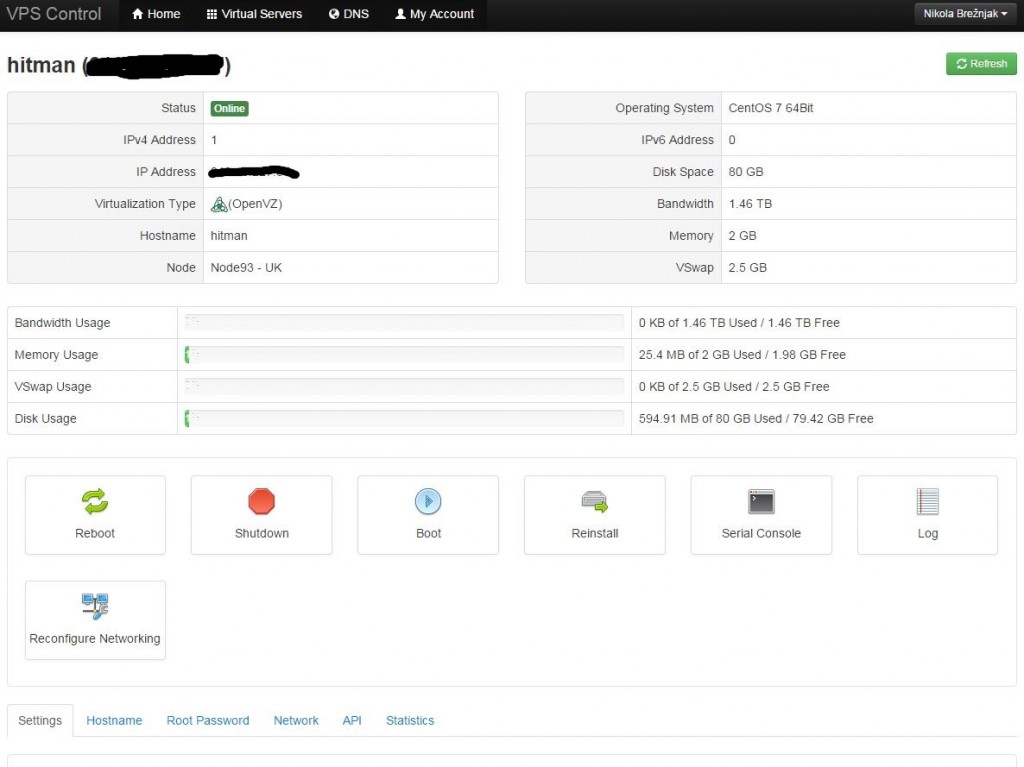
The basic panel looks like this:

wlsPanel2

We’ll see how this goes in the future – of which I’ll update you on this blog.

Happy testing!

Linux, Quick tips

Installing CasperJS on RHEL Linux distribution

First you have to install NodeJS. You can do that via package manager for your distribution. In my case (RHEL) it is easily done with:

sudo yum install nodejs npm --enablerepo=epel

Installing CasperJS is easy via npm (Node package manager):

sudo npm install -g casperjs

You will get output similar to this:

Copying extracted folder /usr/lib/node_modules/casperjs/node_modules/phantomjs/phantomjs/phantomjs-1.9.7-linux-x86_64.tar.bz2-extract-1396259124118/phantomjs-1.9.7-linux-x86_64 -> /usr/lib/node_modules/casperjs/node_modules/phantomjs/lib/phantom
Writing location.js file
Done. Phantomjs binary available at /usr/lib/node_modules/casperjs/node_modules/phantomjs/lib/phantom/bin/phantomjs
/usr/bin/casperjs -> /usr/lib/node_modules/casperjs/bin/casperjs
npm WARN unmet dependency /usr/lib/node_modules/block-stream requires inherits@'~2.0.0' but will load
npm WARN unmet dependency undefined,
npm WARN unmet dependency which is version undefined
npm WARN unmet dependency /usr/lib/node_modules/fstream requires inherits@'~2.0.0' but will load
npm WARN unmet dependency undefined,
npm WARN unmet dependency which is version undefined
npm WARN unmet dependency /usr/lib/node_modules/fstream-ignore requires inherits@'2' but will load
npm WARN unmet dependency undefined,
npm WARN unmet dependency which is version undefined
npm WARN unmet dependency /usr/lib/node_modules/fstream-npm requires inherits@'2' but will load
npm WARN unmet dependency undefined,
npm WARN unmet dependency which is version undefined
npm WARN unmet dependency /usr/lib/node_modules/glob requires inherits@'2' but will load
npm WARN unmet dependency undefined,
npm WARN unmet dependency which is version undefined
npm WARN unmet dependency /usr/lib/node_modules/npmconf requires inherits@'~2.0.0' but will load
npm WARN unmet dependency undefined,
npm WARN unmet dependency which is version undefined
npm WARN unmet dependency /usr/lib/node_modules/tar requires inherits@'2' but will load
npm WARN unmet dependency undefined,
npm WARN unmet dependency which is version undefined
[email protected] /usr/lib/node_modules/casperjs
âââ [email protected] ([email protected], [email protected], [email protected], [email protected], [email protected], [email protected], [email protected])
[[email protected] ~]$ casperjs
Fatal: [Errno 2] No such file or directory; did you install phantomjs?
[[email protected] ~]$ /usr/bin/casperjs
Fatal: [Errno 2] No such file or directory; did you install phantomjs?
[[email protected] ~]$ /usr/lib/node_modules/casperjs/node_modules/phantomjs/lib/phantom/bin/phantomjs
phantomjs>
[[email protected] ~]$ /usr/lib/node_modules/casperjs/node_modules/phantomjs/lib/phantom/bin/phantomjs --version
1.9.7

To have the binaries in my path every time I log in I added this alias to my .bashrc:

alias phantomset="export PATH=$PATH:/usr/lib/node_modules/casperjs/node_modules/phantomjs/lib/phantom/bin/"

and my .bash_profile looks like this:

# User specific environment and startup programs
PATH=$PATH:$HOME/bin
export PATH
phantomset
Linux

How to use crontab in specific use cases

Here I will post non standard and ‘out of the ordinary’ crontab settings. A note to myself (ANTM): crontab file in Centos is located in /etc/crontab. Lets start:

Run a cron job every 5 minutes but starting from minute 3.

Surely you can go about this like so:

3,8,13,18,23,28,33,38,43,48,53,58 * * * * /bin/mycommand

but there’s much cleaner way of doing it:

3-59/5 * * * * /bin/mycommand

More info can be found on this Stack Overflow question and also another option is suggested here and goes like this:

*/5+3 * * * * /bin/mycommand

Similarly

Run a cron job every 5 minutes

*/5 * * * * /bin/mycommand


Heroku, NodeJS, Windows

Getting Started with Node.js on Heroku on a Windows machine

Heroku is a cloud platform as a service supporting several programming languages which lets app developers spend their time on their application code, not managing servers, deployment, ongoing operations, or scaling…

If you tried to get your feet wet with Heroku by deploying Node.js application, you must have come across this article on Heroku’s documentation (and you also may have run into problems when starting Foreman if you’re on a Windows machine – read onward to see how I’ve solved it).

Obviously, first you have to make an account on Heroku, then install Heroku toolbelt (it gives you git, foreman, and heroku command line interface) for your environment (in my case Windows):
herokuToolbelt

Fire up your command prompt (I use Console2) and run heroku login . You need to have Node.js installed (in case you don’t you can download it here).

Write some Node.js app and put it in app.js file:

//app.js
var express = require("express");
var app = express();

app.get('/', function(req, res) {
  res.send('Every day in every way I\'m serving more requests');
});

var port = Number(process.env.PORT || 5000);
app.listen(port, function() {
  console.log("Listening on " + port);
});

If you have  package.json  file then Heroku will recognize your app as Node.js app. In order to create it, run npm init  in the root directory of your app. The npm init utility will walk you through creating a package.json file by asking few questions. If you already made your repository on GitHub and cloned it locally then npm init command in this folder will recognize that too and add:

"repository": {
    "type": "git",
    "url": "https://github.com/yourUsername/appName.git"
}

If you wish, you can freely clone my test app from Github: https://github.com/Hitman666/herokuTestApp.git

Next, install dependencies from your code (in app.js  example the required module is express). Use npm install <pkg> –save  to install a package and save it as a dependency in the package.json file. In my example that would be one command:

npm install express --save


You have to set a Procfile, which is a text file in the root directory of your application, to explicitly declare what command should be executed to start a web dyno. In our case this would be the contents of Procfile:

web: node app.js

Now you should be able to start your application locally using Foreman (installed as part of the Heroku Toolbelt) by running foreman start .

But here the party started :/

In my case foreman didn’t start at all, and after a lot of searching, I managed to solve it in few steps. First, I updated my Ruby installation:

gem update --system --source http://rubygems.org/

Then, according to this StackOverflow post I installed former version of foreman:

gem uninstall foreman
gem install foreman -v 0.61

Finally, I added Ruby’s bin folder (Ruby which, in my case, is in C:\Program Files (x86)\Heroku\ruby-1.9.2\bin) to my PATH variable.

Ok, almost there! Lets add our app to git (you should skip the git init command if you already cloned your app from GitHub):

git init
git add .
git commit -m "init"

and finally, lets deploy it to Heroku:

heroku create
git push heroku master

To open the app in your browser run heroku open . To push the changes to GitHub you have to execute git push origin master.

*Now that your app is up and running on heroku (my link) you may want to prevent it from going to sleep mode. Some suggestions on how to achieve this are in this post on StackOverflow (I went with UptimeRobot).

**At some point, as I was fiddling with the apps on Heroku’s website, I deleted all apps and then the git push heroku master  command from my console was not working anymore, so I had to do:

git remote rm heroku
heroku create
git push heroku master

***Also, I wanted to rename my app and that can be done easily:

heroku apps:rename NEWNAME


Recent posts

  • Discipline is also a talent
  • Play for the fun of it
  • The importance of failing
  • A fresh start
  • Perseverance

Categories

  • Android (3)
  • Books (114)
    • Programming (22)
  • CodeProject (35)
  • Daily Thoughts (77)
  • Go (3)
  • iOS (5)
  • JavaScript (127)
    • Angular (4)
    • Angular 2 (3)
    • Ionic (61)
    • Ionic2 (2)
    • Ionic3 (8)
    • MEAN (3)
    • NodeJS (27)
    • Phaser (1)
    • React (1)
    • Three.js (1)
    • Vue.js (2)
  • Leadership (1)
  • Meetups (8)
  • Miscellaneou$ (77)
    • Breaking News (8)
    • CodeSchool (2)
    • Hacker Games (3)
    • Pluralsight (7)
    • Projects (2)
    • Sublime Text (2)
  • PHP (6)
  • Quick tips (40)
  • Servers (8)
    • Heroku (1)
    • Linux (3)
  • Stack Overflow (81)
  • Unity3D (9)
  • Windows (8)
    • C# (2)
    • WPF (3)
  • Wordpress (2)

"There's no short-term solution for a long-term result." ~ Greg Plitt

"Everything around you that you call life was made up by people that were no smarter than you." ~ S. Jobs

"Hard work beats talent when talent doesn't work hard." ~ Tim Notke

© since 2016 - Nikola Brežnjak