TL;DR
In this tutorial, I’m going to quickly show you how to get network information change with Ionic framework. What do I mean by network information change? Well, if you need to detect when your phone gets on the Internet, or loses connection, you can do so with this example code. Additionally, you can get the type of the network your phone is connected to (WIFI for example).
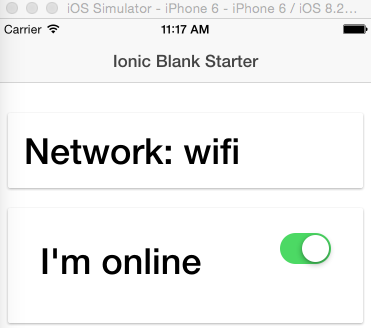
Finished project
You can clone the finished project from Github: https://github.com/Hitman666/IonicNetworkInfo, and you can see how it actually looks like on the image below (nothing fancy, this is a test project after all ;)):
Step by step on how to make this yourself
Here are the quick steps in recreating the exact same app:
- Start a new Ionic project by doing:
ionic start IonicNetworkInfo blank
- Then, change the directory to the newly created IonicNetworkInfo:
cd IonicNetworkInfo
- Install ngCordova with Bower:
bower install ngCordova
If by some chance you don’t have bower installed, you can install it with npm:
npm install bower -g
- Open up the www/index.html file in your favorite editor, and add the reference to ngCordova (just above the cordova.js script):
<!-- This is what you should add, the cordova below you'll already have -->
<script src="lib/ngCordova/dist/ng-cordova.min.js"></script>

<!-- cordova script (this will be a 404 during development) -->
<script src="cordova.js"></script>
- Install the ngCordova network plugin by executing the following command in your Terminal/Command prompt (you should do this from the root directory of your app; so, in our case the IonicNetworkInfo directory):
cordova plugin add org.apache.cordova.network-information
To check if you have successfully installed the plugin, you can run the following command (from the root directory – I won’t be repeating this anymore; when I say you should run some command from the Terminal/Command prompt that, in this case, means from the root directory of the application):
cordova plugin list
You should see the following output:
> cordova plugin list
com.ionic.keyboard 1.0.4 "Keyboard"
org.apache.cordova.network-information 0.2.15 "Network Information"
- Open up the www/js/app.js file and add ngCordova to the dependencies list, so that basically the first line looks like this:
angular.module('starter', ['ionic', 'ngCordova']) - Create a new controller in the www/js/app.js file called MyCtrl, with the following content:
.controller('MyCtrl', function($scope, $cordovaNetwork, $rootScope) {
    document.addEventListener("deviceready", function () {

        $scope.network = $cordovaNetwork.getNetwork();
        $scope.isOnline = $cordovaNetwork.isOnline();
        $scope.$apply();

        // listen for Online event
        $rootScope.$on('$cordovaNetwork:online', function(event, networkState){
            $scope.isOnline = true;
            $scope.network = $cordovaNetwork.getNetwork();

            $scope.$apply();
        })

        // listen for Offline event
        $rootScope.$on('$cordovaNetwork:offline', function(event, networkState){
            console.log("got offline");
            $scope.isOnline = false;
            $scope.network = $cordovaNetwork.getNetwork();

            $scope.$apply();
        })

  }, false);
})
In this controller you attach an event listener on the deviceready event (because it could be that the device would not have been yet initialized when this code runs) and you get the network information with:
$cordovaNetwork.getNetwork();
The information, about weather you’re connected to the internet is obtained with the following line:
$scope.isOnline = $cordovaNetwork.isOnline();
Then, you register two events $cordovaNetwork:online and $cordovaNetwork:online which trigger when the device gets online/offline. In them you then just update the $scope variables ().
Just for reference, the whole content of the www/js/app.js file should be:
// Ionic Starter App // angular.module is a global place for creating, registering and retrieving Angular modules // 'starter' is the name of this angular module example (also set in a <body> attribute in index.html) // the 2nd parameter is an array of 'requires' angular.module('starter', ['ionic', 'ngCordova']) .run(function($ionicPlatform, $cordovaNetwork, $rootScope) { $ionicPlatform.ready(function() { // Hide the accessory bar by default (remove this to show the accessory bar above the keyboard // for form inputs) if(window.cordova && window.cordova.plugins.Keyboard) { cordova.plugins.Keyboard.hideKeyboardAccessoryBar(true); } if(window.StatusBar) { StatusBar.styleDefault(); } }); }) .controller('MyCtrl', function($scope, $cordovaNetwork, $rootScope) { document.addEventListener("deviceready", function () { $scope.network = $cordovaNetwork.getNetwork(); $scope.isOnline = $cordovaNetwork.isOnline(); $scope.$apply(); // listen for Online event $rootScope.$on('$cordovaNetwork:online', function(event, networkState){ $scope.isOnline = true; $scope.network = $cordovaNetwork.getNetwork(); $scope.$apply(); }) // listen for Offline event $rootScope.$on('$cordovaNetwork:offline', function(event, networkState){ console.log("got offline"); $scope.isOnline = false; $scope.network = $cordovaNetwork.getNetwork(); $scope.$apply(); }) }, false); }); - In the index.html file, inside the ion-content tag paste the following content:
<div class="card">
                <div class="item item-text-wrap">
                    <h1>Network: {{network}}</h1>
                </div>
            </div>


            <div class="card">
                <div class="item item-text-wrap">
                    <ion-toggle ng-model="isOnline" ng-checked="item.checked">
                        <h1 ng-show="isOnline">I'm online</h1>
                        <h1 ng-show="! isOnline">I'm offline</h1>
                    </ion-toggle>
                </div>
            </div>
Basically what we do here is we show the contents of the network variable (which is attached to the $scope via the controller). Also, by using the ion-toggle component we show the “I’m online” / “I’m offline” notifications.
Just for reference, the content of the whole index.html file should look like this:
<!DOCTYPE html>
<html>
<head>
    <meta charset="utf-8">
    <meta name="viewport" content="initial-scale=1, maximum-scale=1, user-scalable=no, width=device-width">
    <title></title>

    <link href="lib/ionic/css/ionic.css" rel="stylesheet">
    <link href="css/style.css" rel="stylesheet">

    <!-- IF using Sass (run gulp sass first), then uncomment below and remove the CSS includes above
    <link href="css/ionic.app.css" rel="stylesheet">
    -->

    <!-- ionic/angularjs js -->
    <script src="lib/ionic/js/ionic.bundle.js"></script>

    <script src="lib/ngCordova/dist/ng-cordova.min.js"></script>
    <!-- cordova script (this will be a 404 during development) -->
    <script src="cordova.js"></script>

    <!-- your app's js -->
    <script src="js/app.js"></script>
</head>
<body ng-app="starter" ng-controller="MyCtrl">

    <ion-pane>
        <ion-header-bar class="bar-stable">
            <h1 class="title">Ionic Blank Starter</h1>
        </ion-header-bar>

        <ion-content padding="true">
            <div class="card">
                <div class="item item-text-wrap">
                    <h1>Network: {{network}}</h1>
                </div>
            </div>


            <div class="card">
                <div class="item item-text-wrap">
                    <ion-toggle ng-model="isOnline" ng-checked="item.checked">
                        <h1 ng-show="isOnline">I'm online</h1>
                        <h1 ng-show="! isOnline">I'm offline</h1>
                    </ion-toggle>
                </div>
            </div>

        </ion-content>
    </ion-pane>
</body>
</html>
Testing time
In order to test this application you should run it on your device (because you can’t disable network in iOS simulator).
First, in case you haven’t, add the desired platform (execute this command from the root of the directory). For iOs execute:
ionic platform add ios
Or, for Android execute:
ionic platform add android
Just a quick note – in order to build the app for iOs, you need to be running this on Mac machine (sure, there are ways around it, but TBH, I’m not a fan of them). As for Android, you can normally run it on your Windows machine (if, of course you have all the SDKs in place. I’ll write about setting these up in another tutorial, so will update the link here when the post will be published, for those who want to see this kind of information).
If you have an Android device plugged to your computer (and all the SDKs in place) you can run the following to commands to get your application running on your Android device:
ionic build android && ionic run android
To get this application running on your iOS device, you first have to build the application, and you can do this by executing the following command:
ionic build ios
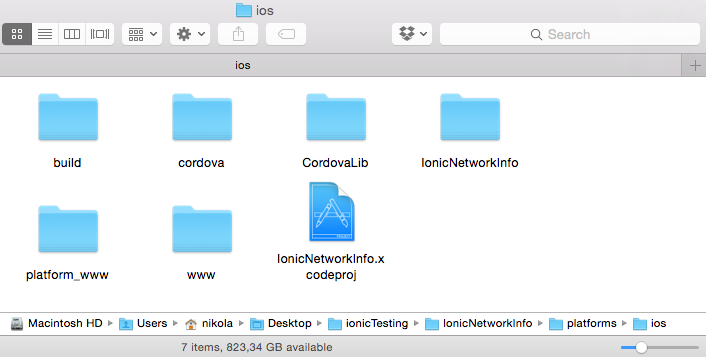
Now, open up the IonicNetworkInfo/platforms/ios folder and you should see the following content:
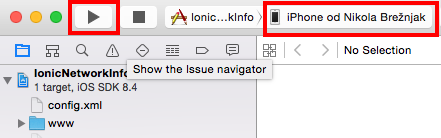
Next, open up IonicNetworkInfo.xcodeproj file with Xcode:
Make sure that your iOS device is connected to your Mac computer, select it from the dropdown menu and click run:
Now, experiment with the application by turning your WIFI on/of, turning your Cellular network (if you have it) on/off, and basically enjoy seing the information chage automatically :). Surely, you can do way more advanced stuff based on this simple example, but I hope this will get you started…
That’s all folks, I hope this will prove to be useful to someone. If you have any questions, or you’ve noticed some blatant blunder that I may have made, please don’t hesitate to share it in the comments, I’ll make sure to reply promptly.