Nikola Brežnjak blog - Tackling software development with a dose of humor
  • Home
  • Daily Thoughts
  • Ionic
  • Stack Overflow
  • Books
  • About me
Home
Daily Thoughts
Ionic
Stack Overflow
Books
About me
  • Home
  • Daily Thoughts
  • Ionic
  • Stack Overflow
  • Books
  • About me
Nikola Brežnjak blog - Tackling software development with a dose of humor
CodeSchool, JavaScript

Codeschool JavaScript Best Practices Notes

I finished the course at CodeSchool, and below are my notes from it.

Level 1

Ternary howto with SIAF

var allPacked = true;
var readyToGo = true;
var adventureTime;

adventureTime = allPacked && readyToGo ?

  function( ){
    return "Adventure time is now!" ;
  }()
  :
  function( ){
    return "Adventuring has been postponed!" ;
  }() ;

console.log(adventureTime);

Short-circuting, if the this.swords is not empty it takes it immediately, without looking at the thing after the ||

this.swords = this.swords || [];

Same goes for &&, as soon as it finds a first falsy value – it returns that. If all falsy, it returns the last one.

Level 2

If you need lengthy, repetitive access to a value nested deep within a JS Object, then cache the necessary value in a local variable.

var numCritters = location.critters.length;
for(var i = 0; i < numCritters; i++){
      list += location.critters[i];
}

//instead of
for(var i = 0; i < location.critters.length; i++){
      list += location.critters[i];
}

//and even better
for(var i = 0, numCritters = location.critters.length; i < numCritters; i++){
    list += location.critters[i];
}

Put script tag just before the ending body tag, or you can also leave them in the head section, but add async keyword. Use a list of variables after the keyword var all at once! Use function join() on the array instead of concatenation. with +=. console.time(“string”) is the opening statement to a timer method that will help us measure how long our code is taking to perform. console.timeEnd(“string”) ends it and prints how long it took. “string” has to be the same in both cases.

var now = new Date();

console.log(+now) == console.log(new Number(now));

 Level 3

 === compares type and content. instanceof – userful to determine, well, the instance of some object 🙂

function Bird(){}
function DatatypeBird(){}
function SyntaxBird(){}
DatatypeBird.prototype = Object.create(Bird.prototype);
SyntaxBird.prototype   = Object.create(Bird.prototype);

Runtime error catching:

try{
   if(someVar === undefined)
        throw new ReferenceError();
}
catch(err){
    if(err instanceof ReferenceError)
        console.log("Ref err:" + err);

    //TypeError
}
finally{
    //this will execute no matter what
}

Avoid eval, with.

Use num.toFixed(2), parseFloat(), parseInt(num, radix). Radix can be from 2 – 36. typeof along with isNan to determine if the number is trully a number.

Level 4

Namespace is an object that groups and protects related data and methods in JavaScript files.

Say you have a code like this:

var treasureChests = 3;
var openChest = function(){
    treasureChests--;
    alert("DA DADADA DAAAAAAA!");
};

you can use namespacing like this:

var DATA = {
	treasureChests : 3,
	openChest : function(){
	    this.treasureChests--;
	    alert("DA DADADA DAAAAAAA!");
	}
};

You then call the function like this: DATA.openChests().

Closures are a feature of JavaScript, used to cause some properties to be private, bound only to a surrounding function’s local scope, and some properties to be public, accessible by all holders of the namespace.

Private properties are created in the local scope of the function expression. Public properties are built within the object which is then returned to become the namespace. Access to private data is thus possible only because of closure within the larger module.

Say you have a code like this:

var CAVESOFCLARITY = {
  stalactites: 4235,
  stalagmites: 3924,
  bats: 345,
  SECRET: {
    treasureChests: 3,
    openChest: function(){
      this.treasureChests--;
      alert("DA DADADA DAAAAAAA!");
    }
  }
};

You would make it into a closure like this:

var CAVESOFCLARITY = function () {

  var treasureChests = 3;

  return {
    stalactites: 4235,
    stalagmites: 3924,
    bats: 345,
    openChest: function () {
        treasureChests--;
        alert("DA DADADA DAAAAAAA!");
    }
  };
}();

If a module references globally-scoped variables, it’s a best practice to bring them into the scope of anonymous closure through the use of a specific technique called global imports.

Say the code is like this and uses a global variable named globalAnswer:

var MySomething = function () {
  var a = 3;

  return {
    getA: function() {return a; },
    summon: function(){
      if(globalAnswer === "42"){
        alert("YEP!");
      }
      else{
          alert("NOPE");
      }
    }
  };
}();

You would rewrite this using global imports like this:

var MySomething = function (answer) {
  var a = 3;

  return {
    getA: function() {return a; },
    summon: function(){
      if(answer === "42"){
        alert("YEP!");
      }
      else{
          alert("NOPE");
      }
    }
  };
}(globalAnswer);

Your import ensures clarity of scope within a module. By using a parameter, you protect the global data that might have been overwritten. All imported data becomes locally scoped to the anonymous function, to be used in closure. Thus, when compared with searching the entire scope, import are both clearer and faster.

Augmentation is the term for adding or changing properties in a module after the module has already been built.

In simple augmentation, the module file and the augmentation file do not share their private state. Augmented module properties may only access the private data from their file’s closure. Private data from the original closure will not be lost, and will be accessible to all original properties that referenced it.

Angular

Angular CodeSchool Notes

Here are my notes from a free CodeSchool tutorial sponsored by Google:

Things I wish I were told about Angular.js.

Binding

<!DOCTYPE html>
<html>
	<head>
		<title>AngularJS Tutorials</title>
	</head>
	<body>
		<div ng-app="">
			<input type="text" ng-model="data.message">
			<h1>{{data.message}}</h1>
		</div>
		<script type="text/javascript" src="angular.js"></script>
	</body>
</html>

Controllers

<html>
	<body>
		<div ng-app="">
			<div ng-controller="FirstCtrl">
				<h1>{{data.message + " world"}}</h1>
				<div class="{{data.message}}">
					Msg...
				</div>
			</div>
		</div>
		<script type="text/javascript" src="angular.js"></script>
		<script type="text/javascript" src="main.js"></script>
	</body>
</html>
//main.js
function FirstCtrl($scope){
$scope.data = {message: "Hello"};
}

Dot

https://www.youtube.com/watch?v=DTx23w4z6Kc

The initial setup:

<div ng-app="">
  <input type="text" ng-model="data.message">
  <h1>{{ data.message }}</h1>

  <div ng-controller="FirstCtrl">
    <input type="text" ng-model="data.message">
    <h1>{{ data.message }}</h1>
  </div>

  <div ng-controller="SecondCtrl">
    <input type="text" ng-model="data.message">
    <h1>{{ data.message }}</h1>
  </div>
</div>
function FirstCtrl($scope) {

}

function SecondCtrl($scope) {

}

In this setup, all three instances of data.message are bound to each other through the first data.message, which is in the scope of the entire application.

If we were to replace the instances of data.message with just message,

<div ng-app="">
  <input type="text" ng-model="message">
  <h1>{{ message }}</h1>

  <div ng-controller="FirstCtrl">
    <input type="text" ng-model="message">
    <h1>{{ message }}</h1>
  </div>

  <div ng-controller="SecondCtrl">
    <input type="text" ng-model="message">
    <h1>{{ message }}</h1>
  </div>
</div>

It breaks the scope inheritance that was binding all the data.message instances. Now, each new ng-model of message is creating a new instance of message, and so each model will be an unbound instance. So, important to note here is the data.message which will be available to all of the controllers!

Sharing data between controllers

https://www.youtube.com/watch?v=HXpHV5gWgyk

The initial setup:

<div ng-app="">
  <input type="text" ng-model="data.message">
  <h1>{{ data.message }}</h1>

  <div ng-controller="FirstCtrl">
    <input type="text" ng-model="data.message">
    <h1>{{ data.message }}</h1>
  </div>

  <div ng-controller="SecondCtrl">
    <input type="text" ng-model="data.message">
    <h1>{{ data.message }}</h1>
  </div>
</div>
function FirstCtrl($scope) {

}

function SecondCtrl($scope) {

}

With this setup, data.message is defined outside of either controller, scoped to the entire ng-app. The bindings within each of the controller divs both point to that ‘parent’ model. Because of this, all 3 instances of the data.message input are bound to each other because of the first instance, which is globally scoped in the application.

If one were to remove the first model that does not reside in a controller, there is no parent model for either controller to bind to, so each instance of data.message will be scoped within its respective controller. Thus, neither data.message will be bound to the other.

We’d like to share the data model between the two controllers without creating a parent scope. This requires a service within a formally defined Angular application.

<div ng-app="myApp">

  <div ng-controller="FirstCtrl">
var myApp = angular.module('myApp', []);

myApp.factory('Data', function () {
  return { message: "I'm data from a service" };
});

function FirstCtrl($scope) {

This Data service can be injected into each of the controllers as a parameter. By doing this, we are now attaching the data.model to an app service, which repairs the binding between the two controller models.

Stackoverflow thread on this.

<!DOCTYPE html>
<html>
<head>
	<title></title>
</head>
<body ng-app="myApp">
	<div ng-controller="FirstCtrl">
		<input type="text" ng-model="data.message">
		<h1>{{ data.message }}</h1>
	</div>

	<div ng-controller="SecondCtrl">
		<input type="text" ng-model="data.message">
		<h1>{{ data.message }}</h1>
	</div>
	
	<script src="https://ajax.googleapis.com/ajax/libs/angularjs/1.3.14/angular.min.js"></script>
	<script type="text/javascript" charset="utf-8">
		angular.module('myApp', [])

		.factory('Data', function () {
		  return { message: "I'm data from a service" };
		})

		.controller('FirstCtrl', function ($scope, Data){
			$scope.data = Data;
		})

		.controller('SecondCtrl', function ($scope, Data){
			$scope.data = Data;
		});
	</script>
</body>
</html>

Method on a scope

function SecondCtrl($scope, Data) {
  $scope.data = Data;

  $scope.reversedMessage = function() {
    return $scope.data.message.split("").reverse().join("");
  };
}

Bootstraping https://docs.angularjs.org/guide/bootstrap

Changing the data in the service and then showing it again, the ultimate example which eluded me for some time (Plunkr):

<!DOCTYPE html>
<html>
<head>
	<title></title>
</head>
<body ng-app="myApp">
	<div ng-controller="FirstCtrl">
		<input type="text" ng-model="data.msg">
		<h1>{{ data.msg }}</h1>

		<button type="" ng-click="sayItBack()"></button>
	</div>

	<div ng-controller="SecondCtrl">
		<input type="text" ng-model="data.msg">
		<h1>{{ data.msg }}</h1>
	</div>
	
	<script src="https://ajax.googleapis.com/ajax/libs/angularjs/1.3.14/angular.min.js"></script>
	<script type="text/javascript" charset="utf-8">
		angular.module('myApp', [])

		.service('Data', function () {
			this.data = {};
			this.data.msg = "Howdy!";

			this.getMsg = function() {
			    return this.data;
			};

			this.setMsg = function(city){
				this.data.msg = city;
			};
		})

		.controller('FirstCtrl', function ($scope, Data){
			$scope.data = Data.getMsg();

			$scope.sayItBack = function(){
				Data.setMsg("Hello to you too!");
			}			
		})

		.controller('SecondCtrl', function ($scope, Data){
			$scope.data = Data.getMsg();
		});
	</script>
</body>
</html>
NodeJS

Codeschool Express.js Notes

Building blocks of Express.js on CodeSchool,  notes below… If you’re interested for more in depth tutorial about Node.js and Express, make sure you check out the 2nd tutorial (free, OFC) in a MEAN series I made for HackHands named Delving into Node.js and Express web framework.

Level 1

Install Express with npm:

npm install express

Simples web server which responds with Howdy!

var express = require('express');
var app = express();

app.get('/', function(req, res){
    res.json("Howdy!");
});

app.listen(1337); //tcp port btw

Test with curl (-i switch prints the headers):

curl -i http://localhost:1337

Redirecting the requests:

res.redirect(301, '/newLink');

Level 2

Static middleware to serve files from folder public.

app.use(express.static('public'));
app.use(function(req, resp, next){
    ...some work, when done call Ghost buster, erm, no
    next();
});

Level 3

app.get('/blocks', function(request, response) {
    //request.query.limit
    //if the request was like /api?limit=10
});
app.get('/blocks/:name', function(request, response) {
    //request.params.name
});

Level 4

//npm install body-parser

var bodyParser = require('body-parser');
var parseUrlencoded = bodyParser.urlencoded({ extended: false });
//false forces the use of the native querystring Node library

app.post('/api', parseUrlencoded, function(request, response) {
var blocks = { ... };
var newBlock = request.body;
});

Level 5

app.route('/cities')
.get(function (request, response) {
})
.post(parseUrlencoded, function (request, response) {
});

Instead of

app.get('/apiEndpoint', function (request, response) {
});
app.post('/apiEndpoint', parseUrlencoded, function (request, response) {
});

Using the router to put in different file:

var router = express.Router();

router.route('/', router)
  .get(function (request, response) {
  })
  .post(parseUrlencoded, function (request, response) {
  });

router.route('/:name', router)
  .get(function (request, response) {
  })
  .delete(function (request, response) {
  });

app.use('/cities', router);
Ionic, Quick tips

Handling Ionic CORS issue

CORS = Cross origin resource sharing – a pain in the butt when trying to do an ajax request when developing locally.

For local testing I ended up using a Chrome plugin: https://chrome.google.com/webstore/detail/allow-control-allow-origi/nlfbmbojpeacfghkpbjhddihlkkiljbi?hl=en.

The site http://enable-cors.org/ gives a lot of info on how to solve the cors issue if you control the API server. Namely, for Apache: http://enable-cors.org/server_apache.html.

But, TBH, all this ended up not working for me, so what I did was I created a “proxy” .php page which is called first (not calling the json file directly) and the PHP code for that page looks like this:

<?php
	header('Access-Control-Allow-Origin: *'); 
	echo file_get_contents("myJSON.json");
?>

edit: I answered a similar question on StackOverflow and I wrote a full tutorial with downloadable project from Github about this.

Angular

Speeding up Angular development with Yeoman

Yeoman helps you to kickstart new projects, prescribing best practices and tools to help you stay productive.

To do so, we provide a generator ecosystem. A generator is basically a plugin that can be run with the `yo` command to scaffold complete projects or useful parts…

First, install Yeoman with npm:

npm install yo -g

Now you need a “generator”, and most likely you’ll need grunt:

npm install -g generator-angular grunt

If you get the error like The package generator-karma does not satisfy its siblings’ peerDependencies requirements then try uninstalling generator-karma:

npm uninstall -g generator-karma

and running the previous npm install command again.

Btw,  you can use Yeoman’s CLI (by first executing yo) to search and install any of the existing generators.

To scaffold a new app, create some folder and execute the following command:

yo angular myApp

Yeoman will ask you few questions to which you can all give a default answer and it will start the installation process. After the installation is done you can do:

grunt serve

to actually see a live preview of your scaffolded app.

If you get an error like Warning: Couldn’t find the `compass` binary. Make sure it’s installed and in your $PATH Use –force to continue install it with (if you’re on Mac):

sudo gem install compass

Additional cool thing is that this generator comes with extra tools for quick scaffolding of routes, controllers, views, directives, services, filters… Be sure to check the project on GitHub for more info.

For example, the following command generates a controller and a view, and configures a route in app/scripts/app.js connecting them.

yo angular:route myroute


NodeJS, Quick tips

Keep your Node.js scripts running with Forever and Nodemon

edit (18.06.2015): Nowdays I’m using PM2, and here’s my post that explains how to use PM2.


Nodemon is a utility that will monitor for any changes in your source and automatically restart your server.  Install with npm:

npm install -g nodemon

Forever is a simple CLI tool for ensuring that a given script runs continuously (i.e. forever). Install with npm:

npm install -g forever

Forever & Nodemon running together:

forever start nodemon --exitcrash app.js

edit (24.02.2015):

If you get an error like this:

error:   Cannot start forever
error:   script /home/nikola/nodemon does not exist.

Try to run nodemon with the full path:

forever start /usr/bin/nodemon --exitcrash app.js

You can find out the path to nodemon by executing:

which nodemon
NodeJS

How to use Redis with Node.js

Redis is an open source, BSD licensed, advanced key-value cache and store. It is often referred to as a data structure server since keys can contain strings, hashes, lists, sets, sorted sets, bitmaps and hyperloglogs.

Comparison with Memcache and Memcached can be found here, and the naming distinction can be found here.

You can download the installation zip file here (I used the Windows version), and extract it to C:\redis. To run the Redis server (in order to be able to save to it and query it) you have to execute the redis-server.exe from this directory.

To use Redis with Node.js you have install the redis module:

npm install redis

A simple usage example:

var redis = require("redis"),
    client = redis.createClient();

// if you'd like to select database 3, instead of 0 (default), call
// client.select(3, function() { /* ... */ });

client.on("error", function (err) {
    console.log("Error " + err);
});

client.set("string key", "string val", redis.print);
client.hset("hash key", "hashtest 1", "some value", redis.print);
client.hset(["hash key", "hashtest 2", "some other value"], redis.print);
client.hkeys("hash key", function (err, replies) {
    console.log(replies.length + " replies:");
    replies.forEach(function (reply, i) {
        console.log("    " + i + ": " + reply);
    });
    client.quit();
});

A lot more examples here.

Ionic

Create icons and splash screen automatically with ionic resources

In Ionic framework you can use the

ionic resources

command to automatically generate icons and splash screen of different sizes and for optionally different platforms (iOS, Android).

All you have to do is place the icon.png and splash.png in the resources folder in the root of the application and execute the aforementioned command. Ionic will generate the needed configuration in the config.xml file. More about it on the official blog post.

CodeProject, NodeJS

How I built my own testable The Answer To Life The Universe And Everything npm module

TL;DR: In this short tutorial I’ll show you how I built my own testable (Jasmine) npm module which I then published to npm repository. The npm module is here, and the GitHub repository is here.

First, if you haven’t already, set some author info in your terminal:

npm set init.author.name "Nikola Brežnjak"
npm set init.author.email "[email protected]"
npm set init.author.url “http://www.nikola-breznjak.com"

Then, create a new GitHub repository, clone it to your disk and then run npm init. Create a index.js file and copy/paste the following code:

module.exports = function(){
    return 42;
}

Next, install Jasmine by doing:

npm install jasmine-node -g

To test your module, create a folder spec, and a file TheAnswerToLifeTheUniverseAndEverything.spec.js inside it with the following content:

var TheAnswerToLifeTheUniverseAndEverything = require('../index.js');

describe("TheAnswerToLifeTheUniverseAndEverything Suite", function() {
 it("should return a value of 42", function(done) {
 var value = TheAnswerToLifeTheUniverseAndEverything();
 expect(value).toEqual(42);
 done();
 });
});

In order to test your module, run jasmine-node spec/ as shown on the image below:

jasmineTest

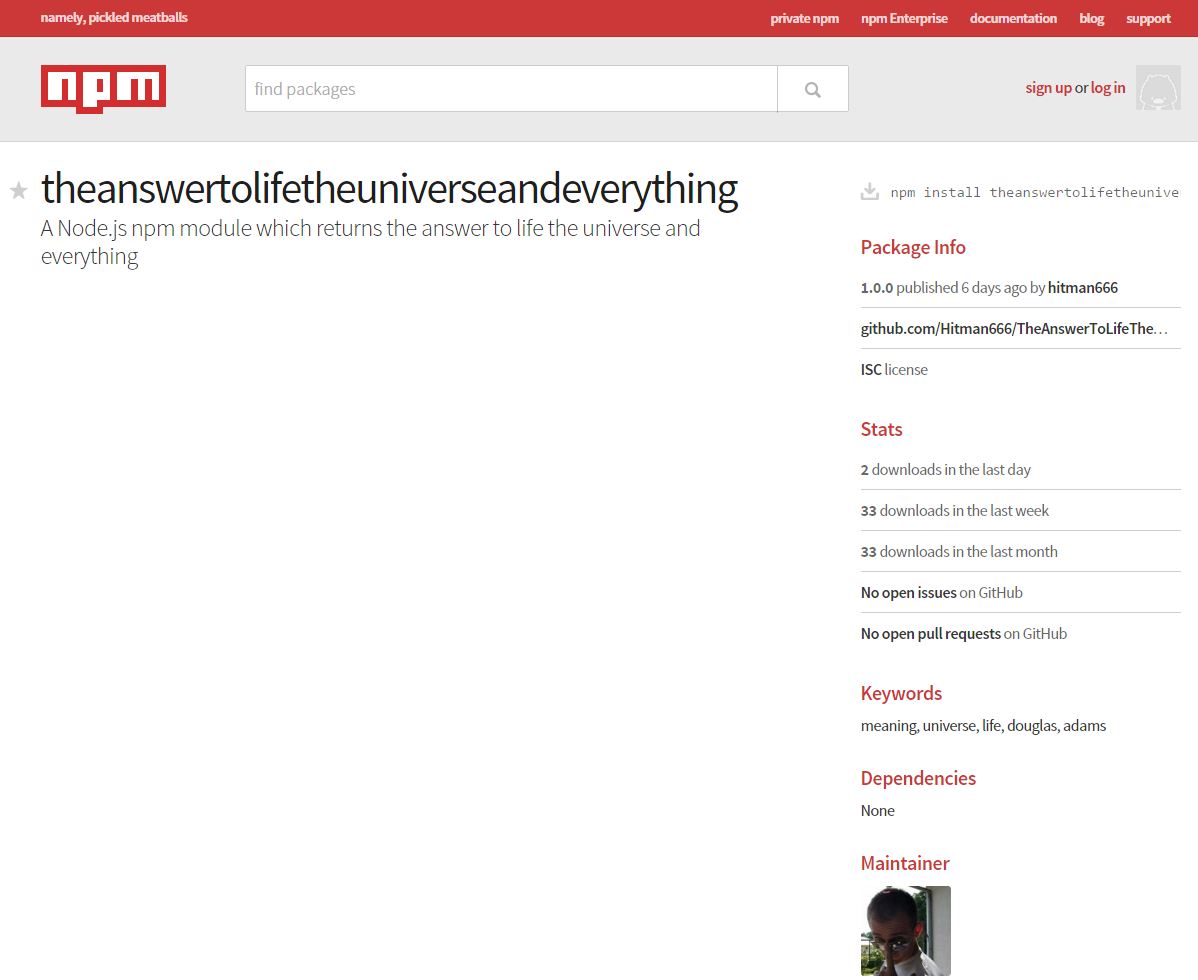
In order to publish your npm module you first have to execute the npm adduser command and answer few of the questions, and after that you just have to execute npm publish and you’ll have your npm module listed on npmjs.com:

theAnswerToLifeNPMmodule

Now you can use npm install theanswertolifetheuniverseandeverything to install the module.

If you’re testing this your self and you get an error like “Error: forbidden New packages must have all-lowercase names: TheAnswerToLifeTheUniverseAndEverything” then that means what it says – you must use only lowercase letters when naming your modules.

NodeJS, Servers

How to host multiple Node.js applications with multiple different domains on one VPS with Nginx

First things first, if you bought your domain elsewhere then you first need to point that domain to your server. You basically have two options here

  • installing, setting up and running a DNS on your VPS and pointing the DNS (from the control panel where you bought a domain) records to your VPS
  • setting your DNS Zone file A record (in the control panel where you bought a domain) to the VPS IP
  • this posts explain what are the pros and cons

Now, if you do that for multiple domains they will all point to your server’s IP and show the same thing, essentially the thing which is running on port 80 (and that, in our main Nginx installation, will be a default Nginx welcome screen). If you have multiple Node.js applications, which are running on different ports, and you want to pinpoint the domains to that particular applications, then this is where the Nginx comes in so that it takes the requests for each domain and routes it to an appropriate port where the appropriate Node.js application is running. Basically, what Nginx does in this case is called reverse proxying.

Useful links:

  • this StackOverflow question
  • http://blog.grabeh.net/Digital-Ocean-VPS-Nginx-Express-apps
  • https://www.digitalocean.com/community/tutorials/how-to-host-multiple-node-js-applications-on-a-single-vps-with-nginx-forever-and-crontab
  • http://ludovf.net/blog/configure-nginx-to-proxy-virtual-hosts-to-apache/
  • http://kbeezie.com/apache-with-nginx/
  • https://www.digitalocean.com/community/tutorials/how-to-set-up-nginx-virtual-hosts-server-blocks-on-centos-6

Use forever:

  • npm install forever -g
  • forever start –spinSleepTime 10000 yourApp.js
  • if the app crashes, forever starts it up again

Lets start:

  • sudo vim /etc/nginx/conf.d/example.com.conf:
    server {
        listen 80;
    
        server_name your-domain.com;
    
        location / {
            proxy_pass http://localhost:{YOUR_PORT};
            proxy_http_version 1.1;
            proxy_set_header Upgrade $http_upgrade;
            proxy_set_header Connection 'upgrade';
            proxy_set_header Host $host;
            proxy_cache_bypass $http_upgrade;
        }
    }
  • to reference multiple domains for one Node.js app (like www.example.com and example.com) you need to add the following code to the file /etc/nginx/nginx.conf in the http section: server_names_hash_bucket_size 64;
  • but, as it always is, the upper statement didn’t work for me, so I ended up using this solution from StackOverflow:
    server {
        #listen 80 is default
        server_name www.example.com;
        return 301 $scheme://example.com$request_uri;
    }
  • sudo service nginx restart

Forever keeps your application running when it crashes but if VPS is rebooted it won’t start anymore. Simple cronjob solves this issue. Create starter.sh in your application’s home folder and copy the following code:

#!/bin/sh

if [ $(ps -e -o uid,cmd | grep $UID | grep node | grep -v grep | wc -l | tr -s "\n") -eq 0 ]
then
export PATH=/usr/local/bin:$PATH
forever start --sourceDir /path/to/your/node/app main.js >> /path/to/log.txt 2>&1
fi

where main.js is your application’s main script. Add to crontab the following line: @reboot /path/to/starter.sh.

Page 11 of 13« First...«10111213»

Recent posts

  • Discipline is also a talent
  • Play for the fun of it
  • The importance of failing
  • A fresh start
  • Perseverance

Categories

  • Android (3)
  • Books (114)
    • Programming (22)
  • CodeProject (35)
  • Daily Thoughts (77)
  • Go (3)
  • iOS (5)
  • JavaScript (127)
    • Angular (4)
    • Angular 2 (3)
    • Ionic (61)
    • Ionic2 (2)
    • Ionic3 (8)
    • MEAN (3)
    • NodeJS (27)
    • Phaser (1)
    • React (1)
    • Three.js (1)
    • Vue.js (2)
  • Leadership (1)
  • Meetups (8)
  • Miscellaneou$ (77)
    • Breaking News (8)
    • CodeSchool (2)
    • Hacker Games (3)
    • Pluralsight (7)
    • Projects (2)
    • Sublime Text (2)
  • PHP (6)
  • Quick tips (40)
  • Servers (8)
    • Heroku (1)
    • Linux (3)
  • Stack Overflow (81)
  • Unity3D (9)
  • Windows (8)
    • C# (2)
    • WPF (3)
  • Wordpress (2)

"There's no short-term solution for a long-term result." ~ Greg Plitt

"Everything around you that you call life was made up by people that were no smarter than you." ~ S. Jobs

"Hard work beats talent when talent doesn't work hard." ~ Tim Notke

© since 2016 - Nikola Brežnjak