Nikola Brežnjak blog - Tackling software development with a dose of humor
  • Home
  • Daily Thoughts
  • Ionic
  • Stack Overflow
  • Books
  • About me
Home
Daily Thoughts
Ionic
Stack Overflow
Books
About me
  • Home
  • Daily Thoughts
  • Ionic
  • Stack Overflow
  • Books
  • About me
Nikola Brežnjak blog - Tackling software development with a dose of humor
Breaking News, Ionic2

Ionic framework 2 is in beta

Ok, true, this “news” is few days old now and I’ve been slow to post about it.

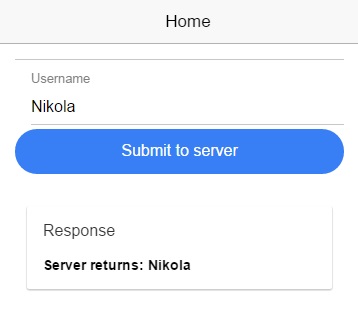
Nevertheless, this is awesome news as I’m really excited about the 2.0 version, which follows closely the Angular 2.0 version. Btw, I wrote a tutorial about how to post data from Ionic 2 app to php  server, in case you’re curious you can find it here.

You can read the docs over at http://ionicframework.com/docs/v2/, but to quote the official post:

we’ve focused on performance boosts, architectural improvements, cross-platform theming, support for Angular 2, support for the mobile web, and so much more!

In case someone is still doubting Ionic, they state a very interesting fact:

Ionic has seen widespread adoption, with over 1.9 million apps built by everyone from individual developers to small startups to large enterprise businesses from around the world.

And, in defence of why Angular 2, here is their response:

Today, an Ionic and Angular 2 app is just TC-39, standards-compliant JS. While it may look different from what you’re used to, the benefit is the entire web industry is moving towards this standard set of technologies, so your skills will adapt to other projects beyond Ionic and Angular 2. That wasn’t the case with Angular 1.

Ionic 2 styles UI components based on the platform in which it’s being displayed, and the great news is that they’ve added material design for Android apps.

I totally agree with the following:

Ionic is pretty much the only major mobile framework out there that lets you adapt your app to the app store as a native app and put it on a web server to provide a great mobile web experience with no changes required.

clap

#Ionic framework 2 is in beta https://t.co/Nyy2QQZqRf

— Nikola Brežnjak (@HitmanHR) February 15, 2016

Ionic2

Posting data from Ionic 2 app to a PHP server

TL;DR

This is the simplest example which shows how to POST data from an Ionic 2 app to a PHP server.

The tutorial covering the Ionic version 2 can be found here. The tutorial covering the Ionic version 3 can be found here.

Quickstart

To see it in action:

    1. Clone the finished project from Github
    2. Make sure you’ve got the newest Ionic beta CLI (see below for instructions)
    3. Run ionic serve
    4. You should see something like this:
      ionic2ServerPost

If you want to make it work from your server:

  1. Make sure you’ve got the newest Ionic beta CLI (see below for instructions)
  2. Clone the finished project from Github
  3. Upload the PHP/api.php file to your server
  4. In the app/pages/home/home.js file adjust the link variable (line #18) to point to your server
  5. Run ionic serve

Getting started with Ionic 2

By now you probably have heard that Ionic is in beta for its version 2, which closely follows Angular 2.

You can find a lot more Ionic 2 related tutorials on my friend Gajotres site.

To install the Ionic SDK and create Ionic 2 projects, you need to install the latest beta release:

npm install -g ionic@beta

You don’t need to worry about this messing up your current ionic CLI since the beta release has all the functionality to work with both V1 and V2 projects.

Step by step on how to create this yourself from scratch

  1. Create a new blank Ionic project with:
    ionic start Ionic2ServerSendTest blank --v2
  2. Copy the following code in app/pages/home/home.html file:
    <ion-navbar *navbar>
        <ion-title>
            Home
        </ion-title>
    </ion-navbar>
    
    <ion-content padding>
        <ion-list>
            <ion-input floating-label>
                <ion-label>Username</ion-label>
                <input type="text" name="username" [(ngModel)]="data.username">
            </ion-input>
    
            <button round block (click)="submit()">Submit to server</button>
        </ion-list>
    
        <ion-card>
            <ion-card-header>
                Response
            </ion-card-header>
            
            <ion-card-content>
                <b>{{data.response}}</b>
            </ion-card-content>
        </ion-card>
    </ion-content>
    

    Here you basically created a form with an username input field and with a button which acts as a submit button.

    As you can see, the syntax is a bit different since Ionic2 uses Angular2. Once the button is clicked AngularJS should handle it within the submit() function which we will define in our app/pages/home/home.js file (shown below).

    Input username uses  the new syntax for ng-model as well, and it binds to the variable data.username, so that you can then use it in your submit() function (shown below).

    Also, components are a bit different in Ionic now, and I encourage you can take a look at the official documentation.

  3. On your server, create an api.php file with the following content:
    <?php
        //http://stackoverflow.com/questions/18382740/cors-not-working-php
        if (isset($_SERVER['HTTP_ORIGIN'])) {
            header("Access-Control-Allow-Origin: {$_SERVER['HTTP_ORIGIN']}");
            header('Access-Control-Allow-Credentials: true');
            header('Access-Control-Max-Age: 86400');    // cache for 1 day
        }
    
        // Access-Control headers are received during OPTIONS requests
        if ($_SERVER['REQUEST_METHOD'] == 'OPTIONS') {
    
            if (isset($_SERVER['HTTP_ACCESS_CONTROL_REQUEST_METHOD']))
                header("Access-Control-Allow-Methods: GET, POST, OPTIONS");         
    
            if (isset($_SERVER['HTTP_ACCESS_CONTROL_REQUEST_HEADERS']))
                header("Access-Control-Allow-Headers:        {$_SERVER['HTTP_ACCESS_CONTROL_REQUEST_HEADERS']}");
    
            exit(0);
        }
    
    
        //http://stackoverflow.com/questions/15485354/angular-http-post-to-php-and-undefined
        $postdata = file_get_contents("php://input");
        if (isset($postdata)) {
            $request = json_decode($postdata);
            $username = $request->username;
    
            if ($username != "") {
                echo "Server returns: " . $username;
            }
            else {
                echo "Empty username parameter!";
            }
        }
        else {
            echo "Not called properly with username parameter!";
        }
    ?>

    As you can see from the code, the first part is explained in detail in this StackOverflow question, and it basically solves the CORS issue that you would otherwise run into.

    The second part, explained in detail in this StackOverflow question,  deals with the way you POST data from Ionic to your PHP server. The gist is that since we POSTed in a JSON format, we have to json_decode  the data that comes to your PHP server.

  4. In app/pages/home/home.js file adjust the link variable to point to the file on your server
  5. In app/pages/home/home.js file copy the following content:
    import {Page} from 'ionic/ionic';
    import {Http} from 'angular2/http';
    
    @Page({
        templateUrl: 'build/pages/home/home.html',
    })
    
    export class HomePage {
        constructor(http: Http) {
            this.data = {};
            this.data.username = '';
            this.data.response = '';
    
            this.http = http;
        }
    
        submit() {
            var link = 'http://nikola-breznjak.com/_testings/ionicPHP/api.php';
            var data = JSON.stringify({username: this.data.username});
            
            this.http.post(link, data)
            .subscribe(data => {
                this.data.response = data._body;
            }, error => {
                console.log("Oooops!");
            });
      }
    }

    Again, as I said, some (a lot) of things have changed in Angular 2, and at first glance you really may not like it (tbh, I know I didn’t). But, that will change with usage, so no worries.

    First thing that we do here is we import Page and Http components from Ionic and Angular, respectively. Then we’re setting the Page templateUrl to our home.html file.

    Inside the HomePage class we now have a constructor where we’re setting some default values. Important to note, see how we’re passing in Http via the constructor parameter. Again, I won’t go into details of using this, as I mentioned you can take a look at a lot more in depth tutorials on Gajotres.

    Inside the submit function we use the http service to post to our API endpoint with some data. Make note of how we use subscribe to handle data once it  arrives.

  6. Run ionic serve  from the root directory of your Ionic app
  7. Hope this tutorial helps you in starting your journey towards (Ionic + Angular)_2

Recent posts

  • Discipline is also a talent
  • Play for the fun of it
  • The importance of failing
  • A fresh start
  • Perseverance

Categories

  • Android (3)
  • Books (114)
    • Programming (22)
  • CodeProject (35)
  • Daily Thoughts (77)
  • Go (3)
  • iOS (5)
  • JavaScript (127)
    • Angular (4)
    • Angular 2 (3)
    • Ionic (61)
    • Ionic2 (2)
    • Ionic3 (8)
    • MEAN (3)
    • NodeJS (27)
    • Phaser (1)
    • React (1)
    • Three.js (1)
    • Vue.js (2)
  • Leadership (1)
  • Meetups (8)
  • Miscellaneou$ (77)
    • Breaking News (8)
    • CodeSchool (2)
    • Hacker Games (3)
    • Pluralsight (7)
    • Projects (2)
    • Sublime Text (2)
  • PHP (6)
  • Quick tips (40)
  • Servers (8)
    • Heroku (1)
    • Linux (3)
  • Stack Overflow (81)
  • Unity3D (9)
  • Windows (8)
    • C# (2)
    • WPF (3)
  • Wordpress (2)

"There's no short-term solution for a long-term result." ~ Greg Plitt

"Everything around you that you call life was made up by people that were no smarter than you." ~ S. Jobs

"Hard work beats talent when talent doesn't work hard." ~ Tim Notke

© since 2016 - Nikola Brežnjak