This is the first post in a series of posts which will teach you how to take advantage of your web development knowledge in building hybrid applications for iOS and Android with Ionic framework 3 (I’ll use Ionic in the rest of the post).
This is an update of the series of posts that I did for the original version of the Ionic framework, and you can read it here.
This first post explains:
- How to make an app these days
- What actually is Ionic framework
- How is Ionic 3 different from Ionic 1 and 2
- How to install Ionic on both Mac and Windows
- How to use Ionic CLI to start an Ionic project
- How to run an Ionic application
You can read the second post in the series here: How to create a calculator application with Ionic framework 3 by using Ionic Creator for UI.
Why should you listen to me?
This is in no way my attempt at feeding my ego, it’s just to give you soundness of mind that what I’m writing here may actually be useful to you.
- Wrote a book about the original Ionic framework, and you can get it for free
- Wrote for Pluralsight on the topic of Ionic: Ionic Framework: A definitive 10,000-word guide
- In the top #3 all time answerers for the
ionictag on StackOverflow. If you want to see what those answers actually are, you can take a look at my StackOverflow profile. - Was a technical reviewer for the book Getting started with Ionic
Introduction
…up to 90% of mobile time is spent in apps
You’re bombarded with reports like this and this that users tend to spend way more time on their phones and especially in apps (rather than surfing the web using their phones) and you decided that it’s time to learn how to make an app.
If you’re a web developer, you have a decent knowledge of HTML, CSS, and JavaScript; also, you’re most likely using one of the ever so slightly popular frameworks these days like Angular, React or Ember, to name a few. If you’re even proficient enough with the MEAN stack, you are a well-rounded full stack developer, and you basically have it all. Well, except the apps part, right?
If you want to see what’s all that fuss about the MEAN stack, you can check out the free four-part tutorial series that I wrote for HackHands, starting with the first post on How to get started on the MEAN stack.
But, where to start with making an app? Could you use some of your existing skills? Up until fairly recently, if you wanted to make an app for (currently) two most popular mobile operating systems (iOS and Android – sorry Windows Phone ?) your only bet was to make the so-called, native application by using the SDKs of the intended platforms.

This, of course, meant that you needed to make two versions of your application; one for iOS and one for Android. If you are a solo developer, chances that you’re proficient in both are not so great. Even if you are; I bet you’re favoring one platform over the other, right?
Therefore, for some time, developers were opting for either iOS or Android, whereas big firms had two developing departments, one for each platform.
Nowadays, luckily, with the help of Ionic Framework, and few others like React Native, NativeScript, Fuse, you can create an application by using the skills you, as a web developer, already have. If you’re not a web developer, don’t fret – this isn’t rocket science or machine learning… ?

How can you make an app these days?
We’ve kind of touched all three in the Introduction section, but let’s keep it nice and concise and list them here as well. So, there are actually few ways that you can make an application for mobile devices these days:
- Native app
- Mobile website (PWA)
- Hybrid app
- Xamarin, ReactNative, NativeScript!?
Now, let’s talk a bit more about the pros and cons of each of them.
Native app
As mentioned previously, you can make an app specifically for iOS and Android by using their specific SDKs. If you want to build a native application for iOS you have to:
- have a Mac computer. Sure, there are ways around it, but I honestly don’t recommend them; for starters, a cheap Mac Mini will do just fine
- download Xcode from the App Store (it’s actually free)
- buy the Apple Developer license that costs 99$ per year. Even if you don’t make any new apps after publishing your one app to the App Store, you’ll still have to renew your subscription every year to keep your app in the App Store ??
You can write the apps by using the Swift language, or it’s predecessor ObjectiveC.

If we’re honest here, I think that Swift is a great step up from the clunky ObjectiveC, but that’s just my own opinion (some people, of course, disagree). Anyways, if you ever decide to go native just make sure you go with Swift as you’ll get to know your way around it way sooner than with ObjectiveC, especially if you have a background in web development.
If you want to build a native application for Android you have to:
- have any computer
- download the appropriate SDKs (we’ll cover this in the next section)
- buy the Google Developer license which is a one time 25$ purchase
One of the pros of a native applications would be it’s speed and direct access to a native API (you don’t have to use any middleman wrappers, like in hybrid apps). A definite con of a native applications is that you need to build two (or more) applications, one for each desired platform.
Mobile website (PWA)
A mobile website is actually a “normal” website (yeah, don’t go jumping because of the terminology; you’re smart, you get the point) that you visit with your browser on your phone, designed specifically to adapt to your phone’s screen. As we’ve noted in the Introduction section, researches show that in today’s world mobile websites tend to have a way lower engagement than they used to.
Developers used to make specific sites just for mobile browsers (on it’s own domain; usually m.domain.com) but this proved to be hard to maintain. A practice called responsive website design is used these days, where you basically have one HTML codebase, and you determine the look for specific devices (based on resolutions) by using the so-called media queries.
A great example of a mobile framework is jQuery mobile that is soon coming out with its new 1.5 version (here’s their alpha changelog), so we’ll see if they bring something new to the table. From my personal experience with the framework from four years ago, I have all but good words for it; so, definitely use it if you’re “only” making a mobile version of your web application.
A definite advantage of the mobile websites is that you can update them as you see fit, without waiting for the approval from Apple or Google. One of the disadvantages is definitely the fact that the mobile websites these days have way lower engagement than they used to, and that you can’t basically use any of the additional phone features like for example camera or GPS.
Since this is an update of the post, few things have changed and if you only want to make a ‘mobile website’. I’d suggest looking into PWA (Progressive Web Apps) as they are the new cool nowadays, and some go even as far as saying that native apps are doomed due to PWAs, but we won’t be focusing on that here.
Good news for those of you who also want to create PWAs of your apps – with Ionic you can! Ionic enables you to get the best of both worlds: cross-platform app store deployment on iOS, Android, and Windows, along with deployment to the mobile web as a Progressive Web App with the same code. But, let’s not be hasty, we’ll cover that in the next section.
Hybrid app
A hybrid app is a basically a mobile application, written with the same set of languages that you use when building websites, with the addition that it contains an isolated browser instance, called WebView, which runs this web application inside of a native app. Hybrid apps can access the mobile device and use the additional phone features like for example camera or GPS.
A definite advantage of the hybrid apps is the fact that you can access the additional phone features via plugins and that you can do all the development with the same set of skills as you use when developing “normal” web applications.
One of the disadvantages is the fact that, even though it’s improving, the so-called Web View has its limitations in terms of speed. Also, it might not be best suited to choose hybrid if you’re using a lot of additional phone features, as you would have to use a lot of plugins which would slow the app down. But, from my personal experience, we have 30+ plugins (yeah, don’t ask) that we use in our app and we’re getting away with it ?.
Finally, you would definitely not use it if you’re on a quest to make the next best game with full-blown 3D graphics.
Xamarin, ReactNative, NativeScript!?
We have to be fair here and mention the new players who promise the fact of having a full API access without any additional plugins and produce ‘actual’ native apps with very high percentage of shared code. So, the app is not run in the Web View like in Ionic’s case which is a boost to the app speed.
If you’re coming from .NET background and you want to create an app; then you can stop reading here, as from what I’ve seen Xamarin is a sure bet for you and you’ll instantly feel at home.
If you’re a React guy, then ReactNative may just be up your alley. As they say on their website:
With React Native, you don’t build a “mobile web app”, an “HTML5 app”, or a “hybrid app”. You build a real mobile app that’s indistinguishable from an app built using Objective-C or Java. React Native uses the same fundamental UI building blocks as regular iOS and Android apps. You just put those building blocks together using JavaScript and React.
As for NativeScript; to be honest, I don’t have experience with it, but it seems they’re in a similar boat as ReactNative as they also give you the NativeUI without web views.
You can check out a good blog post on the topic of Ionic vs. NativeScript vs. ReactNative here.
What is Ionic and why it’s so good
As I gave an answer on StackOverflow:
Disclaimer: This will sound like an advertisement, so I have to say I’m in no way affiliated with Ionic, I just happen to like it so much that I’m sharing the love for it.
Ionic is so much more than “just” a UI framework. Ionic allows you to:
- have truly only one single codebase and deploy to iOS, Android, and Windows, along with the mobile web as a Progressive Web App
- generate icons and splash screens for all devices and device sizes with a single command:
ionic cordova resources. This alone saves you at least a day of image preparing for various sizes.- instantly update your apps with code changes, even when running directly on your device with
ionic cordova run --livereload- build and test iOS and Android versions side-by-side and see changes instantly with
ionic lab- share your Ionic apps with clients, customers, and testers all around the world without ever going through the App Store with
ionic upload- easily access the full native functionality of the device using Ionic Native
- Also, Drifty (the team behind the Ionic framework) is building a full-stack backend services and tools for your Ionic app like Live updating (for deploying a new version without going through Apple review process! – this is huge!), Push notifications, Cloud packaging, Ionic Creator etc.
- Ionic CLI (command line interface) uses Cordova in the backend and allows you to build (directly using Ionic CLI) apps for iOS and Android (just by doing
ionic cordova build iosorionic cordova build android).- Ionic uses Angular as a frontend framework so if you’re familiar with it, it will come as a bonus. Yes, the newest version of Ionic (currently 3) uses the newest and coolest Angular (currently 4) (which was a total rewrite from the Angular 1 version)
- All in all, I personally think Ionic framework has a bright future, so if nothing else – give it a try I bet you’ll like the ease of making an app with it.
Do I have your attention now? Great, let’s install all the needed prerequisites in the next section and start using Ionic!
How is Ionic 3 different from Ionic 1 and 2
Josh Morony wrote about 7 Reasons Why Ionic 2 Is Better Than Ionic 1 and made a video about What Ionic 3 means to Ionic 2, and I encourage you to check them out to learn more about:
- why Ionic 2 is totally different (and better) from Ionic 1 and
- why Ionic 3 is not that much different from Ionic 2
The biggest change comes down to the fact that Ionic 2 and 3 use the new Angular (now at version 4), whereas Ionic 1 uses the old Angular 1.
Now, don’t get me wrong – we all seem to love the ‘new shiny things’, but I can tell you from my experience that even with Ionic 1 you can still make great apps! So, even if you’re awesome at Angular 1 I’d suggest you go for Ionic 3, as the benefits are truly amazing. Plus, you don’t want to be working in a 5 years ‘old’ technology, now do you? ?
Installing prerequisites for both Mac and Windows
We need to have Node.js and Git installed in order to install both Ionic and Cordova. If you already have (and if you’re a web developer chances are that you do) these tools installed, you can skip this section, and go straight to installing Ionic.
Installing Node.js
In order to download Node.js, visit https://nodejs.org/en/download/, where you’ll see the following options:

Installation on Windows and Mac OS is simple as you just have to download and run the appropriate installer and follow the familiar instructions (next, next, next, sure I accept, next, finish ).
If you have brew on your Mac then you can also install Node.js with:
brew install node
In both cases, npm (Node Package Manager – used to install other packages) will be installed along with Node.js.
To verify that you installed Node.js correctly on a Windows machine, run the following command in your Command prompt (or, even better, use Console 2):
node -v
You should get an output similar to: v8.0.0.
To verify that you installed Node.js correctly on your Mac, run the same command as above in your Terminal (or, even better, use iTerm), and you should get the same similar output as above.
To verify that you have npm install, just run: npm -v and you should get an output similar to: 5.0.1
Installing Git
In order to install Git, visit http://git-scm.com/download, where you’ll see the following options:

Installation on Windows and Mac OS is as simple as for Node.js as you just have to download and run the appropriate installer and follow the, yet again, familiar instructions.
To verify that you installed Git correctly on your Windows/Mac machine, run the following command in your Command prompt/Terminal:
git
You should get an output similar to:
usage: git [--version] [--help] [-C ] [-c name=value]
[--exec-path[=]] [--html-path] [--man-path] [--info-path]
[-p | --paginate | --no-pager] [--no-replace-objects] [--bare]
[--git-dir=] [--work-tree=] [--namespace=]
<command></command> []

These are common Git commands used in various situations:

start a working area (see also: git help tutorial)
clone Clone a repository into a new directory
init Create an empty Git repository or reinitialize an existing one

work on the current change (see also: git help everyday)
add Add file contents to the index
mv Move or rename a file, a directory, or a symlink
reset Reset current HEAD to the specified state
rm Remove files from the working tree and from the index

examine the history and state (see also: git help revisions)
bisect Use binary search to find the commit that introduced a bug
grep Print lines matching a pattern
log Show commit logs
show Show various types of objects
status Show the working tree status

grow, mark and tweak your common history
branch List, create, or delete branches
checkout Switch branches or restore working tree files
commit Record changes to the repository
diff Show changes between commits, commit and working tree, etc
merge Join two or more development histories together
rebase Reapply commits on top of another base tip
tag Create, list, delete or verify a tag object signed with GPG

collaborate (see also: git help workflows)
fetch Download objects and refs from another repository
pull Fetch from and integrate with another repository or a local branch
push Update remote refs along with associated objects

'git help -a' and 'git help -g' list available subcommands and some
concept guides. See 'git help <command></command>' or 'git help '
<command></command> to read about a specific subcommand or concept.
<command></command> ```

You don't have to worry if you don't know how to use Git since you won't be needing it directly (npm uses it to download packages). However, if you would like to learn (and there's no reason why you shouldn't expand your knowledge), you can check out this [good interactive tutorial](https://try.github.io/levels/1/challenges/1) made by CodeSchool.

## Installing Ionic
If you've installed the needed prerequisites from the previous section, then in order to install Ionic (both on Mac and Windows) you just have to run the following command:

`npm install ionic cordova -g`

Ionic uses [Cordova](https://cordova.apache.org/) in the background for packaging up the native app, thus the need for it. We're using the **-g** flag here, in order to install the packages **ionic** and **cordova** [globally](https://docs.npmjs.com/getting-started/installing-npm-packages-globally).

To verify that you've installed Ionic correctly on your Windows/Mac machine, run the following command in your Command prompt/Terminal:

`ionic -v`

You should get an output similar to:

`3.4.0`

To verify that you've installed Cordova correctly on your Windows/Mac machine, run the following command in your Command prompt/Terminal:

`cordova -v`

You should get an output similar to:

`7.0.1`

If you had Node.js installed before (and haven't used it much since), you may get a notification like this:
Upgrade warning – for the CLI to run correctly,
it is highly suggested to upgrade the following:
Please update your Node runtime to version >=0.12.x
To resolve this issue, just update Node.js; either by re-downloading it (on Windows) or by executing the following command in the Terminal (on a Mac):

`brew update; brew upgrade node`

> I would like to take a moment here and encourage you to post a comment about any problems you may come across (and from my experience from StackOverflow there tends to be quite a lot of them ?) with these (seemingly simple) installation tasks. There always tends to be some older version of Node.js installed, or problems with cache and npm, blah blah blah... I will do my best to try to resolve your issue.

## Using Ionic CLI
If you run `ionic` in your Terminal/Command prompt you will get an output similar to the one below:
CLI 3.4.0
Usage:
$ ionic
Global Commands:
docs ………………… Open the Ionic documentation website
info ………………… Print system/environment info
login ……………….. Login with your Ionic ID
signup ………………. Create an Ionic account
start ……………….. Create a new project
telemetry ……………. Opt in and out of telemetry
Project Commands:
You are not in a project directory.
What you got is actually a nice summary of the global commands that you can run using the ionic CLI, along with their short descriptions. _Btw, if you're wondering what this CLI thing is (and you haven't [Googled it yet](https://en.wikipedia.org/wiki/Command-line_interface)); it's actually an acronym for Command Line Interface, and in Ionic terms it's actually a tool that makes it easier to [start, build, run, and emulate, (and a lot more), Ionic apps](http://ionicframework.com/docs/cli/)._
In the following chapters we will cover most of these commands, but for now, let's not burden you too much, and let's do a quick skin deep dive by making a simple project using `ionic start` command.
## Starting a project with Ionic CLI by using the existing templates
Cool, you've made it so far - I promise, you're going to see some code now!

Ionic CLI allows you to start and initialize your project by using the aforementioned `ionic start` command. If you take a look at [the official documentation for the start command](http://ionicframework.com/docs/cli/start/) you will see something like the following definition:
`ionic start [<name>] [<template>]`
>❗If you're familiar with Ionic 1, then you'll notice that they've changed it a bit.
If you still want to run Ionic 1 apps with an Ionic CLI version 3 or above, you need to pass in the `--type` flag like this:
`ionic start myApp --type ionic1`
If you just run `ionic start appname` the Ionic CLI will make a bootstrap application with all the needed parts in the **appname** folder, with the so-called **blank** template.
In case you want to see the list of all the starter projects, you can run `ionic start --list`:
ionic start –list
tabs …………… ionic-angular A starting project with a simple tabbed interface
blank ………….. ionic-angular A blank starter project
sidemenu ……….. ionic-angular A starting project with a side menu with navigation in the content area
super ………….. ionic-angular A starting project complete with pre-built pages, providers and best practices for Ionic development.
conference ……… ionic-angular A project that demonstrates a realworld application
tutorial ……….. ionic-angular A tutorial based project that goes along with the Ionic documentation
aws ……………. ionic-angular AWS Mobile Hub Starter
tabs …………… ionic1 A starting project for Ionic using a simple tabbed interface
blank ………….. ionic1 A blank starter project for Ionic
sidemenu ……….. ionic1 A starting project for Ionic using a side menu with navigation in the content area
maps …………… ionic1 An Ionic starter project using Google Maps and a side menu
Additionally, you can use Github repo starters and Codepen URL starters.

In our example, we will use the **sidemenu** template, so execute the following command from your Terminal/Command prompt:

`ionic start Ionic3_1stTutorial sidemenu`

You should see something similar to the following output:
✔ Creating directory ./Ionic3_1stTutorial – done!
[INFO] Fetching app base (https://github.com/ionic-team/ionic2-app-base/archive/master.tar.gz)
✔ Downloading – done!
[INFO] Fetching starter template sidemenu (https://github.com/ionic-team/ionic2-starter-sidemenu/archive/master.tar.gz)
✔ Downloading – done!
✔ Updating package.json with app details – done!
✔ Creating configuration file ionic.config.json – done!
[INFO] Installing dependencies may take several minutes!
npm install
✔ Running command – done!
npm install –save-dev –save-exact @ionic/cli-plugin-ionic-angular@latest
✔ Running command – done!
git init
✔ Running command – done!
git add -A
✔ Running command – done!
git commit -m “Initial commit” –no-gpg-sign
✔ Running command – done!
♬ ♫ ♬ ♫ Your Ionic app is ready to go! ♬ ♫ ♬ ♫
Run your app in the browser (great for initial development):
ionic serve
Run on a device or simulator:
ionic cordova run ios
Test and share your app on a device with the Ionic View app:
http://view.ionic.io
? Link this app to your Ionic Dashboard to use tools like Ionic View? No
Go to your newly created project: cd ./Ionic3_1stTutorial
## Running the Ionic application
Now that we've initialized our Ionic application based on the **sidemenu** template, we have to run it in order to see what Ionic CLI generated for us.
First, change the directory to the name of the application you gave in the `ionic start` command. In our case, that's: `cd Ionic3_1stTutorial`.
If you open up the project in your editor (I use [Visual Studio Code](https://code.visualstudio.com/) with Solarized Dark theme nowadays, after being loyal, and paying ?, customer of [Sublime Text 3](http://www.sublimetext.com/3)) you will see the following folder structure:

In the following chapters, we will spend most of the time in the **app** folder.
> ❗ Those of you coming from Ionic 1 background be wary of the `www` folder - don't touch it at all, as this is where all the transpiled/compressed code is saved. `src/app` is your new `www` folder.
> Since Ionic 3 is based on [Angular](https://angular.io/) framework, you will need at least a basic understanding of it, and you can start exploring it with a [free interactive tutorial](https://www.codeschool.com/courses/accelerating-through-angular) by CodeSchool, or you can check out my post for Pluralsight: [Getting started with Angular 2 by building a Giphy search application](https://www.pluralsight.com/guides/front-end-javascript/getting-started-with-angular-2-by-building-a-giphy-search-application). Please note that this is very different from Angular 1 that you (and me ?) was accustomed to.
There are few ways in which you can get your Ionic application running:
+ `ionic serve` - starts the app in a local web browser
+ `ionic cordova emulate android` - starts the app in an emulator (in this example Android is used; you can also use **ios** if you're on a Mac and have all the prerequisites installed)
+ `ionic cordova run android` - starts the app on the actual device that's plugged into your computer
+ `ionic cordova build android` - creates an **.apk** file which you can physically copy to your Android device and run it (this scenario doesn't work for iOS devices in normal circumstances; you have to go through Xcode, as we'll describe in detail in the next chapter)
So, now run the following command in your Terminal/Command prompt:
`ionic serve`
You should see the following similar output:
[INFO] Starting app-scripts server: –port 8100 –p 8100 –livereload-port 35729 –r 35729 –address 0.0.0.0 – Ctrl+C to
cancel
[13:56:20] watch started …
[13:56:20] build dev started …
[13:56:20] clean started …
[13:56:20] clean finished in 1 ms
[13:56:20] copy started …
[13:56:20] transpile started …
[13:56:22] transpile finished in 2.03 s
[13:56:22] preprocess started …
[13:56:22] deeplinks started …
[13:56:22] deeplinks finished in 11 ms
[13:56:22] preprocess finished in 13 ms
[13:56:22] webpack started …
[13:56:22] copy finished in 2.20 s
[13:56:29] webpack finished in 6.91 s
[13:56:29] sass started …
[13:56:30] sass finished in 953 ms
[13:56:30] postprocess started …
[13:56:30] postprocess finished in 10 ms
[13:56:30] lint started …
[13:56:30] build dev finished in 9.95 s
[13:56:30] watch ready in 10.03 s
[13:56:30] dev server running: http://localhost:8103/
[INFO] Development server running
Local: http://localhost:8103
[13:56:35] lint finished in 5.13 s
“`
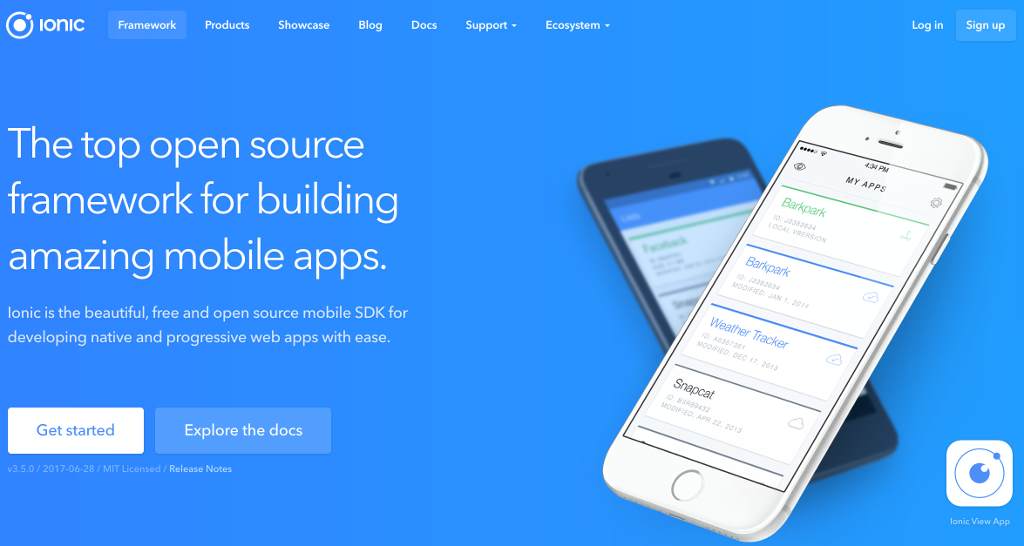
Also, you should get your local browser started up automatically, pointing to the address http://localhost:8100/, with an output similar to the one on the image below (I resized the window for clarity – if you’re using Chrome, you can get the Window Resizer plugin, or use the Chrome Dev Tools Emulate feature):

Awesome thing about this is that you have automatically set up live reload feature, which means that as soon as you change the code in your app folder, the application will reload automatically so that you don’t have to keep pressing the F5 (⌘+R) key on your Windows (Mac) machine.
If you like, you can get this project on Github.
Conclusion
In this chapter we’ve gone through the options that you have in making an app these days. Then we explained what actually is Ionic framework and how to install it on both Mac and Windows. With the use of the Ionic CLI we started a project based on the sidemenu template, and finally, we ran it locally in the browser with the use of ionic serve command. In the next chapter, I’ll show you how to create your own calculator application by making use of Ionic Creator.

How to get started with @Ionicframework 3 on #Mac and #Windows https://t.co/DZrp4q5ott pic.twitter.com/SbGfTbXzh0
— Nikola Brežnjak (@HitmanHR) July 16, 2017