
Posting data from Ionic 2 app to a PHP server
TL;DR
This is the simplest example which shows how to POST data from an Ionic 2 app to a PHP server.
The tutorial covering the Ionic version 2 can be found here. The tutorial covering the Ionic version 3 can be found here.
Quickstart
To see it in action:
- Clone the finished project from Github
- Make sure you’ve got the newest Ionic beta CLI (see below for instructions)
- Run ionic serve
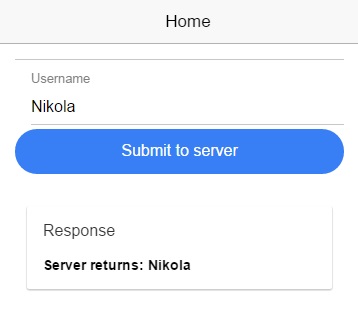
- You should see something like this:
If you want to make it work from your server:
- Make sure you’ve got the newest Ionic beta CLI (see below for instructions)
- Clone the finished project from Github
- Upload the PHP/api.php file to your server
- In the app/pages/home/home.js file adjust the link variable (line #18) to point to your server
- Run ionic serve
Getting started with Ionic 2
By now you probably have heard that Ionic is in beta for its version 2, which closely follows Angular 2.
You can find a lot more Ionic 2 related tutorials on my friend Gajotres site.
To install the Ionic SDK and create Ionic 2 projects, you need to install the latest beta release:
npm install -g ionic@beta
You don’t need to worry about this messing up your current ionic CLI since the beta release has all the functionality to work with both V1 and V2 projects.
Step by step on how to create this yourself from scratch
- Create a new blank Ionic project with:
ionic start Ionic2ServerSendTest blank --v2
- Copy the following code in app/pages/home/home.html file:
<ion-navbar *navbar>
    <ion-title>
        Home
    </ion-title>
</ion-navbar>

<ion-content padding>
    <ion-list>
        <ion-input floating-label>
            <ion-label>Username</ion-label>
            <input type="text" name="username" [(ngModel)]="data.username">
        </ion-input>

        <button round block (click)="submit()">Submit to server</button>
    </ion-list>

    <ion-card>
        <ion-card-header>
            Response
        </ion-card-header>

        <ion-card-content>
            <b>{{data.response}}</b>
        </ion-card-content>
    </ion-card>
</ion-content>
Here you basically created a form with an username input field and with a button which acts as a submit button.
As you can see, the syntax is a bit different since Ionic2 uses Angular2. Once the button is clicked AngularJS should handle it within the submit() function which we will define in our app/pages/home/home.js file (shown below).
Input username uses the new syntax for ng-model as well, and it binds to the variable data.username, so that you can then use it in your submit() function (shown below).
Also, components are a bit different in Ionic now, and I encourage you can take a look at the official documentation.
- On your server, create an api.php file with the following content:
<?php
    //http://stackoverflow.com/questions/18382740/cors-not-working-php
    if (isset($_SERVER['HTTP_ORIGIN'])) {
        header("Access-Control-Allow-Origin: {$_SERVER['HTTP_ORIGIN']}");
        header('Access-Control-Allow-Credentials: true');
        header('Access-Control-Max-Age: 86400');    // cache for 1 day
    }

    // Access-Control headers are received during OPTIONS requests
    if ($_SERVER['REQUEST_METHOD'] == 'OPTIONS') {

        if (isset($_SERVER['HTTP_ACCESS_CONTROL_REQUEST_METHOD']))
            header("Access-Control-Allow-Methods: GET, POST, OPTIONS");

        if (isset($_SERVER['HTTP_ACCESS_CONTROL_REQUEST_HEADERS']))
            header("Access-Control-Allow-Headers:        {$_SERVER['HTTP_ACCESS_CONTROL_REQUEST_HEADERS']}");

        exit(0);
    }


    //http://stackoverflow.com/questions/15485354/angular-http-post-to-php-and-undefined
    $postdata = file_get_contents("php://input");
    if (isset($postdata)) {
        $request = json_decode($postdata);
        $username = $request->username;

        if ($username != "") {
            echo "Server returns: " . $username;
        }
        else {
            echo "Empty username parameter!";
        }
    }
    else {
        echo "Not called properly with username parameter!";
    }
?>
As you can see from the code, the first part is explained in detail in this StackOverflow question, and it basically solves the CORS issue that you would otherwise run into.
The second part, explained in detail in this StackOverflow question, deals with the way you POST data from Ionic to your PHP server. The gist is that since we POSTed in a JSON format, we have to json_decode the data that comes to your PHP server.
- In app/pages/home/home.js file adjust the link variable to point to the file on your server
- In app/pages/home/home.js file copy the following content:
import {Page} from 'ionic/ionic';
import {Http} from 'angular2/http';

@Page({
    templateUrl: 'build/pages/home/home.html',
})

export class HomePage {
    constructor(http: Http) {
        this.data = {};
        this.data.username = '';
        this.data.response = '';

        this.http = http;
    }

    submit() {
        var link = 'http://nikola-breznjak.com/_testings/ionicPHP/api.php';
        var data = JSON.stringify({username: this.data.username});

        this.http.post(link, data)
        .subscribe(data => {
            this.data.response = data._body;
        }, error => {
            console.log("Oooops!");
        });
  }
}
Again, as I said, some (a lot) of things have changed in Angular 2, and at first glance you really may not like it (tbh, I know I didn’t). But, that will change with usage, so no worries.
First thing that we do here is we import Page and Http components from Ionic and Angular, respectively. Then we’re setting the Page templateUrl to our home.html file.
Inside the HomePage class we now have a constructor where we’re setting some default values. Important to note, see how we’re passing in Http via the constructor parameter. Again, I won’t go into details of using this, as I mentioned you can take a look at a lot more in depth tutorials on Gajotres.
Inside the submit function we use the http service to post to our API endpoint with some data. Make note of how we use subscribe to handle data once it arrives.
- Run ionic serve from the root directory of your Ionic app
- Hope this tutorial helps you in starting your journey towards (Ionic + Angular)_2


Great, glad to see you started with Ionic 2 tutorials!
Very thank full for this tutorials. How to send data to loopback server, from ionic? I have both these running in different URL. Is it possible? Or can we put ionic2 in loopback server. Now when I am trying to post to loopback from ionic2 getting 422 error. Thanks.
Thanks, I’m glad the tutorial was helpful to you. Unfortunately, I’m not familiar with loopback. However, if it provides you with an API (which I’m suspecting it is) then it shouldn’t be a problem to consume it’s API as you would any other for that matter. Also, the 422 error that you’re mentioning, I never got that kind of a response. I would go to loopback’s site/forum and ask for more info there.
Works like a charm. The syntax for the home.html template has changed a little:
Username
Submit to server
And the default project created with ‘ionic start’ doesn’t use the typescript version anymore. In which case the first lines of code in home.js will look like:
import {Page} from 'ionic-angular'; // note different path!import {Http} from 'angular2/http';
@Page({
templateUrl: 'build/pages/home/home.html'
})
export class HomePage {
static get parameters() {
return [[Http]];
}
constructor(http) {
this.http = http;
this.data = {};
this.data.username = '';
this.data.response = '';
}
Thanks for this Nikola!
Thanks! I’ve updated the comment so that it includes the code.
Hi Nikola,
The HTML in the first part of my post is not displaying …
Also, I just generalised the code to accept larger JSON objects, which I would like to share.
How do I display code in this forum?
Hi Dirk,
You can just post the code and I’ll approve it through the admin.
Thanks!
In home.js, I created a more complex JSON object:
var data = JSON.stringify({

      glossary: {

        title: "example glossary",

        GlossDiv: {

          title: "S",

          GlossList: {

            GlossEntry: {

              ID: "SGML",

              SortAs: "SGML",

              GlossTerm: "Standard Generalized Markup Language",

              Acronym: "SGML",

              Abbrev: "ISO 8879:1986",

              GlossDef: {

                para: "A meta-markup language, used to create markup languages such as DocBook.",

                GlossSeeAlso: ["GML", "XML"]

              },

              GlossSee: "markup"

            }

          }

        }

      }

    });
Then in the php file, I adjusted the code to catch errors and generalise reading any JSON object:
 $postdata = file_get_contents("php://input");

	if (isset($postdata)) {

		// ref: http://php.net/manual/en/function.json-decode.php

		if (json_last_error() === JSON_ERROR_NONE) {

			$jsonIterator = new RecursiveIteratorIterator(

    			new RecursiveArrayIterator(json_decode($postdata, TRUE)),

    				RecursiveIteratorIterator::SELF_FIRST);
foreach ($jsonIterator as $key => $val) {
if(is_array($val)) {
echo "$key:\n";
} else {
echo "$key => $val\n";
}
}
} else {
echo "Not in JSON format!!!";
}
}
else {
echo "Not called with proper parameter!";
}
Lastly, in home.html, I replaced the ‘b’ tag surrounding {{data.response}} with the ‘pre’ tag so that the raw data gets displayed.
Hello,
Followed the way you described. But showing me blank page. Nothing on screen. When checked inspect tool, found showing some errors. here is the link of the image of error.
https://nimbus.everhelper.me/client/notes/share/500219/qngw8cl4tpx1ylptstxf
Regards
Hello , I have a problem when run IONIC SERVE .
The error message is :
../ionic2php/app/pages/home/home.ts(11,14): Error TS2339: Property ‘data’ does not exist on type ‘HomePage’.
My IONIC version is : 2.0.0-beta.31
Thanks all for answers .
I have the same problem 🙁
Here -> http://i.imgur.com/NrVBzuQ.png
how do you encrypt the connection? do I add https:// to the link in js file? does the domain need to have a ssl certificate?
You can add https:// only if the domain has a SSL cert, yes.
hy!
i am new on ionic2, i have used your code to get data from from php, but when i run ionic serve got some error.
Uncaught Error: Cannot find module “angular2/http”
please help
Hi Rehan,
Please try
import { Http } from ‘@angular/http’;
Hi REHAN,
I used this code but on execution it gives this error on console.
XMLHttpRequest cannot load [url] No ‘Access-Control-Allow-Origin’ header is present on the requested resource. Origin ‘http://localhost:8100’ is therefore not allowed access.
Oooops!
What could be the issue ?
If you teste in localhost and the api is a extrenal source, you need put in the external source (api) = Access-Control-Allow-Origin: *, if the api is in PHP file add in the header:
header(“Access-Control-Allow-Origin: *”);
header(“Access-Control-Allow-Methods: PUT, GET, POST, DELETE, OPTIONS”);
header(“Access-Control-Allow-Headers: *”);
Anyway you could update this article to be able to work with ionic 3?
Hey, yes, thank you for the nudge – I will be updating it over this weekend and will ping you when done. Thanks for a nudge 😉
Hey JJ, I’m happy to announce that the post for how to post data from Ionic 3 app to the PHP server is live here: http://www.nikola-breznjak.com/blog/javascript/ionic3/posting-data-ionic-3-app-php-server/
Hi, I really like your tutorials but I can’t seem to find Posting data from Ionic 3 app to a PHP server
Hey Ruby, thank you very much! I plan on publishing that post tomorrow, just polishing it up. I will ping you here when it’s online. Thanks once again!
Hey Ruby, I’m happy to announce that the post for how to post data from Ionic 3 app to the PHP server is live here: http://www.nikola-breznjak.com/blog/javascript/ionic3/posting-data-ionic-3-app-php-server/
How to send username along with image? Thanks ….
Hey, what have you tried so far?
I am going to send post containing title and img from ionic 2 with
rest api. laravel 5 is my backend.. just let me know the steps to upload data containing image to server…
I am able to send just data but not able to send image..
Hey Sanchit, see if this tutorial from my friend Simon over at devdactic would help: https://devdactic.com/ionic-2-images/
thanks dude 😀
You’re welcome!